How to Author with TMPGEnc DVD Author
The same company that sells the forever-popular TMPGEnc Plus Encoder, also makes one of the cheapest, yet easiest authoring programs that exists – Pegasys TMPGEnc DVD Author (TDA). TDA is now known as TMPGEnc Authoring Works as of version 4, and includes Blu-ray authoring. Although lacking in some features, it is easily the most popular authoring software for beginners.
Create Menus and Author
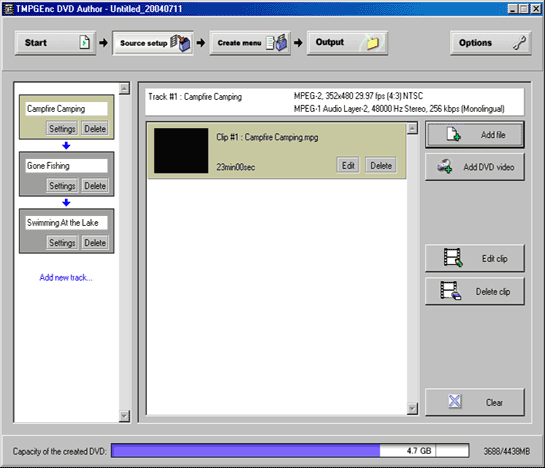
Create new project. When you start TDA, it automatically creates a new project. At the top of the program, notice the five buttons: Start, Source Setup, Create Menu, Output, and Options. Much of this is self-explanatory. Click on Source Setup.

Software interface. There are essentially three columns under Source Setup:
- The first is the Tracks columns (VTS).
- The second is the Clips column.
- And the third is the Controls column, where all the control buttons are.
Tracks, size. The DVD must have at least one track, so the first track is already shown, although it is empty at this time (no clips in the clips column). Each track has its own clip list. The status bar on the bottom of the page shows how full the disc is. It is very accurate, and the 4.7GB measurement at bottom is the same false 4.7GB label put on DVD recordable media. It also reads out the MB size, and will give a warning if it exceeds 4438 MB (which is 4.38GB on a computer).
Import assets. Click on Add File and then select an MPEG file to add to the DVD. You can add either multiplexed MPEG (merged audio/video) files or elementary files (separate audio and video files). If using muxed files, audio and video will auto load. If using demuxed files, video will load, and audio will only load if it has the same name as the video. Audio can be added separately if needed. TDA can transcode audio to 48 kHz, making it a perfect program for putting VCD files onto DVD in one easy step. It is suggested to add video clips into separate tracks. Click the Add New Track text to create a new track.
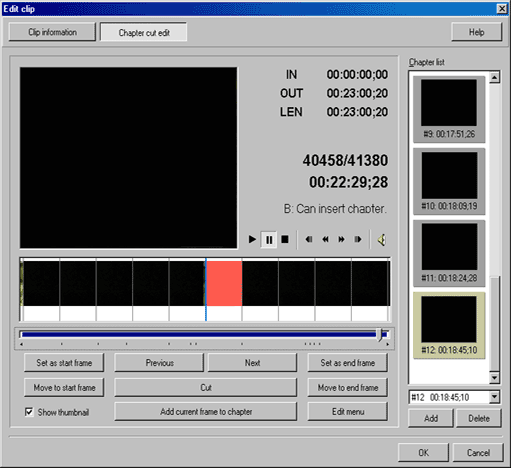
Insert chapters. The new clip will launch a new video when added, which has two tabs. The Clip Information tab is shown first, and shows the specs of your files. The Chapter Cut feature is where you can add chapters and remove unwanted footage (like TV commercials). To add chapter, move the slider bar to the correct position and press the Add Current Frame to Chapter button. To remove footage, move to the beginning of the piece to be cut away, and pres the Set As Start Frame button. Next move to the end of the piece to be cut, and press the Set As End Frame button. Then finally, press the Cut button to cut it out. For those extra precise cuts, play the video and press pause to stop. When the slider bar is highlighted with the necklace, you can use the keyboard arrow keys to move one frame at a time. Click OK when done. You will be taken back to the main Source Setup window.

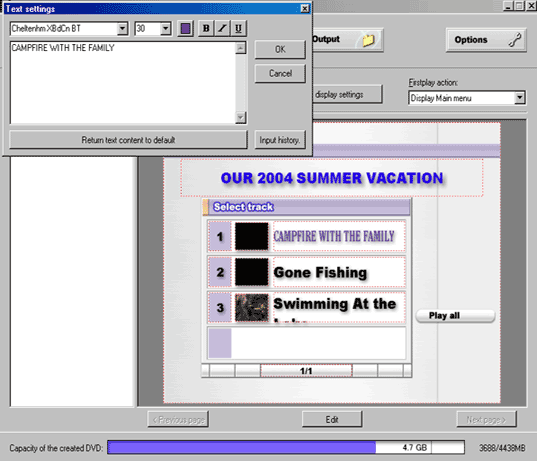
Create menu. After all the source files are added, and the chapters and edits are done, it’s time to make the menu. Click on the Create Menu button at the top of the software. TDA 1.5 comes with several templates, as well as the option to create your own layout from a list of preset options. Because this guide is for basic authoring, a preset menu will be used. To alter the color, size and font of text, click on it, and it will launch a new window. After the fonts are picked, you can also change the size and color of the numbers. I usually make them much smaller, about 10-point. You can also change the background image to a custom image or background video by clicking on it and selecting a new image. The menu thumbnails can also be replaced with other videos (no audio) or images.
- Click on the Menu Display Settings button to alter the menu performance.
- On the General tab, you can pick how many menus you want on the disc. Pick just the main menu, or add the track menus and chapter menus.
- On the Chapter Display tab, choose which chapters should appear on the menu.
- On the Motion Menu tab, select the type of motion objects that are desired. Tracks and chapters can have thumbnail motion, and the menu background can be a motion background. Select if audio is wanted for the menu background, and the length of the motion. It will loop continuously when played. The longer the motion menu duration, the larger the disc output.
- Click OK to return to the Create Menu window.
- MENU TIP: The Firstplay Action can also be edited, being the first thing that plays when the disc is put into a DVD player. It can play the first track first, play all videos, or go to the menu.
- MENU TIP: To get an audio-only menu, merely encode (in an encoder like TMPGEnc Plus) a still image with an audio file.

Done. Now that the videos are imported, chapter/edits made, and menus are created, there is nothing left to do but burn the DVD. Click on the Output button at the top of TDA and go to the output screen. Choose the output folder on the hard drive where the files will be stored temporarily until burned. Click on the Being Output button and wait.
Please note that some users experience bad burns or other non-compliance issues using this built-in burner. This author suggests authoring to the hard drive and then burning the DVD in Nero.
Burn. When it is finished, which can take anywhere from 15 minutes to a few hours depending on the motion menu settings and video edits, it will ask you to launch the Burning Utility. Go into the burning utility, select the DVD burner drive, give the disc a label name, and burn the DVD. This tool only works on Windows 2000 or XP. If you are using Windows 98 or ME, you will have to use burning software like Nero Burning ROM or RecordNow Max to burn the disc.
Copyright Notice: All guides, articles and editorials found on digitalFAQ.com are copyright by The Digital FAQ and/or the respective authors. Articles may not be copied, borrowed, full-quoted or reproduced in any manner, online or in print, which includes blogs and forums, without the written email consent of Site Staff (which may or may not be given, for free or fee). Know that digitalFAQ.com staff does routinely monitor online plagiarism, and we do send takedown notices to site admins and/or web hosts (DMCA et al legal actions) as is necessary. If you would like for others to read articles found on The Digital FAQ, simply link to our content. (Note: Printouts for personal use is specifically allowed.)