All you do with ColorMill is click on a category, move sliders up and down, and watch the results in its preview.
Having reopened it, I guess it's just an initially overwhelming number of options. Apart from that, though, not sure what the 'stick' and 'lock' buttons do.
"Stick" allows you to adjust all three sliders at the same time. "Lock" lets you lock your settings in place so you don't accidentally blow away your settings.
At the bottom of ColorMill's dialog, forget the "sharp" button. It doesn't do anything. The :MIDDLE POINT" needs explaining. The assumed midpoint between RGB 0 and 255 is RGB 128. In terms of grays/whites, it's the middle gray point. If you lower the midpoint, other controls that are are based on the normal midpoint will assume a midpoint lower than 128. Raise the midpoint, and the new middle point is centered higher than 128. The Booster and Base Shift button tweak brightness values above or below the set middle point. If you try it sometime you'll see that it acts like the gamma slider in the middle of a Levels control. Usually one makes very slight adjustments with those options, but you can see the difference. Advanced NLE's have simialr controls, but they're more complicated (!)
From your samples it looks as if you did a pretty decent job of handling some really bad color. A little noisy in spots, so when I worked with the originals I did some mild denoising in Avisynth. The originals have set the black levels too high, which brought on some bright chroma clipping, especially bright red. The reds in this video are monsters. They're over saturated to the point of glowing. Bright Cyan (blue+green) has the same trouble in some spots.
The opening frames of Example2 are troublesome, as the player moves through some uneven stadium color lighting at first; fix skin colors in the opening frames, and by the end of the clip the colors are out of whack again. Anoither problem is getting decent color and levels in the playing court. Chroma blending and ghosting are a nigthmare, making it impossible to get clean color for the players and uniforms.
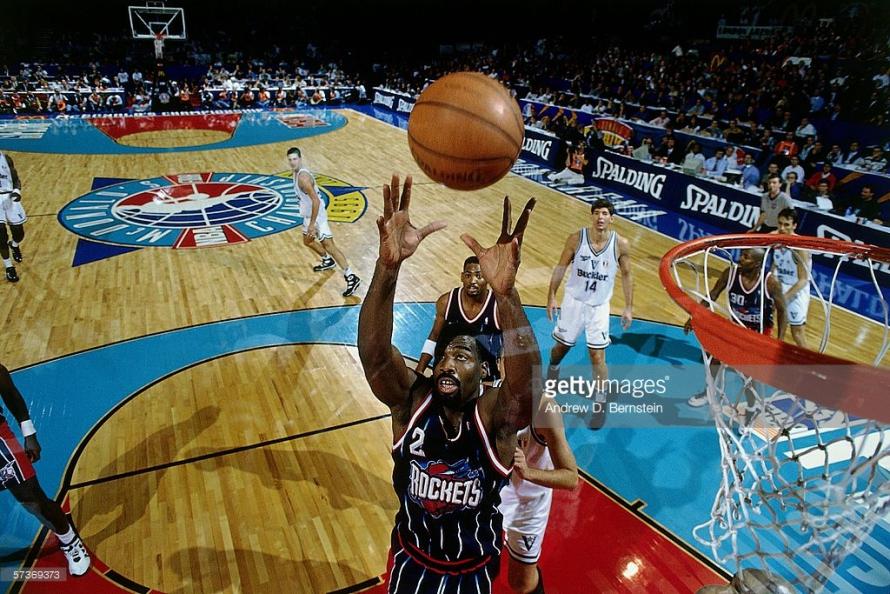
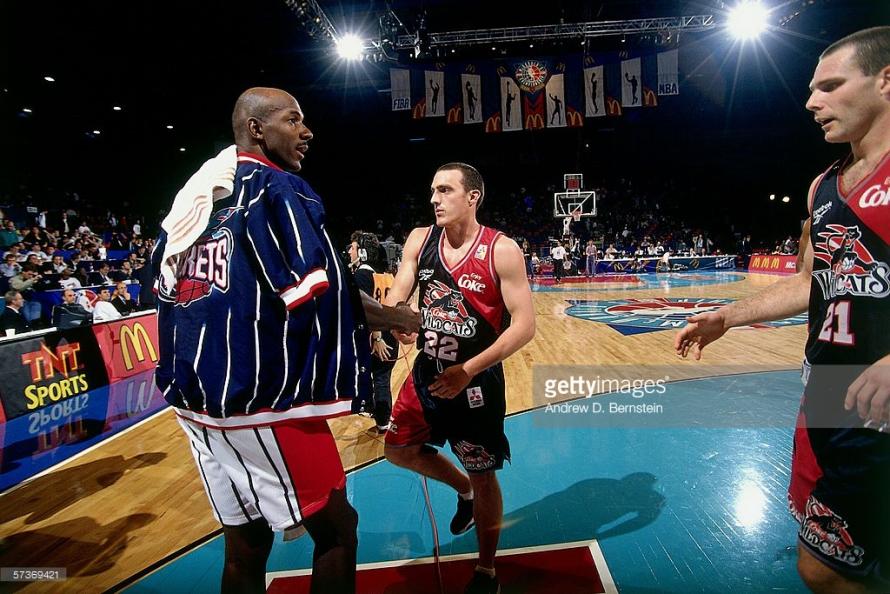
The image below taken from two frames in Original1 shows how chroma blending makes moving objects take on the colors of the background. This isn't the same as motion blur, which is bound to happen in action shots. In the picture at left, the player in the upper right has disappeared into the MacDonald's ad. In the right-hand image, see if you can find the basketball (it's on the green part of the floor in front of the lower left player). In some frames the guys look transparent.
One curious thing I saw in the Restorations. Interlaced VHS from TV is usually top field first. Your Originals are top field first as well. But the Restorations are bottom field first, which is more common with DV. Was that on purpose?
The attached mp4's are the results I got, having the hardest time with that MacDonald's ad lining the court's side walls -- it's more pinkish than the other reds (the seats are closer to real red). Red oversaturation was another problem, as it obscured contours in the auditorium seats. My own take with the samples was to reduce saturation a bit and remove some noise. But give 10 people a video like this and you'll get 10 different videos in return. Your work was definitely an improvement.
One curious thing I saw in the Restorations. Interlaced VHS from TV is usually top field first. Your Originals are top field first as well. But the Restorations are bottom field first, which is more common with DV. Was that on purpose?
Um...no. Oops.
Could that be a result of the crop/add borders?
Quote:
The attached mp4's are the results I got, having the hardest time with that MacDonald's ad lining the court's side walls -- it's more pinkish than the other reds (the seats are closer to real red). Red oversaturation was another problem, as it obscured contours in the auditorium seats. My own take with the samples was to reduce saturation a bit and remove some noise. But give 10 people a video like this and you'll get 10 different videos in return. Your work was definitely an improvement.
Wow, yours looks way better than mine. What did you do specifically?
I used a VHS filter to shift the chroma 4 vertically, -2 horizontally. Cropped X1 6, X2 28, Y1 12, Y2 12. Resize to letterbox to 720x576. Color Mill levels middle -6, bright -13. Levels to bring the blacks to 28. HSI on all colors bringing saturation to 1.03, Red/Cyan/Blue saturation to 0.9, red hue to 3, CCD at 20, temporal cleaner at defaults, and a small overall and borders with MSU Smart Sharpen.
EDIT: I'm less interested in your settings specifically than something like "I noticed X problem, so I applied Y filter to achieve Z result" or something. Something I can apply later, to different tapes.
Looking at mine compared to yours, it seems I've gone a bit dark and oversaturated? Hard to tell just playing such short clips back-to-back, and I don't have time to split-screen them in Premiere right now (like I did with the earlier DVD-recorder example).
Reversed field order? Not with Avisynth's Crop. I never use VDub's crop, so I don't know how that works. But if you used a resizer (Mm, shouldn't have to do that, and resizing always has a cost) it might have deinterlaced in the background and put the fields back together in reverse order. Interlaced video should never be resized while interlaced.
I don't see that the mp4's look better, they just look different (But thank you, anyway!). The fist step in Avisynth was to crop the black borders so I could check levels without throwing off histograms. I did this in YUY2 without touching the core image, then added black borders (later) for centering and final frame size:
Code:
Crop(8,12,-34,-10).AddBorders(12,12,14,10)
Black levels were about y=20 points too high, a little less on some shots, so I lowered black levels by applying ColorYUV's luminance offset, which lowers all luminance values over the entire spectrum by the same amount (I used minus 15 to suit all 3 clips):
Code:
ColorYUV(Off_y=-15)
Red was oversaturated and bright reds were starting to glow. So I lowered red contrast and bright gain:
Code:
ColorYUV(gain_v=-20,cont_v=-15
The U and V channel had some chroma noise (subtle, unevenly colored "stripes", difficult to see but noisy in motion). There was line shimmer and some ragged edges, and plain old tape noise. I used SmoothUV() at its weak default for some of the chroma junk. Then for shimmer, fuzzy edges and mild denoising, I used QTGMC at default "medium" presets.
For color bleed and chroma shift I used Avisynth's FixChromaBleeding and ChromaShift filters, then added awarpsharp2 on Chroma only (basically, it's used that way to "tighten" chroma along edges and contours). The only sharpener was default values of LimitedSharpenFaster, a sophisticated sharpener that avoids halos and many common sharpening artifacts. At default values this is a "smoothing" sharpener, if you can imagine such a thing. If you want, you can pump its parameters and make a really horrible looking video.
Correcting line shimmer and disjointed-looking edges usually requires deinterlacing, which is what QTGMC did along with smoothing noise. So the video had to be reinterlaced and then converted properly to RGB for work in Virtualdub. Avisynth can do a very clean job of it:
Videos with fewer problems wouldn't need QTGMC, and there are other motion smoothing specific filters (good luck on learning how to use them, only their creators know for sure). For heavier denoising in itself you wouldn't get much from QTGMC, and some denoisers work without affecting interlace.
In VirtualDub I used ColorMill and gradation curves, and ColorTools for checking results along with a free Photoshop-style desktop pixel sampler called CSamp. I used hue/sat/intensity for red, yellow, and cyan, and on one clip I used temporalsmoother. Never cared for MSU filters, I removed them years ago.
I saved VDub's output to new files, then I went to sleep. Next morning I took a look with fresh eyes. Yes, indeed, almost every setting had to be tweaked further. Amazing what you think you see the first time around. Then I saved VDub's output as YV12 with Lagarith lossless compression and opened the new file into an X264 encoder.
Others might do something entirely different.
You can create a side-by-video in Avisynth and encode it as generic mp4 or something that doesn't require standard frame sizes, but your video and mine use a different frame size (mine are 704x576). But you can add side border pixels to make it 720x576. More simple: What I often do is set VLC player to loop through selections and play two files, one after another, over and over.
But both Avisynth and VirtualDub are easy to make mistakes. In fact, everything is: pro NLEs like Premiere, freeware, and everything in between. I'm really tired of seeing interlace errors on cable/satellite.
Even the fixed clips have a chroma blooming problem. It's not the TBC, and my money is on the VCR. The tape signal is possible, but less likely. I'd want to see more samples, from other tapes, to be sure there's really a problem.
I need to clean this thread up, and read new posts (not just skim), before I say anything else.
Reversed field order? Not with Avisynth's Crop. I never use VDub's crop, so I don't know how that works. But if you used a resizer (Mm, shouldn't have to do that, and resizing always has a cost) it might have deinterlaced in the background and put the fields back together in reverse order. Interlaced video should never be resized while interlaced.
I'll get to the other stuff later, but the only resize I did was to add the borders, there was no scaling.
I tried to attach the vdscript file earlier, but that's not an allowed file format here.
How can you actually tell what the field order is?
Even the fixed clips have a chroma blooming problem. It's not the TBC, and my money is on the VCR. The tape signal is possible, but less likely. I'd want to see more samples, from other tapes, to be sure there's really a problem.
How about the same tape from two other VCRs? I ran it through the old VCR I mentioned in the OP (no AVT, but using the USB-Live2), capped as Lagarith and then saved the clips as Lagarith. I've also pulled the same clips from a capture made by a friend using a DVD-VCR combo unit, straight to a single-layer DVD. I converted the VOB files to Lagarith AVI using TMPGEnc, then used VDub to get Lagarith clips.
Not really entirely sure what chroma blooming is, so I can't tell if that's still present, but the AltVCR clips make me damn happy I spent the money on a good VCR.
Quote:
Originally Posted by sanlyn
Red was oversaturated and bright reds were starting to glow. So I lowered red contrast and bright gain:
Lowering the red contrast is basically just desaturating it, yes? Not sure what the 'bright gain' is?
Quote:
The U and V channel had some chroma noise (subtle, unevenly colored "stripes", difficult to see but noisy in motion). There was line shimmer and some ragged edges, and plain old tape noise.
Not even sure what I'm looking for with regards to any of those issues?
Quote:
So the video had to be reinterlaced and then converted properly to RGB for work in Virtualdub.
Could you expand a little on what each piece of that AVISynth script does? And am I doing something wrong by editing my YUV captures in VDub?
Your Originals are top field first as well. But the Restorations are bottom field first, which is more common with DV. Was that on purpose?
Quote:
Originally Posted by koberulz
Could that be a result of the crop/add borders?
Quote:
Originally Posted by koberulz
I just went with what looked good (6 & 28 X, 12 & 10 Y).
Any time you alter the top of the image by an odd number, you have reversed the field order. You cropped it by even numbers, but if VirtualDub then centered it exactly, it added 11 to the top & bottom. Choosing "Multiples of 2" under "Codec-friendly sizing" makes it stick to even numbers.
The following users thank msgohan for this useful post:
sanlyn (06-26-2016)
Also for comparison, there was another game played the night before in the same venue with one of the same teams. Some highlight clips from that game were shown at the end of the broadcast of this game. So they were recorded on the same VHS tape, and captured using the same equipment. I've attached a sample, unrestored. It's significantly better quality, so a lot of the issues with the game I'm working on at the moment were presumably inherent in the actual broadcast.
This clip might also be helpful in color-correcting the Perth-Madrid game. The area inside the three-point line looks a lot more blue in this clip, as opposed to the greener tint of the full game (which is one of the biggest things that stood out to me in comparing my work to sanlyn's).
Any time you alter the top of the image by an odd number, you have reversed the field order. You cropped it by even numbers, but if VirtualDub then centered it exactly, it added 11 to the top & bottom. Choosing "Multiples of 2" under "Codec-friendly sizing" makes it stick to even numbers.
I'll give that a shot, cheers.
After looking at that other clip, I set the hue of the greens and cyans at +18 to try and replicate the blue color (which, now that I look at it, also makes the FIBA logo the correct color), desaturated the yellows to 0.84 to make the court more of a brown colour, and lowered the intensity of the reds to 0.95.
Problem is, I'm now getting this sort of thing happening: Artefact.png
If I drop the intensity of the reds to 0.90, I get a similar result with this shot:
You must be logged in to view this content; either login or register for the forum. The attached screen shots, before/after images, photos and graphics are created/posted for the benefit of site members. And you are invited to join our digital media community.
However, the first one goes away if I enter and exit the Filters dialog, or go forward a couple of frames and then back. So I'm not sure if it's a VDub display issue or something...the second example is permanent, without upping the intensity of the reds again. Not really sure what it is in either case or what I should be doing differently.
Sorry for the delay. I'll post new material and answers tomorrow.
To partially offer an answer for your saturation control problems: mounting multiple copies of that plugin with separate color selections for each copy of he plugin will bring on the posterizing and hard gradient edge effects you're seeing. There are other ways to control specific colors in specific ranges.
The FIBA logo you pictured is neither blue nor green. but it's both colors. Blue + Green = Cyan. The logo in the FIBA image is 1/3 green an 2/3 blue, or an average of RGB Red=0, Green-108, Blue=210. In real life those exact colors in a scene would not always look exactly like the cyan in the artwork because of lighting, conditions of scale, reflections, and other factors. But it's certainly more blue than green. However if getting that exact logo color in a scene with a human would cause the human turn green or other weird colors, I'd rather favor believable flesh tones and clean whites.
Switched from desaturating the yellow to changing its hue, which has the court looking even better.
I still don't know how to figure out field order, so I'm not sure if I've fixed that issue.
I'd like to lower the intensity of the reds a bit more and see how that goes. They keyways still don't look right, but I can't see how it affects skintones because of the posterizing (which is already present in the FIBA logo anyway).
How can you actually tell what the field order is?
A quick way to check field order in Virtualdub is to open a video in VDub and load the builtin "bob doubler" filter. In the bob doubler setup dialog window, set Field Order to "Top field first", and set Deinterlacing Method to "Bob". The bob doubler breaks down each fame into its separate fields and resizes the fields into full frames. Simple double-rate deinterlacing, but not very clean.
Scroll to a section of the video that contains definite motion horizontally or vertically. Move the frames manually one frame at a time using the frame advance button and observe the effect in the right-hand Output pane. Each time you press the frame advance key, the Output pane will show one field at a time. Press the frame advance button repeatedly and note how objects move in the Output pane. If you see stuttery back-and-forth motion instead of a consistent flow, you chose the wrong field order. If you change the field order in the bob dialog window and see motion moveing correctly, you've determined the correct field order for that video.
With field types other than plain interlaced it's more complicated. The old neuron2 website had a ton of tips and tricks for Virtualdub and Avisynth. He'd suggest Avisynth for analyzing different frame structures. I have attached an offline copy of his old html page with the article titled "How do I figure out the nature of my source video?". Since html isn't an allowed upload format, it's attached as D2_neuron2_faq_AnalyzeVideo.zip
Crop: Whether one uses Avisynth or VirtuaLDub to crop a video, be careful about colorspace and frame structure. In VDub the working colorspace is RGB. The rules for safely cropping a video apply to all colorspaces in Avisynth and to VirtualDub as well. Those rules were mentioned earlier, but I'll link to that page of cropping rules again. Look for the table in the lower part of this page: http://avisynth.nl/index.php/Crop. Telecined video should be considered as interlaced for cropping.
Quote:
Originally Posted by koberulz
Not really entirely sure what chroma blooming is, so I can't tell if that's still present
If Contrast/saturation is set too high the color will “bloom”, glow unnaturally, or flare, and highlights and other details in objects can distort or tend to disappear under the flood of color. Color bleeding is often sign of oversaturation. Look at the red auditorium seats in the original capture, where red is so "hot" that edges and contours in the seats seem to blend.
Quote:
Originally Posted by koberulz
Lowering the red contrast is basically just desaturating it, yes?
Basically, yes.
Quote:
Originally Posted by koberulz
Not sure what the 'bright gain' is
"Gain" in both YUV and RGB applies a multiplier to luminance or chroma. Darker colors have lower values so are raised to fairly low numbers, but the multiplier acts more progressively as values get brighter. Thus middle and brighter values are "stretched" from the bottom up. Decreasing gain will "shrink" values from the brights downward.
Note that increasing gain stretches available data so that the brights have data "gaps" that can
result in rough edges on fine gradients, as in shadow-to-highlight skin tones and areas that are supposed to have smooth transitions from one hue to another. Decreasing gain can compress darker values so that some fine detail gets merged. A gain control is used in moderation and often followed by dithered smoothing to "fill in the gaps" with interpolated values. Some Avisynth smoothing filters that use dithering.
Quote:
Originally Posted by koberulz
am I doing something wrong by editing my YUV captures in VDub?
It's your choice. Avisynth has more flexibility, more filters, is more precise with colorspace changes, etc. AVisynth and VirtualDub work together: what you can't do in one, you can do in the other. For one thing, AVisynth has more comprehensive and specific denoisers, and better deinterlacing when required.
Quote:
Originally Posted by koberulz
Quote:
The U and V channel had some chroma noise (subtle, unevenly colored "stripes", difficult to see but noisy in motion). There was line shimmer and some ragged edges, and plain old tape noise.
Not even sure what I'm looking for with regards to any of those issues?
You'll see shimmer or ragged motion noise when the camera pans in Original1.avi in the stadium seats. Also some slight edge buzz in the markings on the court.
Subtle striping and noise mentioned are difficuly to see in large expanses of solid color unless the video is moving. Below, from Bluer3.avi, you can see blocky coarse grain chroma noise and streaking, especially the reds. Sharpening while still noisy and interlaced compounds the issue.
Another type of noise is discoloration.
Below, in the left-hand image you see vertical orange discoloration in the guy's arm as well as rough grainy edges on skin hue transitions and the "hot spot", some of it from clipped brights. In the middle image from Restored.avi, the edge effects are worsened by sharpening noise and grain -- in the middle case a posterized effect is more evident, not too bad but more noisy during play. In the right-hand image from the mp4's original AVI, SmoothUV cleaned the orange, dithering and QTGMC denoising softened the grainy edge transitions, sharpening while deinterlaced avoided exaggerating hard edge effects, and lowering the brightest highlights with VDub's gradation curves above RGB 180 tamed the hot spots.
Below, from Bluer3.avi, you can see blocky coarse grain chroma noise and streaking, especialluy in reds. Sharpening while still noisy and interlaced compounds the issue.
[quote=koberulz;44727]After looking at that other clip, I set the hue of the greens and cyans at +18 to try and replicate the blue color (which, now that I look at it, also makes the FIBA logo the correct color)
Problem is, I'm now getting this sort of thing happening:
[quote]
Color looks better in the logo, but that's block noise from sharp color cutoff and sharpening noise. The noise in the white lettering in he background was removed from the mp4 version with SmoothUV in AVisynth and CamcoderColorDenoise in VirtualDub. But the mp4 logo is still too green.
I note you increased green and cyan saturation. The bright part of logos are already too green, so increasing green and cyan at the same time made extra work with green (cyan is a secondary color = green + blue).
Quote:
Originally Posted by koberulz
Also for comparison, there was another game played the night before in the same venue with one of the same teams. Some highlight clips from that game were shown at the end of the broadcast of this game. So they were recorded on the same VHS tape, and captured using the same equipment. I've attached a sample, unrestored. It's significantly better quality, so a lot of the issues with the game I'm working on at the moment were presumably inherent in the actual broadcast.
They were indeed. It would serve as a useable color and levels guide, although balck levels in the Highlights.avi are still too high but can be fixed. The FIBA logos won't look the official brand, so to speak, because of environmental differences and size. Still, the offficial colors I saw at the FIBA have more blue than green. The FIBA colors in all of the samples posted including mine are still too green. But remember that lowering blue or green saturation affects all resulting colors including skin tones, which contain Red, Green, and Blue. So it presents a very tricky dilemma.
Don't trust TV broadcasts to get everything right. They often don't. VHS inconsistencies don't help, either. Just do the best you can.
I thought I explained the Avisynth procedures earlier. What part do you have a problem with?
[EDIT] Oops. I forgot the neuron2 web page. Fixed. 2 coffees are better than one!
It's your choice. Avisynth has more flexibility, more filters, is more precise with colorspace changes, etc. AVisynth and VirtualDub work together: what you can't do in one, you can do in the other. For one thing, AVisynth has more comprehensive and specific denoisers, and better deinterlacing when required.
The biggest advantages of VDub are being able to look through a list of filters for things that might help, and being able to live-preview things. I've used the HD2SD plugin quite a bit but other than that have no real experience with AviSynth.
Quote:
Color looks better in the logo, but that's block noise from sharp color cutoff and sharpening noise. The noise in the white lettering in he background was removed from the mp4 version with SmoothUV in AVisynth and CamcoderColorDenoise in VirtualDub. But the mp4 logo is still too green.
So if I run SmoothUV, that gets rid of the posterizing? I didn't quite follow the deinterlace-and-reinterlace procedure you mentioned last time.
Quote:
I note you increased green and cyan saturation. The bright part of logos are already too green, so increasing green and cyan at the same time made extra work with green (cyan is a secondary color = green + blue).
I'm not sure what you mean by 'made extra work', but I don't see anything in my filters list that would increase saturation? I increased the hue of those two colors by 18, to make them bluer, but that's it.
Quote:
They were indeed. It would serve as a useable color and levels guide, although balck levels in the Highlights.avi are still too high but can be fixed. The FIBA logos won't look the official brand, so to speak, because of environmental differences and size. Still, the offficial colors I saw at the FIBA have more blue than green. The FIBA colors in all of the samples posted including mine are still too green. But remember that lowering blue or green saturation affects all resulting colors including skin tones, which contain Red, Green, and Blue. So it presents a very tricky dilemma.
Given that the unpainted areas of the court look way too yellow and the blue areas look way too green, I think it's fair to assume skintones and anything else in the video would also benefit from deyellowing.
And yeah, I was never expecting to get the FIBA logo looking perfect, by any means, just throwing it out there as another bit of evidence that things were greener (or yellower) than they should have been.
As far as skin tones containing blue and green...are you sure? Green screen and blue screen are a thing for a reason. And I actually did try zipping up and down the hue scale on the green and cyan just to test skin tones, and never saw any movement whatsoever.
Quote:
I thought I explained the Avisynth procedures earlier. What part do you have a problem with?
TSo if I run SmoothUV, that gets rid of the posterizing? I didn't quite follow the deinterlace-and-reinterlace procedure you mentioned last time.
SmoothUV does some chroma smoothing to help clean upblotching and, rainbows, and color streaking of various kinds, , but it won't defeat posterizing on its own. It's a rather mild filter.
In order to use chromableed fixers, motion smoothing, many denoising operations, and other factors, the video was deinterlaced. QTGMC is a deinterlacer that smooths motion between fields, does some noise and edge cleanup, and a lot of other work in interpolating new full-sized frames from half-sized fields. PAL interlaced video is a 720x576 frame with two interlaced fields, each 270x288. QTGMC uses sophisticated cleaners, interpolation, and motion compensation to create full-sized 720x576 frames from each 720x288 field. If your video has 1000 frames at 25fps, the deinterlaced result would be 2000 frames at 50fps progressive video. There are other ways to do this, but QTGMC seemed the better choice than heavy-duty denoisers on a video with so little sharp detail to work with.
After cleanup the video was reinterlaced by breaking the frames into original half-sized fields and reweaving them into a 25fps interlaced video.
SmoothUV does some chroma smoothing to help clean upblotching and, rainbows, and color streaking of various kinds, , but it won't defeat posterizing on its own. It's a rather mild filter.
So how do I fix that?
Quote:
After cleanup the video was reinterlaced by breaking the frames into original half-sized fields and reweaving them into a 25fps interlaced video.
So...AssumeTFF handles field order, SeparateFields splits the fields, Weave combines them? No idea what SelectEvery does?
And how do I get/use these AviSynth plugins. I've downloaded SmoothUV and ChromaShift, and just dumped the files into the AviSynth/plugins folder, but both have an avisynth.h file. And is there a quick way to get everything I need for QTGMC, or do I have to manually track down and install every necessary plugin?
Originally Posted by sanlyn View Post
SmoothUV does some chroma smoothing to help clean upblotching and, rainbows, and color streaking of various kinds, , but it won't defeat posterizing on its own. It's a rather mild filter.
So how do I fix that?
I found that with these clips QTGMC's denosing smoothed rough grainy edges well enough with its "Medium"" defaults. QTGMC has a few dozen parameters, but the several preset defaults are often good enough. You can be more picky and change some defaults. But you have to look up its HTML doc to know what's going on.
Quote:
Originally Posted by koberulz
So...AssumeTFF handles field order, SeparateFields splits the fields, Weave combines them? No idea what SelectEvery does?
SelectEvery is one of 4 builtin "Select: functions. Some of which let you do some pretty geeky stuff with fields and frames. SelectEvery(4,0,3) takes groups of 4 of those separated fields. For every 4 fields, use the first field (field #0) as the new frame's top field, use the last field (#3) as the new frame's bottom field, and weave them into a new interlaced TFF frame.
For more details, the web page http://avisynth.nl/index.php/Select is a copy of the same documentation that was installed on your PC with Avisynth.
AssumeTFF() is stated because Avisynth by default assumes BFF. I get kinda picky about making sure TFF is in the script somewhere.
BTW, SmoothUV is designed for non-interlaced video and works in YV12 color, as do a ton of other Avisynth plugins and most of the chroma cleaners. Not a problem. Before running QTGMC or the other filters, use this:
ConvertToYV12(interlaced=true)
Never fear. Avisynth handles that conversion correctly. The SmoothUV plugin came with its own documentation, which I think is a simple read-me or html. The defaults worked OK for me:
Code:
SmoothUV()
Quote:
Originally Posted by koberulz
And how do I get/use these AviSynth plugins. I've downloaded SmoothUV and ChromaShift, and just dumped the files into the AviSynth/plugins folder, but both have an avisynth.h file. And is there a quick way to get everything I need for QTGMC, or do I have to manually track down and install every necessary plugin?
Not a good idea to load plugin .zip packages and unzip everything into your plugins folder. It will fill with junk and irrelevant files, straightaway. ChromaShift includes some .h, .cpp, etc., files in case you're ambitious enough to compile a C++ version of the plugin. Don't bother, it won't change results. The next time you download another .zip package it might have more .cpp and other files of its own. Avisynth can't use those files. Ther chromashift .html is neded but astore it elsewhere. The ChromaShift plugin is ChromaShift.dll, which is the only one of those files Avisynth will recognize and use.
Make a master folder for your downloads, and a subfolder for each filter. That way you'll avoid piling junk into your Avisynth folder and you'll always know where the plugin's documentation is.
Well, now, QTGMC is one big customer. So if you're game....
Doom9 and the Avisynth wiki have download package links for QTGMC files, but many have been updated and not posted in the old links. An updated package was posted in digitalfaq somewhere, but I can't find it. Let me hunt a bit and I'll return with a new compilation.
The attached QTGMC_new.zip has updated versions of the original doom9 download package. Make a folder somewhere, name it "QTGMC", and download QTGMC_new.zip to that location.
The filters and other stuff are in 6 small zipped subfolders. As supplied, and with the included plugins installed as directed in the read-me's, you should be able to run QTGMC with Medium default presets using this statement:
AssumeTFF().QTGMC(preset="Medium")
QTGMC comes with 18 or so support files including the main QTGMC-3.32.avsi, plus two Windows system dll's. When the .zip file unzips you'll have the 6 small subfolders and three separate files -- a "READ ME FIRST.TXT" file, a .txt version of the entire QTGMC avsi file, and QTGMC's HTML help doc. Don't ignore the big html, even if you don't savvy most of it. You should have at least a quick-browse glance at what this critter is about, even if you don't know how it does its work. But do yourself a favor and start with READ ME FIRST.TXT.
The other plugins have docs in a documentation folder. Those support plugins are stand-alone filters in their own right that you can use without running QTGMC. Many are proof that most Avisynth filters are much leaner than QTGMC. Several other complex plugin packages use some of these plugins.
For many cases you can play with the umpteen QTGMC parameters, but most of the time the defaults work well. There's a specific version of MaskTools.dll somewhere that lets QTGMC run in YUY2, but it's a headache to keep moving it in and out of the plugins. Otherwise, like much Avisynth heavy artillery, it runs in YV12.
3 of the zip'd subfolders have links to Microsoft's download sites for MSVC runtime libraries MSVC2010, 2012, and 2013, used by a great many Avisynth filters. Check those MSVC editions in your Control Panel "add/Remove Programs" list to see if they already exist. Likely, Microsoft installer won't overwrite what's there. Get 32-bit versions.
If you're familiar with Avisynth's installed "Getting Started" intro, there are 3 main types of Avisynth plugins. They should be kept in your plugins folder.
- ".dll" loads automatically when the avs script calls for it.
- ".avsi" loads automatically when the avs script calls for it.
- An ".avs" plugin is a scripted plugin that doesn't load automatically. I suppose the authors have reasons for doing it that way but I'm not willing to second guess their rationale. I don't think you mentioned any .avs plugins (FixChromaBleeding would be one), but they're easy enough to load manually with the Import() function:
Import("drive:\path to plugins\plugin_name.avs")
And there you go.
Now to find the scripts I used for the samples I made, which included two Avisynth filters not mentioned: SmoothAdjust and LimitedSharpenFaster. The latter is tough to find these days, having been replaced with a new "mod" that many users don't like as much. The other has dozens of versions. I'll get a workable package together tomorrow A.M.
I found that with these clips QTGMC's denosing smoothed rough grainy edges well enough with its "Medium"" defaults. QTGMC has a few dozen parameters, but the several preset defaults are often good enough. You can be more picky and change some defaults. But you have to look up its HTML doc to know what's going on.
But if I keept screwing with the colors, it gets worse/comes back. So how do I tweak the colors the way I want without introducing the posterizing effect?
Also, this:
--------------------------- VirtualDub Error
---------------------------
Avisynth open failure:
Cache: Filter returned invalid response to CACHE_GETCHILD_CACHE_MODE. 428222752
(QTGMC-3.32.avsi, line 776)
(QTGMC-3.32.avsi, line 386)
(***\game.avs, line 32)
---------------------------
OK
---------------------------
Code:
Function FixChromaBleeding (clip input) {

  # prepare to work on the V channel and reduce to speed up and filter noise
  area = input.tweak(sat=4.0).VtoY().ReduceBy2()

  # select and normalize both extremes of the scale
  red = area.Levels(255,1.0,255,255,0)
  blue = area.Levels(0,1.0,0,0,255)

  # merge both masks
  mask = MergeLuma(red, blue, 0.5).Levels(250,1.0,250,255,0)

  # expand to cover beyond the bleeding areas and shift to compensate the resizing
  mask = mask.ConvertToRGB32().GeneralConvolution(0,"0 0 0 0 0 1 1 1 0 0 1 1 1 0 0 0 0

0 0 0 0 0 0 0 0").ConvertToYV12()

  # back to full size and binarize (also a trick to expand)
  mask = mask.BilinearResize(Width(input),Height(input)).Levels(10,1.0,10,0,255)

  # prepare a version of the image that has its chroma shifted and less saturated
  input_c = input.ChromaShift(C=-4).tweak(sat=0.8)

  # combine both images using the mask
  return input.overlay(input_c,mask=mask,mode="blend",opacity=1)
}


A = AVISource("Capture.avi").ConverttoRGB32(matrix="rec601",interlaced=true)
B = AVISource("capture.avi")
B = B.FixChromaBleeding()
B = B.ConverttoYV12(interlaced=true)
B = B.SmoothUV()
B = B.QTGMC()
B = B.AssumeTFF().SeparateFields().SelectEvery(4,0,3).Weave()
B = B.ConverttoRGB32(matrix="rec601",interlaced=true)
StackVertical(A,B)