How to Capture AVI Video in iuVCR
The following guide is for capturing AVI with most all capture cards. It requires the inexpensive payware iuLabs iuVCR. A free limited trial is available, with a currently very low price of only $28 to buy.
This guide should work with both style of cards, either the older VFW (Video For Windows) cards or newer WDM (Windows Drive Model) cards. When using Windows XP, VirtualDub should support both VFW and WDM cards, while iuVCR only supports WDM cards. Most video hardware developed after 2000 uses WDM drivers. Detecting whether you have a WDM card is normally pretty easy. Aside from when the card was made, the letters “WDM” will often be in the driver name, seen in the Windows device manager.
This guide was tested with an AVerMedia BT8x8 chipset video capture card, and an ATI All In Wonder Rage Theatre chipset video capture card.
Using iuVCR to Capture AVI
For testing this guide, settings of 720×480 29.97fps video and 48Khz audio were used with the HuffYUV 2.11 codec or the MainConcept MJPEG codec. Capturing at Half-D1 352×480 produced a noticeably softer and less detailed image with this card/software combo, as is typical of BT8x8 chipsets.
Why use iuVCR? Because VirtualDub (the most popular AVI capturing utility) is an older VFW-based capture program that does not always want to cooperate with many newer-generation WDM-based capture cards, even with the VFW-WDM bridge installed.
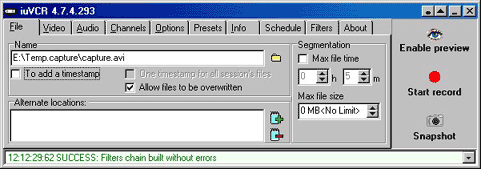
Start capture and open new file. Open iuVCR, select the File tab. In the Name field, enter a name for your capture. To browse your system for a location to capture to, use the folder icon to the right of the Name field. See image:

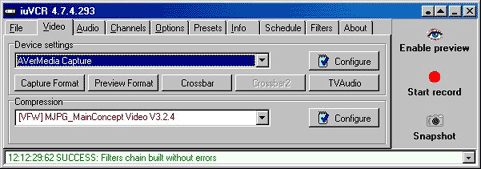
Video settings. Next, go to the Video tab. Under Device Settings, you can select the capture device. The only one in the test system is an AverMedia card, so it is automatically selected. Under Compression, you can select your preferred codec from a drop-down list of installed codecs. I tend to use either HuffYUV 2.11 or the MainConcept MJPEG codec at quality setting 19 or 20. See image:

Audio settings. Under the Audio tab, you can select your audio recording device, set your input level and sample rates. The mixer input, in conjunction with your Windows audio mixer, should be adjusted to give you a solid signal without distortion. This will take some playing around. I suggest spending some time capturing some short clips, checking the sound and changing the balance, until you find a good setting.
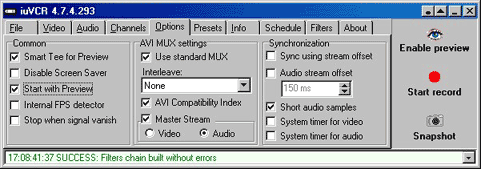
Options settings. Under the Options tab, you can set your preview options. I’ve selected the Smart Tee preview because it gives me a resizable frame where I can preview the video input. Under the AVI MUX settings, the only one to adjust is the Master Stream which is set to Audio. Under Synchronization, I have selected Short Audio Samples. This seems to be the key to getting very tight audio sync. Using HuffYUV, I drop between 6 and 8 frames per hour. Using MJPEG, I drop no more than 1-2 frames in 90 minutes. Even with dropped frames in HuffYUV, the audio stays tight. If it does go out for a second, it usually corrects itself instead of drifting worse as time goes by. See image:

Presets options. Once you have a setting that works well for you, you can make a preset out of it. Go to the Presets tab and click on Add. It will bring up a box where you can name the preset. When you want to use those same settings again, you can go to the Presets tab, select from the list, and click Load. WARNING: Whatever file name you are using when you set the preset will be loaded every time you load that preset, so make sure you double-check your file names before starting the capture – otherwise you may overwrite your previous work!
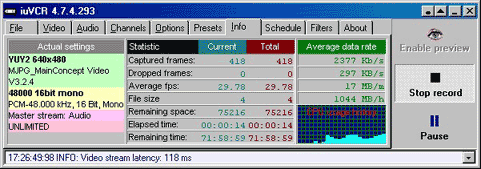
Info options. The Info tab will give you an overview of your settings, your system usage, your average data rates and your frame rates… basically everything. Once you hit the Start Record button, iuVCR will switch to this tab so you can monitor the capture. The Start Record button will become Stop Record, and the Snapshot button will become a Pause button. See image:

Finished! Once you’ve captured your video, hit Stop Record. Close out of iuVCR. Being paranoid, I tend to immediately open the file I’ve just captured and spot-check it for sync issues. If there are none (as usual), it’s time to encode.
Copyright Notice: All guides, articles and editorials found on digitalFAQ.com are copyright by The Digital FAQ and/or the respective authors. Articles may not be copied, borrowed, full-quoted or reproduced in any manner, online or in print, which includes blogs and forums, without the written email consent of Site Staff (which may or may not be given, for free or fee). Know that digitalFAQ.com staff does routinely monitor online plagiarism, and we do send takedown notices to site admins and/or web hosts (DMCA et al legal actions) as is necessary. If you would like for others to read articles found on The Digital FAQ, simply link to our content. (Note: Printouts for personal use is specifically allowed.)