How to Remove Commercials from Video with Womble MPEG-VCR Editor
Removing commercials from an MPEG is a really simple splicing process, and should not be considered “editing” in the traditional video sense. All that is required to remove commercials is to cut and join the footage. This guide is good for trimming MPEG files in general, not limited to just cutting commercials.
This Womble product is nice, especially for those capturing MPEG with ATI or Hauppauge cards, or from files made on DVD recorders. The software is only $19 downloaded from Womble. The interface strongly resembles a timeline found in mainstream non-linear editors (NLEs) like Adobe Premiere and Vegas Video.
Using Womble MPEG-VCR to Remove Commercials
1. Open the File. Either go to FILE-> OPEN MPEG MOVIE or click the OPEN MPEG FILE button (which looks like the NEW FILE button found in most other programs).

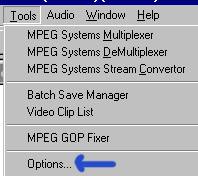
2. Color problems. If the video looks washed-out or has incorrect colors, do not worry. The program comes setup in 8-bit color mode, not 24-bit true-color mode. Goto TOOLS -> OPTIONS to change it.


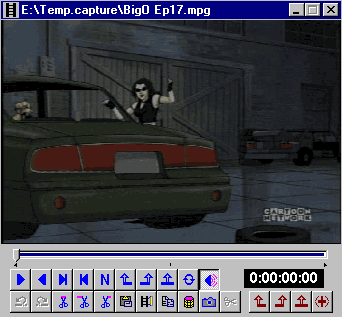
3. The workspace. First it must be understood what each tool does before proceeding to the editing phase. Though the image below is small to save my bandwidth, try to open the box up as large as possible, as it increases the timeline area.

| This is the PLAY button. It plays the video. Press it again to pause. The reverse PLAY button plays the video backwards. These are used to get the video close to the areas where the cutting will take place. | |
| These are the frame advance buttons. You can move frame-by-frame to cut the video with great precision. | |
| This is the MARK IN button. It selects the beginning of the selected area. | |
| This is the MARK OUT button. It selects the end of the selected area. | |
| This is a preview function. It zooms you to the MARK IN frame. | |
| Again, a preview function. This one zooms to the MARK OUT frames. | |
| This is the CUT LEFT button. It cuts all video on the LEFT SIDE of the selection. | |
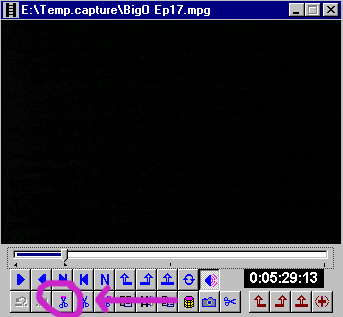
| This is the CUT SELECTION button. It cuts out the selected video between the MARK IN and MARK OUT on the timeline. (FYI: Womble MPEG Video Wizard is missing this useful button, and is why I do not plan make a guide for that software. This button is too important.) | |
| This is the CUT RIGHT button. It cuts all video on the RIGHT SIDE of the selection. |
4. How to edit. The best way to cut out unwanted commercials is to select the area you want removed. The video opened in this example is a capture for BIG O episode #17. I started the capture a few minutes early, and have X-MEN Evolution footage (shown in image above) and commercials before BIG O comes on. First, I’ll MARK IN the very first frame, and select the black frame before BIG O starts as the MARK OUT. I will then use the CUT SELECTION button to remove that piece of unwanted footage.

5. Repeat as needed. Now that the beginning commercials and extra footage are removed, I’ll repeat this process throughout the video clip, dragging the bar along the timeline, scanning for commercials. When I find one, I play the file, looking for the fade from show to commercial, and use the FRAME ADVANCE buttons as needed to get that precise cut.
6. When finished. When all the commercials an extra footage have been removed, it is now time to save the file. As long as you do not wander and change video settings, WOMBLE MPEG2VCR will NOT re-encode the video, and will merely save it as a new file based upon the cuts made in the timeline. Unlike TMPGENC, it will only take a few minutes at most, even for a 3-hour movie!
Be sure to SELECT THE ENTIRE TIMEFRAME, by applying MARK IN on the first frame of the now edited video, and applying MARK OUT on the last frame of the video. The SAVE function saves the selected areas.
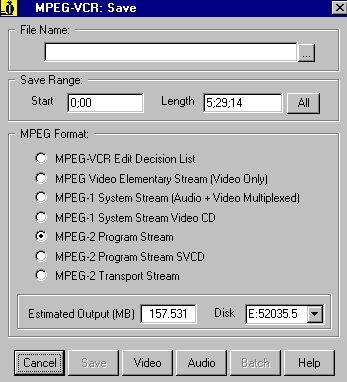
 This is the SAVE button and once pressed it will reveal this screen:

Do NOT change anything. The settings (FORMAT, VIDEO, and AUDIO) have been acquired from your video, and altering them will require a re-encode on the video. Choose a FILE NAME and then merely press SAVE.
Congratulations. The video is now edited free of commercials, and without the need of editing applications, encoding, or conversions to the video file and hence quality remains untouched.
Copyright Notice: All guides, articles and editorials found on digitalFAQ.com are copyright by The Digital FAQ and/or the respective authors. Articles may not be copied, borrowed, full-quoted or reproduced in any manner, online or in print, which includes blogs and forums, without the written email consent of Site Staff (which may or may not be given, for free or fee). Know that digitalFAQ.com staff does routinely monitor online plagiarism, and we do send takedown notices to site admins and/or web hosts (DMCA et al legal actions) as is necessary. If you would like for others to read articles found on The Digital FAQ, simply link to our content. (Note: Printouts for personal use is specifically allowed.)