How to Capture AVI Video in VirtualDub
The following guide is for capturing AVI with virtually any capture card. It requires the use of the freeware (no-cost) software VirtualDub. (You can download a pre-loaded version of VirtualDub in our forum.)
When using Windows XP-Vista-Win7, VirtualDub should support both VFW and WDM cards. Most video hardware developed after 2000 uses WDM drivers. Detecting whether you have a WDM card is normally pretty easy. Aside from when the card was made, the letters “WDM” will often be in the driver name, seen in the Windows device manager. This guide was tested with an AVerMedia BT8x8 chipset video capture card, and an ATI All In Wonder Rage Theatre chipset video capture card.
Using VirtualDub to Capture AVI
Before we begin, understand that not all cards will work with VirtualDub. Many cards based on the BT8x8 chipset, a very popular and cheap WDM-based card, will not cooperate with a VFW-to-WDM bridge or VFW software. Not all new video cards come with backwards compatibility. Simply try it to see if it works.
Open VirtualDub and go to File > Capture AVI. It will launch the VirtualDub capturing interface.
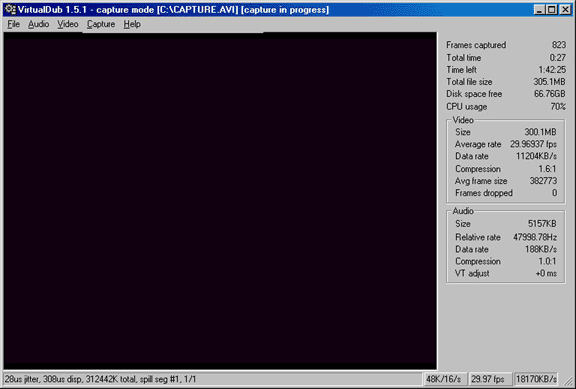
Capture settings. The main window of the capturing console shows preview in the main window, and information on the right-hand side. At the bottom of the screen are the audio and video settings. VirtualDub comes with very low quality default settings, so most settings need tweaking. Change from 15.00 fps to 29.97 fps (full NTSC). The audio setting is also too low, but it will be changed somewhere else.

Audio settings. Go to the Audio menu, and go down to Compression. A new will open with the audio settings. Change it to PCM format using 48.000 kHz 16-bit stereo. Click Save As and give the new settings a name. I choose “DVD 48k” for mine. Click OK. You should now notice the audio level is 48K/16/s in the lower-right corner of the capture console.
Go back to the Audio menu. This time go down to Volume Meter. The Balance should be in the middle, meaning both the left and right stereo get the same amount. The Volume control bar should be at about 50 to 75 percent. Never put volume at 100 percent, as it will often lead to distorted, cracking audio. The left side of the slider bar is 0 percent, the right side is 100 percent. Click the X when done.
One last time, go the Audio menu. Go to Windows Mixer. It will launch the Windows volume controls (you can also get here by double-clicking on the speaker icon in the system tray). Select the soundcard input. For most people this will be either LINE IN for an external soundcard input or AUX for an internal connection.
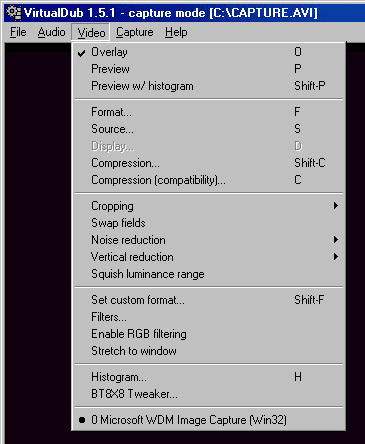
Standard video settings. VirtualDub has an extensive list of video capture options. This hack will help you with the basic settings and give some brief information on the more advanced optional settings. Go to Video and set it for Overlay mode if it is not already set. Overlay is the area of the graphics cards that plays live video data.

Go to Video, and then Format. Set this resolution to an appropriate number, preferably 640×480 or 720×480. Set the compression mode to YUY2 if available. Click OK to return to the capture console.
Next go to Video, and then Source. This is where you select the video capture card to work with VirtualDub. On the Capture Source tab, select the video card and the input (coax tv tuner, s-video, or composite). If using a TV tuner, click on the TV Tuner button to change the channel and select the signal format. In the USA, the signal is NTSC_M. On the Device Settings tab, alter as needed to make color corrections to the video. Realize the PC and TV may not look the same, so never alter color, contrast, brightness, etc., without running test captures and playing the results on a TV set first.
Now go to Video, and then Compression. This is where you select the AVI codec used at capture. For high quality captures meant for DVD, it is suggested to stay with uncompressed or low compression codecs like HuffYUV or MJPEG (Morgan, PicVideo and MainConcept all make MJPEG codecs). However, for computer-only viewing, formats like DivX and Xvid may be used. Codecs must be installed separately, they do not come with the computer. Some are free (example: most lossless codecs), some cost money (example: MPEG-2, MPEG-4, MJPEG). If capturing for DVD, be sure the codec supports interlace (MJPEG and HuffYUV do). Click on the Configure button to tweak the codec settings, normally just to verify interlace fields being captured and raise the quality to higher levels. Click OK and go back to the capture console. Go to Video, and then Compression Compatibility. Match this settings to the one you made in the Compression settings.
Optional Video Settings. Anything below Compression Compatibility on the Video menu is optional. These are advanced features for improving video quality.
Go to Video, and then Cropping. First, enable it (OPTIONAL). Then go to Set Bounds. This will allow you to only capture a certain portion of the video. Just be aware that you cut off pixels doing this. If you trim off 5 pixels from each side on a 640×480 capture, the final file will be 630×470 in size. This is a filter for advanced work only.
Go to Video, and then Noise Reduction to enable noise reduction (OPTIONAL). This setting can remove noise on the video capture, but it will increase system CPU usage, and may result in dropped frames depending on the compression.
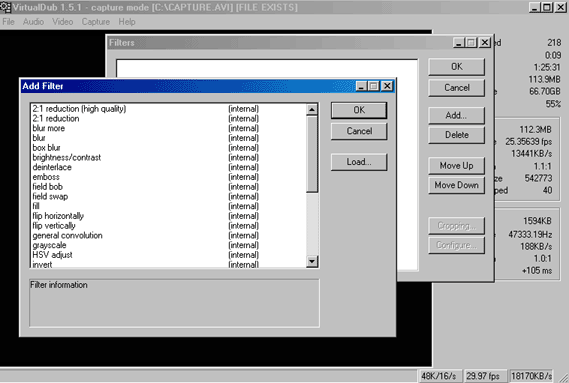
Go to Video, and then Filters (OPTIONAL). This will launch the filters console. VirtualDub filters use a plug-in method, so many filters exist, made by many people. VirtualDub comes with 25 or more filters, and more can be added.

READY TO CAPTURE!
Go to File, and then Set Capture File. Type in the name and select the location for your capture file. AVI files can be rather large, so be sure the hard drive selected has plenty of space, at least 10 GB or more, preferably 20-30GB minimum for full-length movies.
Finally, go to Capture, and Capture Video. F6 on the keyboard is a shortcut for this command. Press Capture again (or F6 again) to stop the capturing. While the video is capturing, pay attention to the information in the info box of capture console. Dropped frames are not good. If you are dropping frames, see the dropped frames guide.
Copyright Notice: All guides, articles and editorials found on digitalFAQ.com are copyright by The Digital FAQ and/or the respective authors. Articles may not be copied, borrowed, full-quoted or reproduced in any manner, online or in print, which includes blogs and forums, without the written email consent of Site Staff (which may or may not be given, for free or fee). Know that digitalFAQ.com staff does routinely monitor online plagiarism, and we do send takedown notices to site admins and/or web hosts (DMCA et al legal actions) as is necessary. If you would like for others to read articles found on The Digital FAQ, simply link to our content. (Note: Printouts for personal use is specifically allowed.)