How to Edit Video with Adobe Premiere, Part 1: Introduction
This guide gives an overview to the basic techniques needed to use both Adobe Premiere and non-linear editors (NLE) in general, such as Apple Final Cut Pro or Sony Vegas Video. Much like Photoshop or any number of intricate/complex software, the best way to learn in Premiere is to literally “play around”. This guide was built with Adobe Premiere 6.5, but the basic techniques are still valid even in the newest edition of Adobe Premiere CS4. Not much has changed in the past decade, in terms of how the software interface looks and functions.
I. Import files
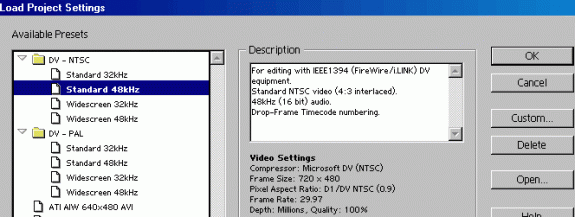
When Premiere starts, it should automatically launch the project wizard that prompts you to either load or start a new editing project. In this example, the DV NTSC Standard 48kHz template was fine, the standard video template.
Get familiar with the PREMIERE interface:
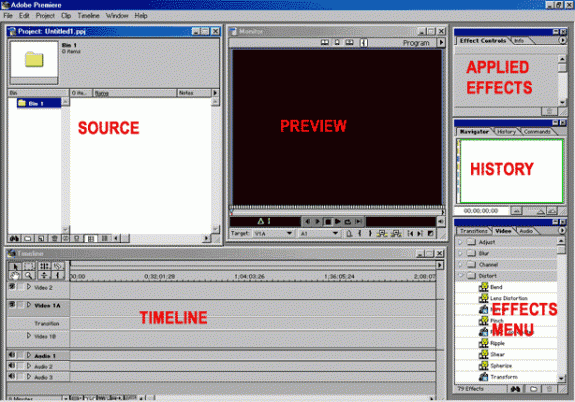
- EFFECTS MENU is audio/video effects you can choose.
- APPLIED EFFECTS is what you have in use for the project at hand. You add them by dragging them onto the video or audio in the timeline.
- HISTORY is the undo area where you can undo changes while working. Just like Photoshop undo history.
- TIMELINE is where the video and audio is maintained. The first time you launch PREMIERE, it’ll ask if you want A/B editing or single time-line editing. As it suggests, for most people the A/B is easier.
- PREVIEW shows you the video as it should look when exported, though it can be a bit buggy on all versions, and needs a good CPU, and fluidity of movement is sometimes determined by the compression of the source file.
- SOURCE is where you import the source files. The assets. Audio, video, images.
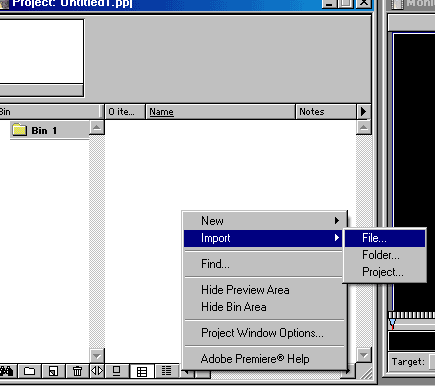
Importing source. Right click in the blank area of the SOURCE window. Go to IMPORT -> FILE and select your audio/video/images for use in the project. You can import new items at any time.
II. Basic editing concepts
The first order of business in Premiere is making the workspace more useful. Some of those windows are just sized wrong and not needed.
For screen resolution, 1024×768 is the minimum screen res you can comfortably have in Premiere. If you have a good video card, I’d actually suggest raising it to 1600×1200 when editing video, simply because all that headroom in the Premiere workplace is nice.
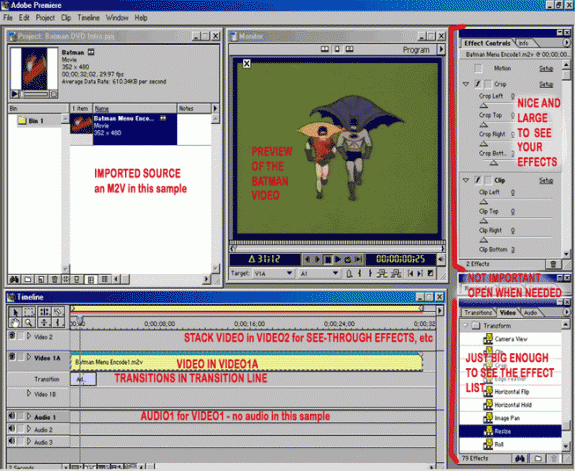
Working with the timeline. The first step is to make sure the video is properly imported. Then drag the video/audio (or video and audio separately if they are separate files) to the timeline. In the image above, I already dragged the M2V file to the VIDEO1A timeline slot. Become familiar with the timeline tools. It’ll affect how you work in the timeline:
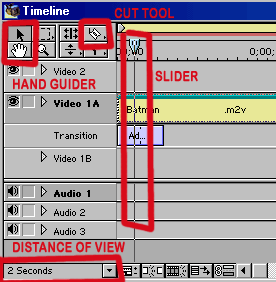
- The “hand” tool works much like it does in Photoshop. You can select this tool, click on the timeline footage, and then hold the mouse button and slide the mouse to move down the timeline with handheld accuracy. This is an alternative to using the scroll bars. Much like photographers prefer this tool, videographers tend to like it also.
- The arrow is “default” status with no tool selected. This lets you move object around on the timeline.
- The “cut” tool will slice items on the timeline into smaller parts. You can then move these smaller parts around or use the arrow to select them and then press DELETE on the keyboard to delete unwanted footage. A good trick for using the CUT tool is to move the timeline slider to the exact position. The slider controls what the preview window shows, so you can see precisely when the cut is being made. When you get the slider in the correct position, move the cut tool on top of the slider line and the cut tool will disappear. This means you have a perfect alignment and will be cutting in the exact spot shown in the preview window.
- The “distance” meter select the visual increments on the timeline. The clip in this guide in 30 seconds long. The default 8 minute mark makes 30 second nothing more than a sliver, and near impossible to accurately insert those 1-second additive fades. Cuts are also harder to make at such long intervals. A 2-second span was chosen for this clip. Usually, 10 seconds is good for long footage, change it as needed. (FYI: There is a max length the Premiere timeline can hold, many hours, I forget the amount. I never have more than 3 hours in a timeline, so I never paid much attention to that high limit, not something that affects me.)
- The DELETE button in general removes items from the timeline.
Adding effects/transitions. As was shown in the workspace image above, this clip has already had 2 effects and 1 transition added. Go to the effect window. Notice how it has effects organized in 3 tabs (transitions, video effects, audio effects). Both a crop filter and clip filter were added to the video in this example. Click on the filter you want, hold the mouse button, drag to the timeline item (video in this case) and drop it on the item when it is highlighted. A green bar will appear at the top of the timeline item and the effect will now appear in the effects window. Most effects are “virgin” and must be altered to actually add the effect (much like clip and crop, which come set to all “0″).
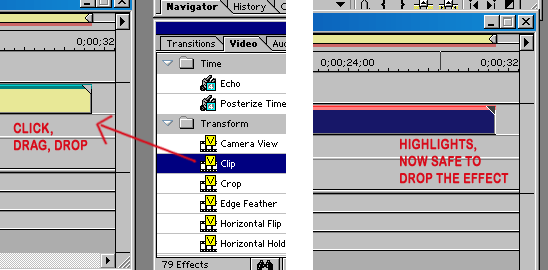
Basic filters: Most PREMIERE filters are named so that they are self-explanatory. In this video in the example (Batman), I wanted to clip out noise, as well as crop in on the video some. Some of the noise over-spilled the typical overscan, so both filters were needed. The next effect I wanted to add was a fade-in and fade-out of the video. The final video will be used in a loop, so this is required. Therefore, I’ll be adding both.
Clip/crop. This is by far a high-use filter for those editing VHS tapes, and often used interchangeably, which is INCORRECT. “Clip” is another term for “MASK” or to “cover up” parts of the video. It will not resize the video. “Crop” is the process of removing extraneous image/footage, and will result in a resize of the remaining image, as it must now fill the canvas with less data. While it is possible to crop without resize, your final video will not be the correct size compliant with DVD. Clip is great for covering up overscan noise. These are just two of many, many filters.
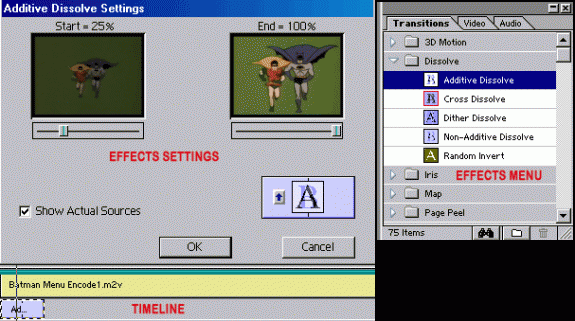
Transitions. Like any other affect, you drag the effect from the effects menu to the timeline. However, you’ll be putting it into the TRANSITIONS slot instead of the VIDEO/AUDIO slots. It will be dropped at default size, but can be dragged out to larger or smaller length. If you hover the mouse over the left or right sides of the effect, a resize icon with arrows will appear that you can use to stretch or shrink the effect. Once it is in the right position, double-click on it (must be on the ARROW tool) to launch the properties window. As shown above, for this dissolve, you can view it on the actual video. Click the up/down arrows to flip the direction of the fade. Move the sliders to preview it in action. This will now get you a clip that is edited to the correct size, has noise covered, cropped as needed, and transitions in place. This will serve for most home editing. It’s a good handful of basics.
III. Advanced Editing, Encoding, Authoring.
This is where the intro guide ends. For more advanced methods, follow the suggestions given at the start of this guide. Adobe Premiere 6.5 and later comes with the Adobe MPEG Encoder (using the MainConcept engine) built-in. Go to FILE -> EXPORT -> EXPORT TIMELINE and select with the Adobe encoder, or any other third-party encoder you may have installed.
What’s next?
- Several excellent training books can be purchased from Amazon.com
- Questions can be answered in the digitalFAQ.com support forum
Copyright Notice: All guides, articles and editorials found on digitalFAQ.com are copyright by The Digital FAQ and/or the respective authors. Articles may not be copied, borrowed, full-quoted or reproduced in any manner, online or in print, which includes blogs and forums, without the written email consent of Site Staff (which may or may not be given, for free or fee). Know that digitalFAQ.com staff does routinely monitor online plagiarism, and we do send takedown notices to site admins and/or web hosts (DMCA et al legal actions) as is necessary. If you would like for others to read articles found on The Digital FAQ, simply link to our content. (Note: Printouts for personal use is specifically allowed.)