How to Restore Audio Quality with Sound Forge
This is a visual guide to using audio correction filters in Sound Forge. The guide does not describe every filter in the program, or every filter in our downloadable filter pack, but rather it teaches some fundamentals on how the filters work, and how to use them in various scenarios.
Getting Started with Sound Forge
You’ll need either Sound Forge Audio Studio (consumer version) or the full Sound Forge professional version. Both versions will work fine, for the filter work discussed here. A fully-functional 30-day trial of the consumer version is available from the Sony site. For the best prices, buy from Amazon, not Sony.
Using a Mac? No problem. Use Parallels Desktop or VMWare Fusion, install a copy of Windows XP inside it, and then run Sound Forge inside of that. Native Mac audio tools are very limited. Don’t let anti-Microsoftism keep you from using this excellent audio program.
Most of these filters use the Paragraphic Equalizer tool. This is a helpful EQ method because it gives both numeric and visual data values. Many of the filters were created in Sonic Foundry SoundForge 6, but should work well in both most earlier and all later versions of Sonic Foundry Sound Forge, now known as Sony Creative Sound Forge.
Download and Install the Free Filters
Download and install the official digitalFAQ SoundForge Filter Pack, which adds more than 100 new filter preset settings to Sound Forge.
Understanding the SoundForge Interface
Sound Forge is often called “the Photoshop of sound” and it deserves this distinction. Why? Well, much like Photoshop, the program can be used as basic or as advanced as the user wants. It appeals to users of all skill levels, and has few limitations. The software is normally limited only by a user’s own skills and creativity, and not the fault of the program itself.
Where are the tools?
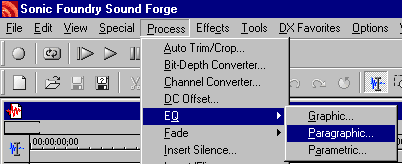
- In the professional version of Sound Forge, most controls are located in the Process menu.
- In the consumer Sound Forge Audio Studio, the filters are under the FX Favorites > Sony menu.
This image below shows how to find the EQ (Paragraphic) and below that is the Normalize function:
General Audio Notes
Try to not over-filter audio! Editing audio with the Paragraphic EQ is essentially a form of frequency carving. You remove the bad parts of the signal, and then enhance the good parts of the signal. Try to use no more than five filters on an audio clip, and know that most audio work is accomplished with only two or three filters.
Be careful of clipping! Altering the EQ of a file can raise and lower the depth and scope of the audio, so be cautious of “red-lining” the file (clipping), as it can corrupt the quality with cracks and other noise. This is very important to monitor as corrections are being made, as well as why audio files should NOT be captured at peak volume levels.
Paragraphic Equalizer Overview
An equalizer is an option to augment the sound of an audio file. Anyone familiar with a high-quality stereo has probably seen a very basic paragraphic EQ. It’s normally the 3-10 little notches that can be moved up and down to raise and lower the tone at various frequencies. But the paragraphic EQ in SoundForge is much more complex. Using these controls, you can remove hiss, raise or lower pitch, remove noise … basically just correct the audio quality of the file.
Unlike some software, Sound Forge also has realtime previewing of the audio changes. Tick and untick the “BYPASS” box to compare original audio (bypass checked) to the filtered audio (bypass unchecked). Use this feature to your advantage.
Since this site is aimed at transferring video to DVD, these audio filters are set to reach the same goal. These are meant to remove the most common problems videographers face: removing hiss, restoring high tonal values to mono/lossy recordings, and to remove errant noise (often from shoddy microphones). There are four categories of paragraphic filters
Hiss Removal Filters
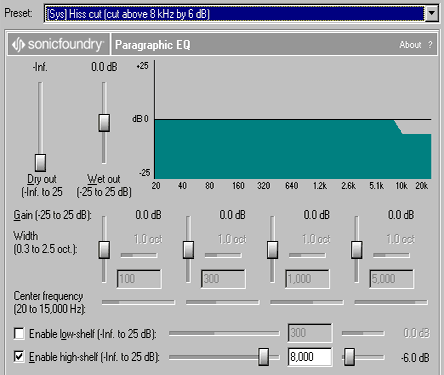
The Paragraphic EQ presetss offer different levels of hiss removal. Just be careful when using them, as it can also muffle the sound if done improperly or you use the wrong filter for your given situation.
Try the small ones first. Try to use the standard hiss cut as much as possible (the one included with Sound Forge). If that is not strong enough, move on to the digitalFAQ Hiss Cut presets. Try to find the one that removes hiss while leaving the high tonal values as intact as possible.
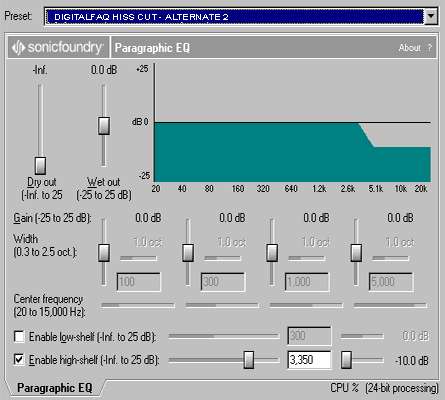
Stronger hiss filtering. Our “Alternate” filters are for more severe hiss problems, and may muffle some, depending on the source. Use sparingly on audio.
Noise Removal/Correction Filters
These EQ presets have been especially good on downloaded files, aging VHS footage, home videos, audio cassettes and records. These sources often have corrupt or noisy audio due to the storage media or the recording equipment used to make the source.
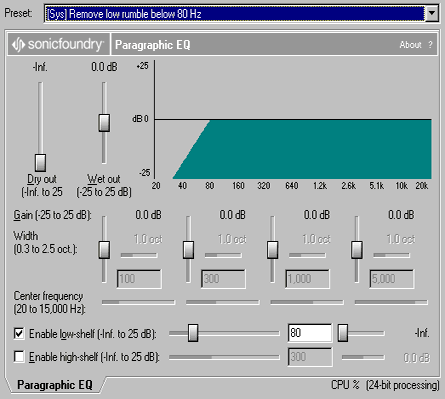
Remove low rumble and harsh bass. These filters are for files that have too much bass, too low of a tone, rumble noise, or a rumbly sound. The “Remove Low Rumble” setting is a default Sound Forge filter. The presets has some added variations of this filter.
Remove AC/Fan noise and audio whine. These filters remove high pitched sounds like artificial whining, wind movements, and motor noises caused from air conditioners and fans. These are often useful on home movies shot outside or with cheap microphones.
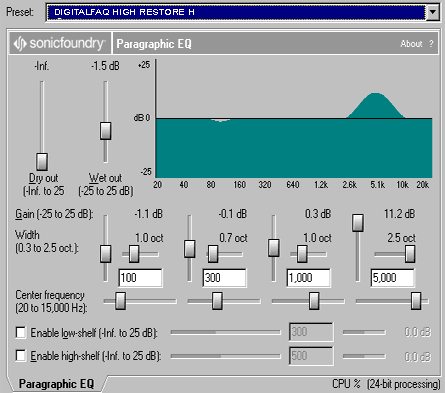
Examples: Restore High Tones
A big problem with early VHS tapes is that they were all monaural sound (mono). Even through the early 1990s many VCRs used mono sound as the de facto recording standard, especially the low budget models. Mono sound, at least on VCR recordings, tends to have lower tonal depth that is a far cry from the Dolby Digital Surround sound we insist on today. These problems are also found on old homemade vinyl and cassette recordings.
Normal usage. The most commonly used filters in the digitalFAQ Filter Pack are High Restores H, I, J, G and E. The rest of them are for more specialty use.
Example: Combo Filters
Combo filters aim to achieve more than one goal. In the sample image below, the high restore filter has a goal of restoring the high tones, but without adding more hiss. There are several combo filters found in the presets file. Some remove whine and hiss, buzz/hum and hiss, high restore and remove hiss, etc.
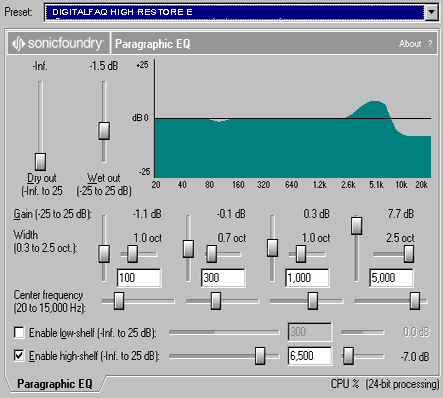
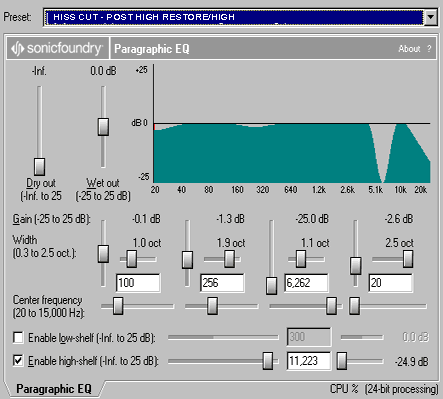
Hiss removal, maintaining high tone from high restore. These presets are for removing hiss that appeared after a high restore was performed. High restoring essentially broadens the higher frequencies, but that is also where most hiss is stored. This EQ preset will remove the new hiss, but without undoing the high restore. This is especially useful on mono VHS tapes. The “high” and “low” variations are for controlling the bass levels.
Normalizing audio
One of the largest problems with homemade DVDs is a lack of proper audio richness. In addition to be properly attuned (like having a proper tonal range free of hiss), it must have a full body for proper presentation. Most people confuse full body with volume. While a full sound is indeed louder, it is not due to volume control.
1. Never raise or lower the “volume” of the audio file – NORMALIZE it !!
2. Avoid normalizing BEFORE adjusting the tonal values or removing noise !! Only in a very few cases must the audio be tweaked quieter prior to filtering.
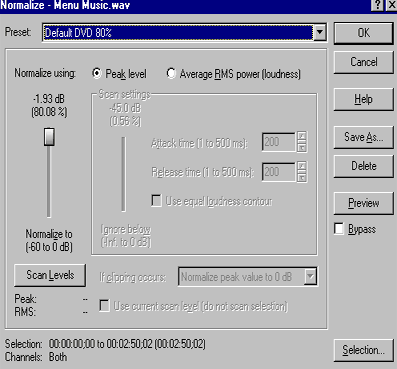
Not too high, only 80 percent at most. One of the biggest mistakes made by those capturing audio is to overdo it or underdo it, resulting in corrupt peak values and other decay. I see other guides that say “use Besweet and tick the normalize function” or “raise capturing volume all the way up” which results in arbitrary values usually nearing the 100% peak value range, and it can crack or otherwise distort on some audio playback equipment (as it does on one of my TV sets). Most “Hollywood released” movies appear to use a range of 60-80% for their audio, and with a greater dynamic range than can be had from home sources.
Not too low. Inversely, many never pay attention to the computer audio controls during capture, and leave it at MS Windows default volume levels. They fall in the 25-50% range. Only is special situations would you keep volume at such a low level. Turning up this volume on the TV will actually result in raising the hiss level. Capturing audio at low volumes results in a captured file with a minimal level of normalization and severe tonal flaws. You cannot fix it by trying to adjust the “volume” in software after-the-fact.
SoundForge filter. This is the 80% value curve based on peaks that I suggest for all DVD-Video applications. Go to Process > Normalize to initiate the filter:
You are now ready to use this audio in your video or audio project.
Copyright Notice: All guides, articles and editorials found on digitalFAQ.com are copyright by The Digital FAQ and/or the respective authors. Articles may not be copied, borrowed, full-quoted or reproduced in any manner, online or in print, which includes blogs and forums, without the written email consent of Site Staff (which may or may not be given, for free or fee). Know that digitalFAQ.com staff does routinely monitor online plagiarism, and we do send takedown notices to site admins and/or web hosts (DMCA et al legal actions) as is necessary. If you would like for others to read articles found on The Digital FAQ, simply link to our content. (Note: Printouts for personal use is specifically allowed.)