Video Workflows: Capture MPEG-2 for DVD
the Frequently Asked Questions…
- Which computer capture card is best for making DVDs?
- How do I capture videotapes onto the computer?
- What do I use to capture video to MPEG files?

and The Digital FAQ Answers…
Capturing directly to MPEG-2 for DVD-Video format (“a DVD”) isn’t suggested anymore in the 2010s. But it can certainly be done if you’re looking to save time, and are willing to compromise quality in the process.
Technically, you can even capture to MPEG-1 for DVD-Video, but that’s never been suggested.
In the days of analog cable, “digital” satellite (also analog output!), and analog antenna TV, it wasn’t a terrible method. You could record a clean source through s-video on the cable box or satellite receiver. While it had some noise in the capture, maybe even some noise in the analog source, it was very tolerable. Especially since most TV sets were still the old-fashioned 4×3 CRTs, not the huge flat screen 16×9 HDTVs of today. Those older TVs hid quite a but of noise, too.
Capturing video tapes directly to DVD was never suggested, and is even more true now. Thanks to advances in video filters, using program like Avisynth and VirtualDub, you can completely eliminate tape errors. The caveat there is that it needs to be a lossless or uncompressed AVI file. Note that using a quality VCRs has always been suggested, and still is.
But if that’s what you want to do, and capture directly to DVD-ready MPEG, this is what we suggest…
How to Test the Burn Quality of CD/DVD Media
Inevitably, everybody will either come across potentially bad media, or will have a desire to insure archival stability of a blank disc. To determine how well a media perform, a battery of tests must be performed. Burn quality problems are almost always the fault of the media itself or the burner/firmware being used. As delicate as optical media can be, scratches and abuse are not the most common reason for bad media.
Be sure to read the other media guides and reviews to better understand the DVD format and blank discs.
Why Do Discs Go Bad?
To understand why a disc goes bad, it helps to understand how a disc is made. CD, DVD and Blu-ray media are created in an interesting manner! Note that this is a basic description:
- First, dye is poured onto the molded plastic (polycarbonate) bottom of a disc, and then spun at high speed to spread the dye evenly (or so you hope). Note: Since there is no dye in a pressed disc, this step does not apply to pressed media.
- Next the foil reflective is added (so the laser has something to bounce off of when burning/reading the disc). It’s “sputtered” on, at a microscopic thickness!
- This is followed by gluing on another plastic layer for protection. (Applies only to DVD and Blu-ray, not CD.)
- Finally, the top is buffed with a lacquer coat, and the disc is done. Optional branding or inkjet surfaces can then be applied.
It sounds pretty chaotic, doesn’t it?! And it comes as no surprise that discs have problems, especially when the blank was created with inferior materials or methods from the manufacturer.
Common Reasons That Discs Go Bad
Disc material imperfections. Bad foils and dyes, as well as bad dye spread are the most common issue that causes bad media. If the dye is uneven or does not reach perfectly to the edge of the disc, it is often bad.
User error. A common “error” with “bad media” is actually user error. Even I’m guilty of this. Do not try to use your computer extensively while burning, especially at 4x or faster speeds. Also test your discs before dumping the source. Run several tests, as the “verification” features found in programs like Nero Burning ROM have been known to not properly catch errors.
Problems past the 4GB mark. Balancing is also a side effect caused by faulty plastic, foils or dye spread. Round objects tend to be most unstable at the outer edges. While DVD media allows for some degree of error (data is written in a “wobble groove”), exaggerated wobble will caused the laser to spew data in areas not meant for writing. It thus disappears, and the data comes up as missing on the disc, resulting in freezing, blockiness and other odd visual errors, which are caused from the decoder attempting to compensate for material that is missing.
Fake media. Fake media is often bad. If you ever acquire good media like TDK, Taiyo Yuden or Maxell, and the results are bad, check to see if the media is legitimate. Many of these top-tier media companies only have branded discs, not plain white-top or silver-top ones. These discs often are cheaply-made unbranded media with a faked write strategy and media ID code. Fake media is often sold on eBay and by unauthorized online merchants. If you want to have guaranteed legitimate media, only buy that media from authorized media resellers. Visit the disc manufacturer Web site to get a listing of authorized distributors.
Gradual data loss (dye media). Also known as “disc fade” and “laser rot”, this is actually not very possible due to the mechanics of dye-based DVD recordable media (DVD-R, DVD+R). See the longevity page for more on this topic.
Gradual data loss (phase change media). Unlike the dyes found in write-once media, phase change crystals are subject to deterioration, sometimes at a disturbingly fast rate. Whether the discs are used or not, phase change crystal can begin to break down in as little a six months! Phase change media includes DVD+RW, DVD-RW and DVD-RAM. See the longevity page for more on this topic.
Dye melting from excess burn speed. Some discs simply cave in under high speed burns. In the past, for example, both OPTODISC 4x DVD-R and RITEKG04 4x DVD-R media were reported as doing this when burned at 4x or 8x speeds. The dye simply cannot handle the write speed. Poor production is to blame. Hacked firmwares that allow overspeed burning has also at fault. The dye appears discolored or otherwise unusual.
Not a media error. This is another very frequent “problem” with discs. The simple fact is not every player or DVD-ROM will read a burned DVD media. Some players were not made to play anything other than official to-spec pressed metal discs. Non-media errors may also include players that have a weak laser or a dirty laser. A non-playing disc is not a sign of a “bad” disc, but rather just means that particular player/ROM cannot play it. Run real tests to see if the disc is truly a coaster. Also be aware that some formats are more compatible than others (with DVD-R being most compatible of them all for DVD-Video content). This is often call a reflectivity error. This is not necessarily the media’s fault.
Test #1 – Visual Test
Although it is not a scientific means of finding flaws in media, simply viewing the burned side of a disc can reveal potentially flawed media. Bad spots and thin areas of dye can easily be seen by the naked eye. Be sure to test these discs in software and view them in a player to confirm the error.
If a visual flaw is found, acquiring better media and re-burning the contents to a new disc is suggested.
Recording drives from the past few years have also introduced variable-speed writing (P-CAV,Z-CLV), which may result in slight color variations in the dye. The drives starts at a certain write speed, and the increase at certain points until it hits the maximum write speed of the disc/drive. Such variations are usually harmless to the burn quality.
 |
 |
 |
 |
| This is a typical disc, a good burn with zero visible flaws in the dye. | This disc shows signs of a bad dye spread or dye melting. In most cases, this is a guaranteed bad burn, and will be entirely unreadable near the middle of the disc. | This disc show blemishes on the dye. It was either a faulty disc or it had dirt/lint on it while being burned. These areas are normally damaged. |
This is a good burn made on a variable-write drive. Note the slight tint changes in the dye where the write speed changed. |
Test #2 – Data Reading and Content Playing
Computers read data off a disc bit by bit, and can be used as one type of test. Can all of the contents of the disc be copied, without hesitation or retry by the drive, to the hard drive of a computer?
- If so, then the disc contents are probably fine.
- If not, then either the disc is bad, or the disc is inferior (reflectivity issue), or the drive is inferior (laser issue), or the drive is bad. Be sure a good drive is being used for this test to eliminate variables, and to determine whether it is the drive or the disc causing the degraded performance.
Playing content is not a valid test! DVD players and CD players have built-in correction measures that allow them to gloss over minor errors. Most people have heard a CD “skip” in a player, or witnessed audio “pop” and the video “turn green” or “go blocky” on a DVD. While this could be caused from any number of reasons, a small bad spot on a disc is highly likely. Because error correction is often so good, the disc may very well “play fine” with no visual/audible artifacts, but still have a small flaw that would cause a computer drive to halt when reading the disc byte-for-byte.
If a player has a difficult time reading a disc, and assuming the player is fine and the laser is not dying, then the disc may not have good enough reflectivity for use in this player. This does not necessarily mean the disc is bad, but it would suggest inferior quality. For example, Ritek and Princo are discs that often have this problem. This topic is discussed in several places throughout our media guides.
Test #3 – Surface Scan Test
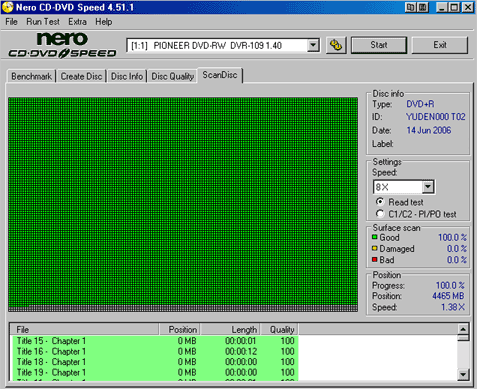
This tool requires Microsoft Windows and a good DVD-ROM or DVD burner drive. (Not just a drive you think is good, but a drive that is known to excel at reading media.) It requires a quick install of the free diagnostic utility Nero Disc Speed or DVDInfoPro.

In Nero CD-DVD Speed, enable READ TEST and then click START. Do not try to use the computer while the test is running. When it is done, red spots means the disc is bad, yellow spots means it may or may be bad at that spot (consider testing it again, maybe on another drive), and green means good.
Please note that these are read tests, and the results may depend on the quality of the reading laser/drive. This is why good drives are important, do not use cheap drive. Good DVD-ROMs include Pioneer, Sony, Samsung, LiteOn, NEC and the now-gone BTC. Not-so-good drives include Hitachi/LG and Panasonic/Matsushita (Matshita).
TEST #4 – Transfer Rate Test (TRT)
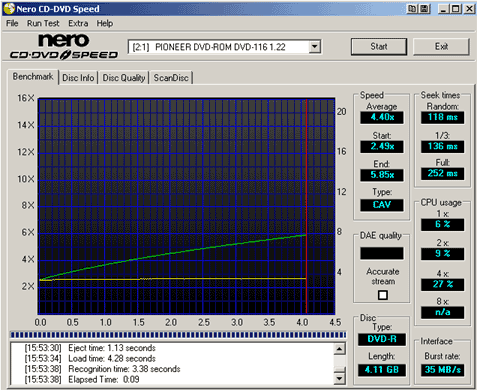
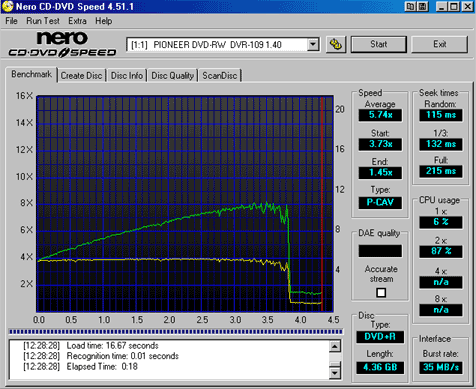
This test attempts to read a disc at maximum available drive read speed, without experiencing any halts or stutters. It appears as a graph. A perfect read test will show as two straight lines, one flat across, and the other steadily rising at an angle as speed increases. A bad or potentially problematic disc will have dips.
Much like the surface scan test, the results largely depends on the quality of the drive. Although a good drive will not mistake a bad disc for a good one, a bad drive can easily mistake all discs (including the good ones!) as bad or problematic discs. And again, do not try to use the computer while the test is being run, as it can skew results.
… sample of a good speed read:

… and a sample of a failed speed read:

Test #5 – Advanced Software Scanning Tests
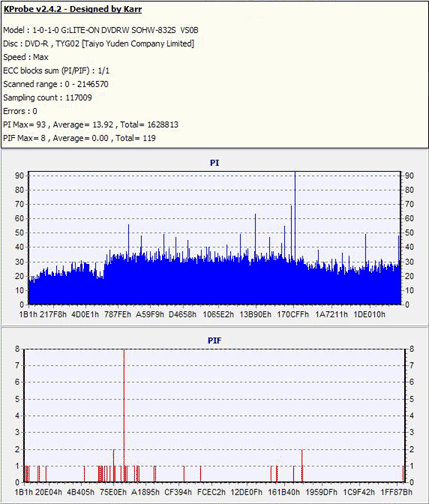
Advanced software scanning is commonly done using software like Nero Disc Speed, Kprobe, Plextools or DVDInfoPro. Most of this software was developed by drive makers for internal testing. These tools analyze the PI/PIE/PIF/PO values of a disc and output varying values and other technical jibber-jabber.
All in all, while surely of great use to drive/media engineers, they are of little value to most people, often serving as nothing more than “facts” for arguments in online user forums. Feel free to perform the tests, but realize they are highly dependent on the drive in use, the settings, and the phase of the moon. It is not uncommon for test results to vary wildly from one drive to the next, and one day to the next, for no apparent reason. Not all drives support support these tests. LiteOn, BenQ and NEC are the preferred testing drives.

To be honest, most of these advanced tests are for entertainment value only, when performed by consumers and hobbyists using home/office burner drives, rather than drive/media manufacturer engineers (or those that have special training) using industrial testing drives.