Quantcast Manual Resizing Using FitCD and Other Tools [Tutorial] - digitalFAQ.com Forums [Archives]
  #1  
12-04-2004, 03:42 AM
shgr shgr is offline
Free Member
 
Join Date: Apr 2004
Location: Lima, Peru
Posts: 30
Thanks: 0
Thanked 0 Times in 0 Posts
Guide starts in post #3
_______________________________

hello everybody
I have a question...

I use avisynth to clean up my videos; usually I resize them to lower resolutions using Tmpgenc. But, I know that is possible to resize it through avisynth... and I guess that the results should be much better.

I tried with Bicubicrezise the other day... however, I didnt know what to do with Tmpgenc... do I have to introduce the same resolution in the script as in tmpgenc?...

So, what I need to know is why is better to do it with avisynth, and how... how can I do it
Reply With Quote
Someday, 12:01 PM
admin's Avatar
Site Staff / Ad Manager
 
Join Date: Dec 2002
Posts: 42
Thanks: ∞
Thanked 42 Times in 42 Posts
  #2  
12-04-2004, 10:17 AM
rds_correia rds_correia is offline
Free Member
 
Join Date: Apr 2003
Location: Chinese Democracy starts now!
Posts: 2,563
Thanks: 1
Thanked 0 Times in 0 Posts
Hi there
Please, always do all the resizing under Avisynth as it is your best choice.
If you're not familiar with the scripting language used in avisynth, do use either Moviestacker or FitCD.
You'll find it hard to download Moviestacker because it is not being delivered by Muaddib for quite some time due to licensing issues.
So either you already have Moviestacker or your best choice is FitCD.
BTW, both are freeware.
But 1st you have to find out the amount of pixels you need to crop both on top and bottom of the video (black bands).
I use VirtualDubMod for that.
When I need to resize I use FitCD just because it has been updated recently.
But I'll post again with more details and a few pictures.
Cheers
__________________
Rui
Reply With Quote
  #3  
12-04-2004, 11:30 AM
rds_correia rds_correia is offline
Free Member
 
Join Date: Apr 2003
Location: Chinese Democracy starts now!
Posts: 2,563
Thanks: 1
Thanked 0 Times in 0 Posts
The guide is now finished.
I may have to change something in it but it will mostly be minor changes.
I could incorporate Tmpgenc's way to find the cropping lines...


Hi shgr
I'll post some screenshots to make things easier.
You will just see the thumbnails in the forum.
But click on the thumbnails to see a big screenshot on your PC.
Also pay attention to the resulting figures you get from either DVD2AVI/DGIndex/VDubMod.
The final result has to be MOD16, that is, dividible by 16 with an integer result.
Example1:
PAL Movie: 720x576
Top figure: 72 Bottom figure: 72
576-72-72=432/16=27 good, you may proceed with these values .
Example2:
PAL Movie: 720x576
Top figure: 74 Bottom figure: 74
576-74-74=428/16=26.75 Not an integer!!
You will have to repeat the process and find new figures.
Unfortunately that can mean that you actually will have to crop not only the black bands but also a few pixels inside your movie area

Using DVD2AVI or DGIndex to discover how many pixels to crop from the original video stream for top and bottom black bars.
For DVD sources, it's easier to use DVD2AVI.
Notice that, these steps should be done after you have already created a D2V project and have it saved in a *.d2v file along with an AC3 file!
This will not create the project file.
This is a simple procedure to get the amount of pixel lines you need to crop with in the Avisynth script file.

1-Open DVD2AVI or DGIndex.
2-Open the "File" menu and click "Open".


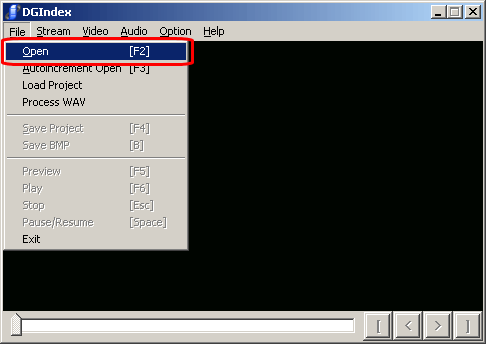
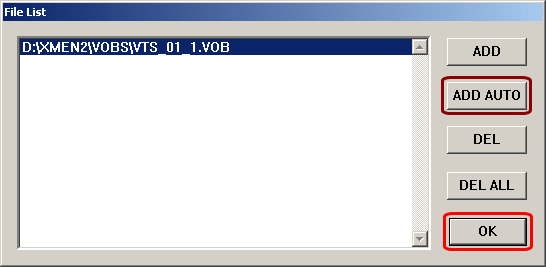
3-In the new "File list" window, choose the movie's 1st VOB file and click on the "Open" button.
4-In the new window check to see if you want to "Add" more VOB files from the same movie. If not just click the "OK" button.
Since this won't be used to create the project file, you may not need all the VOB files loaded.
Sometimes you can find an appropriate frame (bright) to use in this process.
Or you may have ripped your DVD in a single VOB file, as I do nowadays since I use NTFS...


5-Now that DVD2AVI has already a preview of your movie, use the slider in the bottom of the tool to find a top and bottom bright frame.
A bright frame will help you because it will provide the correct contrast with the black bands.
That makes it easier to see where the black band ends and the movie starts
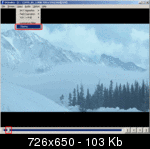
6-Use the "Video" menu and click in "Clipping" option.

(Click the thumbnail for a large image in a new window)

7-In the small "Clipping" window, click the blank check box and use the top slider until there is no top black band.
Now do the same with the bottom slider.
Use the left and right sliders only in rare occasions.
For instance if your movie has left and right black bands too.
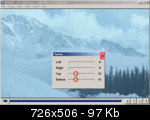
8-Take good note of the figures you find for all the edges of the movie.
In my case I just got 72 for both top and bottom.

(Click the thumbnail for a large image in a new window)

9-Close the small "Clipping" window.
Since in a DVD the picture is expected to be stable, there should be no need to browse the movie back and forwards to see if the clipped result is ok.
Do so if you want to be 100% sure, using the tool's bottom slider.
After that close DVD2AVI/DGIndex.
There's no need to save anything on exit, because you have already done so previously.


Using VirtualDubMod to discover how many pixels to crop from the original video stream for top and bottom black bars.
This is the only way I know to remove black bands from TV captured movies contained in a HuffYUV avi file.
But it can also be used with DVD sources

1-Open VDubMod.
2-Open the "File" menu and choose "Open video file...".


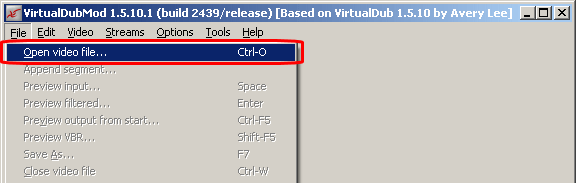
3-In the new child window, choose the movie's 1st VOB file and click on the "Open" button.
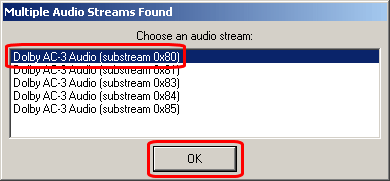
4-Now you need to choose which audio stream you will want VDub to open.
Right now, this is not important, so choose the 1st one and click the "OK" button.


5-Watch the movie being imported to VDub.
BTW, if you feel bored you can stop this process at any time by pressing the "Abort" button and VDub won't lose the amount of video it has already imported .


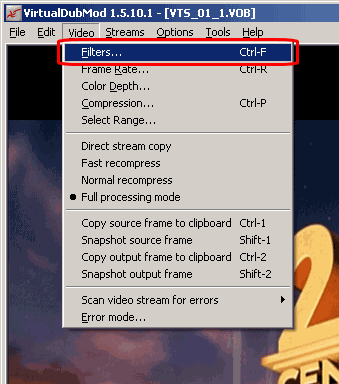
6-Now open the "Video" menu and choose "Filters..." option.


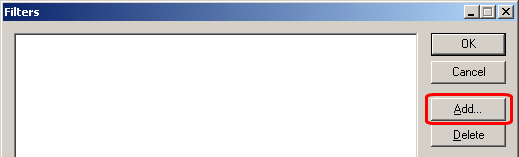
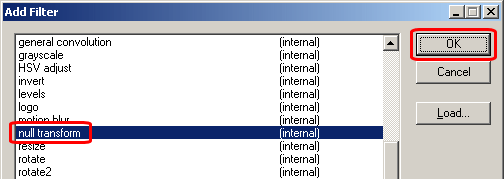
7-In the "Filters" window, press the "Add..." button.


8-In the new "Add Filter" child window scroll down until you find the "null transform" filter. Click on it and press the "OK" button.


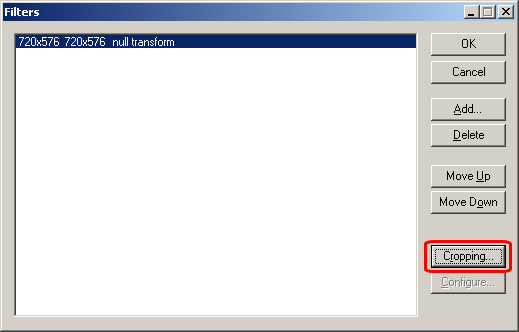
9-You're back to the "Filters" window.
Now hit the "Cropping..." button.


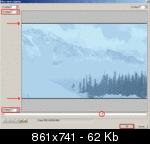
10-A new "Filter input cropping" window appears with a movie preview.
Use the slider on the bottom of the window to find a top/bottom bright frame.
As in DVD2AVI, a bright frame will help you because it will provide the correct contrast with the black bands.
11-Now use the ▲ and ▼ buttons on the Y1 and Y2 offset to get rid of the black bands just as I do.
See the black bands turning grey .
12-Now write down the figures and click the "OK button".

(Click the thumbnail for a large image in a new window)

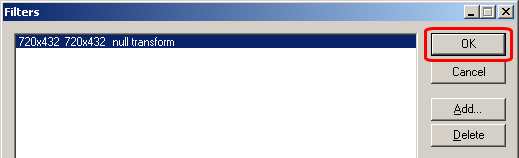
13-Once again, you're back to the "Filters" window.
Just click the "OK" button.


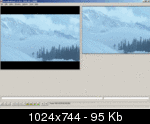
14-You're back to VDub's main window.
If you're using an SVGA resolution of at least 1024x576 on your screen, it will look like mine.
On the left pane you see the original movie.
On the right pane you see the cropped movie.
Check to see that everything is OK and that you're only cropping the black bands and not the movie area.
Move the bottom slider back and forth just to make sure that in other areas of the movie you're still fine.

(Click the thumbnail for a large image in a new window)

The reason I say this is because in a TV capture, sometimes the pictures changes a little bit.
At least that happens to me, maybe due to bad Cable TV reception or bad TV cap board
Satisfied? Close VDub and don't save anything on exit.

Using FitCD to help building the resize portion of your Avisynth script


I have cut down screenshots only showing the options that we'll need to pay attention to,
Things marked red are the ones you surely need to change everytime you load a new movie into FitCD.
Things marked blue are mostly to setup only the 1st time you run FitCD.
They keep their values further on.
Things marked green should be found by FitCD when it analyses the source.
Things marked brown are changed sometimes but not very often.

1-Open FitCD.

2-Notice the screenshot below with the source options.


2a-Click on the "Source:" button in the top/leftmost part of the window.
2b-Open the already made (with DVD2AVI) D2V project file, or an HuffYUV Captured AVI,
and click the "Open" button.
You're back to the main FitCD window.
2c-Use the figures you found for the black bands with DVD2AVI/DGIndex/VDubMod
on the small text boxes in the 16:9 movie screen.
2d-From the Crop: combo box, choose accurate.
2e-Use the round to sliders and set them both to 2 (progressive source) or 4 (interlaced source).
2f-PAL checkbox. If your source is not PAL, this option shouldn't appear checked.
2g-Anamorphic checkbox. If your source is DVD it should >90% appear checked.
For non-Anamorphic sources (such as a home made video HuffYUV AVI file) this option shouldn't appear checked.
2h-ITU-R BT.601-4 checkbox. Although some can disagree, this option should always appear checked. If not check it yourself.

3-Now notice the screenshot below with the target options.


3a-From the Destination: combo box, choose ¾ DVD 528 if your target is KVCD 528x480/576.
3b-Set the amount of Blocks overscan using the ▲ and ▼ buttons right next to it.
That depends very much and it's the right&left area of movie that your TV set can't display.
3c-Set the optimization slider to 16.
3d-PAL checkbox. If your source is PAL and you're not going to change the output frame-rate to 23.976, leave the box checked.
3e-Anamorphic checkbox. If you're going to encode to K(S)VCD, leave the box unchecked.
For KDVD, you might want to check this box, though.
3f-Interlaced checkbox. Check this box, only if your source is interlaced and if you're keeping it interlaced.

4-Notice the screenshot below with the Avisynth script options.


4a-Set the Resizer engine combo box to Bicubic precise.
4b-Set the alignment slider to macroblock aligned.
4c-Hit the "Save script" button, choose an appropriate folder/filename and hit the "Save" button if you want to save a copy of the generated script.
4d-As an alternative to the "Save" option you can copy the resizing options you just found with FitCD and copy them to a script you had already made.
Notice the screenshot below with the generated Avisynth script.


Now use the mouse and select the text inside that box.
Copy the text to your favorite script.

One more thing.
Sometimes, mostly with TV captures, the right&left figures can be different and the same can happen with the top&bottom ones.

As always, you're all welcome to point me to mistakes or missed options so that this post can be improoved and help others in the future reference .
Cheers

The guide is now finished.
I may have to change something in it but it will mostly be minor changes.
I could incorporate Tmpgenc's way to find the cropping lines...
__________________
Rui
Reply With Quote
  #4  
12-04-2004, 02:11 PM
Dialhot Dialhot is offline
Free Member
 
Join Date: May 2003
Posts: 10,463
Thanks: 0
Thanked 0 Times in 0 Posts
rds, do these snapshot have a long lifetime ? or did you post them somewhere where they will disapear soon ?
I want to put your post as sticky post for tutorial.
Reply With Quote
  #5  
12-04-2004, 03:35 PM
rds_correia rds_correia is offline
Free Member
 
Join Date: Apr 2003
Location: Chinese Democracy starts now!
Posts: 2,563
Thanks: 1
Thanked 0 Times in 0 Posts
Those were posted at Imageshack.
And they are supposed to almost be permanent.
Unless they are not displayed for a looooong period of time
Nowadays I only use Imageshack to post pics because it's free and it's fast.
It supports many types of image content but only allows 1Mbyte of upload per picture
Don't you want to contribute with ideas to put in the reference?
Cheers
__________________
Rui
Reply With Quote
  #6  
12-04-2004, 10:23 PM
incredible incredible is offline
Free Member
 
Join Date: May 2003
Location: Germany
Posts: 3,189
Thanks: 0
Thanked 0 Times in 0 Posts
Send a message via ICQ to incredible
Why do you crop in fitCD at "round to 8" ? This causes too much valuable imageloss.

Progressive Sources: Crop by 2
Interlaced Sources: Crop by 4

Reply With Quote
  #7  
12-05-2004, 03:24 AM
Boulder Boulder is offline
Free Member
 
Join Date: Sep 2002
Location: Lahti, Finland
Posts: 1,652
Thanks: 0
Thanked 0 Times in 0 Posts
You should also consider the fact that the border sizes are usually not even, that is, for example the top and bottom (or left and right) borders are not the same size. This is especially true with TV captures.

I would suggest first determining the borders on each side, inputting the values in FitCD and using the Crop(left,top,-right,-bottom) command in the AVS script and not letting FitCD do any cropping on its own. If the A/R error is too big (over +-2%), cropping can be adjusted slightly until the error is in the safe range. This way there would be as much film pixels available as possible. The problem with the script FitCD gives is that it uses the crop method which removes the same amount from opposite sides of the image.

In any case, very good job! It's good to have these kinds of stickies as it's easy to point people here instead of explaining everything to everybody.
Reply With Quote
  #8  
12-05-2004, 08:52 AM
rds_correia rds_correia is offline
Free Member
 
Join Date: Apr 2003
Location: Chinese Democracy starts now!
Posts: 2,563
Thanks: 1
Thanked 0 Times in 0 Posts
Quote:
Originally Posted by incredible
Why do you crop in fitCD at "round to 8" ? This causes too much valuable imageloss.
Progressive Sources: Crop by 2
Interlaced Sources: Crop by 4
Thanks Andrej
I just use 8 because that's what I understood from one of your own posts when you were refering to Moviestacker.
Look here.
Maybe I got it all wrong
I'll do my best to rectify this ASAP
Cheers
__________________
Rui
Reply With Quote
  #9  
12-05-2004, 09:06 AM
rds_correia rds_correia is offline
Free Member
 
Join Date: Apr 2003
Location: Chinese Democracy starts now!
Posts: 2,563
Thanks: 1
Thanked 0 Times in 0 Posts
Quote:
Originally Posted by Boulder
You should also consider the fact that the border sizes are usually not even, that is, for example the top and bottom (or left and right) borders are not the same size. This is especially true with TV captures.
Yes, I've seen it in my analogue cable TV captures
And sometimes during a movie, the top/bottom (black bands) change their size too. Most dramatic to produce a good encode
But I thought it could have something to do with my own capture card.
Quote:
I would suggest first determining the borders on each side, inputting the values in FitCD and using the Crop(left,top,-right,-bottom) command in the AVS script and not letting FitCD do any cropping on its own.If the A/R error is too big (over +-2%), cropping can be adjusted slightly until the error is in the safe range. This way there would be as much film pixels available as possible.
This you will have to explain me in detail because I'm not sure I'm getting it right.
You say that I shouldn't use the cropping values in FitCD?
That I should do it in a small avs script?
Then what's the purpose of FitCD, then ?
Did I get this right?
Quote:
The problem with the script FitCD gives is that it uses the crop method which removes the same amount from opposite sides of the image.
Are you sure about this?
You can choose the right,left,top,bottom figures in FitCD.
What are those for?
Quote:
In any case, very good job! It's good to have these kinds of stickies as it's easy to point people here instead of explaining everything to everybody.
That's what I had in mind when I started it
But, as always, I will need your help not put the noobs in the wrong ways
Cheers
__________________
Rui
Reply With Quote
  #10  
12-05-2004, 09:57 AM
Boulder Boulder is offline
Free Member
 
Join Date: Sep 2002
Location: Lahti, Finland
Posts: 1,652
Thanks: 0
Thanked 0 Times in 0 Posts
When you input the numbers in FitCD, it will give you the correct resizing and AddBorders statements. It just doesn't do the cropping in the script properly. Which means, you should use your own cropping and take the resizing and AddBorders from FitCD. You'll also have to choose 'No cropping' in FitCD so it won't do any cropping on its own.

Let's suppose we have a 720x576 progressive capture clip. The borders around the film pixels are 6 for left, 2 for top, 12 for right and 4 for bottom. When the values are input in FitCD, the resizing+borders with two overscan blocks would be LanczosResize(672,544) and AddBorders(16,16,16,16).

So the simplest script would be:
Code:
MPEG2Source("path\clip.d2v")
Crop(6,2,-12,-4)
LanczosResize(672,544)
AddBorders(16,16,16,16)
The A/R error in this case would be -0.3% according to FitCD.

If the A/R error is more than -2% (for example -3%), crop less horizontally. Start by removing 2 pixels from the parameters that crop either the left or right side of the image.

If the A/R error is over 2% (for example, 2.7%), crop less vertically.

If the source is interlaced and you use a bob (as you should if you denoise or resize interlaced material), cropping should be done right after the bobber (be it smart or stupid). Thus, no need to crop mod-4 pixels off as the video is progressive after the bobber.
Reply With Quote
  #11  
12-05-2004, 10:33 AM
rds_correia rds_correia is offline
Free Member
 
Join Date: Apr 2003
Location: Chinese Democracy starts now!
Posts: 2,563
Thanks: 1
Thanked 0 Times in 0 Posts
Quote:
Originally Posted by Boulder
When you input the numbers in FitCD, it will give you the correct resizing and AddBorders statements. It just doesn't do the cropping in the script properly.
I see.
Now, why is that? Because it's using crop+resize at the same time?
Technically speaking is there a way it could be improoved?
Does Moviestacker has the same problem? Looks to me it has...
This way we could advise Muaddib so that he can take care of that when he finally has the "new"
Moviestacker ready to be launched.
That is, with no licensing issues
Quote:
Which means, you should use your own cropping and take the resizing and AddBorders from FitCD. You'll also have to choose 'No cropping' in FitCD so it won't do any cropping on its own.
Got it.
Quote:
Let's suppose we have a 720x576 progressive capture clip. The borders around the film pixels are 6 for left, 2 for top, 12 for right and 4 for bottom. When the values are input in FitCD, the resizing+borders with two overscan blocks would be LanczosResize(672,544) and AddBorders(16,16,16,16).

So the simplest script would be:
Code:
MPEG2Source("path\clip.d2v")
Crop(6,2,-12,-4)
LanczosResize(672,544)
AddBorders(16,16,16,16)
So far I got it.
Just a question: you only use this method with TV capts or also with DVD sources?
Quote:
The A/R error in this case would be -0.3% according to FitCD.
I'm not getting -0.3% in mine with your settings
EDIT: forget it, I was definitly doing something wrong. I have -0.3% now.
Quote:
If the A/R error is more than -2% (for example -3%), crop less horizontally. Start by removing 2 pixels from the parameters that crop either the left or right side of the image.
If the A/R error is over 2% (for example, 2.7%), crop less vertically.
Do I understand this correctly?
You mean that we should crop less, meaning showing the black bands and the noise that usually is very close to it?
Quote:
If the source is interlaced and you use a bob (as you should if you denoise or resize interlaced material), cropping should be done right after the bobber (be it smart or stupid). Thus, no need to crop mod-4 pixels off as the video is progressive after the bobber.
Now you got me
I'm definitly a noob when it gets to interlaced sources, and seems that I cannot understand it no matter how many guides I read
But I take it that if I copy paste your words to the guide, others will understand.
Many thanks for the input
__________________
Rui
Reply With Quote
  #12  
12-05-2004, 10:49 AM
Boulder Boulder is offline
Free Member
 
Join Date: Sep 2002
Location: Lahti, Finland
Posts: 1,652
Thanks: 0
Thanked 0 Times in 0 Posts
Quote:
Originally Posted by rds_correia
Quote:
Originally Posted by Boulder
When you input the numbers in FitCD, it will give you the correct resizing and AddBorders statements. It just doesn't do the cropping in the script properly.
I see.
Now, why is that? Because it's using crop+resize at the same time?
Exactly. FitCD understands the separate crop parameters for all 4 sides of the image but it doesn't place them correctly in the script.

Quote:
Technically speaking is there a way it could be improoved?
Easily, by doing the cropping and resizing on their own. Now it's using the "internal" cropping method in the resizers.

Quote:
Just a question: you only use this method with TV capts or also with DVD sources?
I use it for all my encodes.

Quote:
Quote:
The A/R error in this case would be -0.3% according to FitCD.
I'm not getting -0.3% in mine with your settings
I have PAL and ITU-R BT.601-4 ticked on the left and PAL on the right. 2 blocks overscan and destination 704x576. Rounding to 16 (macroblock optimized).

Quote:
Quote:
If the A/R error is more than -2% (for example -3%), crop less horizontally. Start by removing 2 pixels from the parameters that crop either the left or right side of the image.
If the A/R error is over 2% (for example, 2.7%), crop less vertically.
Do I understand this correctly?
You mean that we should crop less, meaning showing the black bands and the noise that usually is very close to it?
Yes. In my opinion it's better to leave some black borders instead of cropping the film pixels. The extra few pixels shouldn't show up on the TV. I've seen some retail DVDs that have had more than 20 pixels of overscan. I haven't done any tests compressibility-wise but I suspect the negative effect is minimal.

Quote:
Quote:
If the source is interlaced and you use a bob (as you should if you denoise or resize interlaced material), cropping should be done right after the bobber (be it smart or stupid). Thus, no need to crop mod-4 pixels off as the video is progressive after the bobber.
Now you got me
I'm definitly a noob when it gets to interlaced sources, and seems that I cannot understand it no matter how many guides I read
But I take it that if I copy paste your words to the guide, others will understand.
Many thanks for the input
It's simple. You have an interlaced source, you use Bob() and after that it will be progressive so you can crop in mod-2 instead of mod-4
Reply With Quote
  #13  
12-05-2004, 11:21 AM
rds_correia rds_correia is offline
Free Member
 
Join Date: Apr 2003
Location: Chinese Democracy starts now!
Posts: 2,563
Thanks: 1
Thanked 0 Times in 0 Posts
Quote:
Originally Posted by Boulder
1-Exactly. FitCD understands the separate crop parameters for all 4 sides of the image but it doesn't place them correctly in the script.
2-Easily, by doing the cropping and resizing on their own. Now it's using the "internal" cropping method in the resizers.
3-I use it for all my encodes.
4-I have PAL and ITU-R BT.601-4 ticked on the left and PAL on the right. 2 blocks overscan and destination 704x576. Rounding to 16 (macroblock optimized).
5-Yes. In my opinion it's better to leave some black borders instead of cropping the film pixels. The extra few pixels shouldn't show up on the TV. I've seen some retail DVDs that have had more than 20 pixels of overscan. I haven't done any tests compressibility-wise but I suspect the negative effect is minimal.
6-It's simple. You have an interlaced source, you use Bob() and after that it will be progressive so you can crop in mod-2 instead of mod-4
1-Got it .
2-As said, I got it, but I'm a bit puzzled.
FitCD/Moviestacker both use the crop&resize commands joined.
Does it mean it's a bug in Avisynth?
Should we advise Sh0dan about it?
3-And that only means you don't like to rely on crop&resize joined, right?
4-Sorry about that. Eventually I got the same AR error you got.
I edited my post but you were probably already answering me
5-I like to keep all the movie details that I can, but with TV caps, I get a lot of noise around the edges of the black bands.
That's why I was surprised.
Probably due to a cheap low-end Cap card
6-I see. That's only to be able to crop in MOD2, against MOD4, right?
But that won't treat my source enough to get rid of the interlacing will it?
Otherwise, why do we have so many state-of-the-art scripts to treat so many different kinds of interlacings?
__________________
Rui
Reply With Quote
  #14  
12-05-2004, 11:49 AM
Boulder Boulder is offline
Free Member
 
Join Date: Sep 2002
Location: Lahti, Finland
Posts: 1,652
Thanks: 0
Thanked 0 Times in 0 Posts
2. It's not a bug. Originally Crop() didn't have the option to crop each side individually, it wasn't even mentioned in the docs. Since internal cropping has been there since the beginning of Avisynth IIRC, it has remained untouched. It's always recommended to crop and resize separately anyway.

3. True.

4. Yep

5. You can crop some film pixels, of course. Depending on how the A/R error behaves, you might get away with cropping 2 or 4 extra pixels off either vertically or horizontally.

6. If you resize or alter the interlaced material in any way, you should bob, then do the processing and finally reinterlace.

There's nothing wrong with material being interlaced, it's not a fault in the video or anything like that. It's a problem only when you use MPEG-1 (because it doesn't support interlaced encodes) or when the original material is actually progressive and the interlacing is a result of a poor NTSC->PAL conversion or vice versa. Thus, bobbing and reinterlacing doesn't get rid of interlacing, they just allow you to treat the material properly, without destroying the correct field information.
Reply With Quote
  #15  
12-05-2004, 04:21 PM
Boulder Boulder is offline
Free Member
 
Join Date: Sep 2002
Location: Lahti, Finland
Posts: 1,652
Thanks: 0
Thanked 0 Times in 0 Posts
Just a small correction: in the Notepad screenshot, the Crop line should be Crop(0,74,-0,-74)
Reply With Quote
  #16  
12-05-2004, 06:41 PM
rds_correia rds_correia is offline
Free Member
 
Join Date: Apr 2003
Location: Chinese Democracy starts now!
Posts: 2,563
Thanks: 1
Thanked 0 Times in 0 Posts
Quote:
Originally Posted by Boulder
Just a small correction: in the Notepad screenshot, the Crop line should be Crop(0,74,-0,-74)
Indeed
I'll fix it right away.
Thanks
Cheers
__________________
Rui
Reply With Quote
  #17  
12-05-2004, 08:03 PM
rds_correia rds_correia is offline
Free Member
 
Join Date: Apr 2003
Location: Chinese Democracy starts now!
Posts: 2,563
Thanks: 1
Thanked 0 Times in 0 Posts
OK
I've done all the needed changes.
I appreciate the hints you guys gave me so far.
I would appreciate that you would continue to contribute if you consider needed
All lightweight pics are now being displayed directly in the page.
Only the heavy ones are still showing the thumbnail.
And, of course, you can still click the thumbnails to see the pics in 100% size.
Hope you enjoy it.
I'll try to be back with other ideas to other tutors, at least the simple ones
Cheers
__________________
Rui
Reply With Quote
  #18  
12-05-2004, 08:24 PM
jeo jeo is offline
Invalid Email / Banned / Spammer
 
Join Date: Nov 2002
Posts: 105
Thanks: 0
Thanked 0 Times in 0 Posts
thank you very much Rui Correia, very cool guide!


if you excuse i have one hint.
use this links to see the thumbnails in full size:

http://img63.exs.cx/img63/8233/a6-dvd2avi3.png

http://img63.exs.cx/img63/1481/8e-dvd2avi4.png

http://img4.exs.cx/img4/5347/f0-vdub8.png

http://img115.exs.cx/img115/5672/95-vdub10.png
Reply With Quote
  #19  
12-06-2004, 12:08 AM
kwag kwag is offline
Free Member
 
Join Date: Apr 2002
Location: Puerto Rico, USA
Posts: 13,537
Thanks: 0
Thanked 0 Times in 0 Posts
Just another suggestion. I have found that to find the correct film pixel area, it's easier to use TMPEG than to use the null transform filter of Vdub.
Just open the .d2v file with TMPEG and double click on clip frame on the advanced tab.
Then clip all black areas, and read the values. Then feed the values to MovieStacker or FitCD.

-kwag
Reply With Quote
  #20  
12-06-2004, 04:51 AM
rds_correia rds_correia is offline
Free Member
 
Join Date: Apr 2003
Location: Chinese Democracy starts now!
Posts: 2,563
Thanks: 1
Thanked 0 Times in 0 Posts
Quote:
Originally Posted by jeo
thank you very much Rui Correia, very cool guide!

if you excuse i have one hint.
use this links to see the thumbnails in full size:
http://img63.exs.cx/img63/8233/a6-dvd2avi3.png
http://img63.exs.cx/img63/1481/8e-dvd2avi4.png
http://img4.exs.cx/img4/5347/f0-vdub8.png
http://img115.exs.cx/img115/5672/95-vdub10.png
Hi jeo ,
Yes, I agree with you that it is better to just leave a link so that the page downloads faster.
I didn't notice it at home during the weekend because I had the pics in my browsers cache.
But now that I'm at the office I could see that it takes quite a bit of time to show.
It makes the forum run slower and it raises Karl's ISP account transfers.
I will correct this as soon as I get home.
Many thanks for your opinion .
Cheers
__________________
Rui
Reply With Quote
Reply


Similar Threads
Thread Thread Starter Forum Replies Last Post
Webpage Tools black prince Computers 0 04-07-2006 07:46 AM
Ebay Sellers Tools black prince Computers 0 12-22-2004 07:56 AM
Expert HD from pixel tools TKS Video Encoding and Conversion 3 10-23-2004 11:02 PM
Resizing: Cálculo Manual de Bitrates pulsar informaticks Convertir y Codificar Video (Español) 3 12-18-2003 04:14 AM
Audio tools matto Video Konvertierung und Encodieren (Deutsch) 2 10-25-2003 08:01 AM

Thread Tools


All times are GMT -5. The time now is 02:28 PM  —  vBulletin © Jelsoft Enterprises Ltd