|
07-15-2004, 03:28 PM
|
|
Premium Member
|
|
Join Date: Jul 2004
Location: United States
Posts: 12
Thanked 0 Times in 0 Posts
|
|
|
Hello,
I've taken the time to read through the site and I'm in. I would like to say hello to everyone on the site. I'm a beginner Video Editor and am looking forward to using this site.
Thank you.
-Ron
|
|
Someday, 12:01 PM
|
|
Ads / Sponsors
|
|
Join Date: ∞
Posts: 42
Thanks: ∞
Thanked 42 Times in 42 Posts
|
|
|
|
|
07-15-2004, 04:06 PM
|
|
Site Staff | Web Development
|
|
Join Date: Jul 2003
Posts: 4,310
Thanked 654 Times in 457 Posts
|
|
Quote:
Summary of My Goals and What I Want to Accomplish from my Consultation with You
Objective
My objective during the sessions that I have with you is to ultimately transfer my video from my Sony MiniDV camcorder to DVD through the technology of my Computer.
My Current System
Dell P4 2.8 GHz processor, 1 GB RAM, DVD + and RW, + and R, IEEE 1394 Firewire card, DVD Rom, Broadband internet, 40 GB Hard drive & 400MHz bus.
I purchased the ATI Radeon 9200 128MB AGP 8x/4x/2x Graphics Card. I should receive this card by early next week. If there is a distinct difference between the quality outcomes of having the ATI Radeon 9200 128 MB vs. the ATI Radeon 9800 256MB, please let me know. As I said before, I would like the best quality video transferred to my DVD. Also, was it best that this card is for an AGP slot as opposed to a PCI slot?
Dumb question Does having an ATI Radeon card make a difference for transferring video applications?
Applications on My PC
1.Windows Movie Maker
2.Pixela Imagemixer
3.DVDit PE
4.Adobe Premier 6.0
5.Roxio Easy CD and DVD Creator 6.0
Just fyi
I can get more or any one that you suggest.
Some of the Things that I would like to Understand and Do for the Videos I Create
1.How to transfer video the quickest way possible without losing quality?
2.Applying credits and music to my videos?
3.Special effects between important scenes?
4.Cutting and editing different scenes with each other and having them on DVD?
5.Adding light to the video scenes?
6.Differences between AVI & MPEG 1 & 2
7.Is shrinking files to fit on one DVD a good or bad idea?
8.What type of DVD players that can read these videos?
9.Converting files a good or bad idea?
|
This is the Word document you sent to me.
I'll get started on answering it over the weekend.
- Did this site help you? Then upgrade to Premium Member and show your support!
- Also: Like Us on Facebook for special DVD/Blu-ray news and deals!
|
|
07-25-2004, 07:39 AM
|
|
Premium Member
|
|
Join Date: Jul 2004
Location: United States
Posts: 12
Thanked 0 Times in 0 Posts
|
|
|
Hi Lordsmurf...any movement on this?
|
|
07-31-2004, 03:36 PM
|
|
Site Staff | Web Development
|
|
Join Date: Jul 2003
Posts: 4,310
Thanked 654 Times in 457 Posts
|
|
Okay, since my server upgrades about 1-2 weeks ago obviously botched up this page, looks like I get to start over. Sigh... Here goes.... I'll be doing this in several posts, and I'll let you know when I'm done again.
HARDWARE
First off, your hardware looks good. (Dell P4 2.8 GHz processor, 1 GB RAM, DVD +/ RW, IEEE 1394 Firewire card, DVD Rom, Broadband internet, 40 GB Hard drive & 400MHz bus.) You should be set, you've got a nice little setup.
You may want to consider adding a second hard drive, about 80GB or more (however much you want to spend is fine). It will make your life a lot easier, as this video stuff uses up lots of room. I mean it'll swallow space in 10GB chunks! Video is a large file type, probably the largest that exists. Video will be difficult enough without having to constantly worry about space. I have 600GB on my main system because I don't want to worry about petty things like space, I want to concentrate my efforts on my work.
I think I already covered this in an e-mail to you, but the ATI card in use for your is just your PC graphics card. It really has no bearing on video. You are NOT using it for video capturing, just the PC display. Either card should be fine. In fact, older ATI Radeon cards are fine too. All those new video cards are mostly meant for video games anyway, not reason for "commoners" like us to buy it unless we start to play video games on the PC. Not a dumb question at all.
OVERVIEW
To me, editing video is all about workflow. Do it fast, do it properly, and do it in a certain order. Allow yourself enough time when you sit down to work, because it's difficult to stop video work in the middle of a step. For me, it's mostly because I can forget what step I did last, and it's easier to mess up video than it is to do it correctly.
What we want to do here is:
1. transfer your DV from the camera to the PC
2. then import clips into Premiere for editing
3. then add effects, titles, transitions, splice footage, etc, as you want ... external software like Adobe After Effects and Adobe Photoshop may be needed here, used in conjunction with Premiere
4. after you see a video timeline is the way you want it, then you export to MPEG
5. once MPEG encoding is done, time to import assets into authoring software
6. again, probably good to use Photosop to make menu images, buttons, etc
7. make menus and author DVD
8. burn DVD
This may sound easier than it is. Then again, it may sound harder than it really is.
SOFTWARE REQUIREMENTS
== 1. CAPTURING: I think you already have AVI_IO, DVIO, Scenalyzer, correct? You should have those freeware ones installed, we'll see if they work for your computer before spending money on the payware ones.
== 2. EDITING: You already have Premiere. This is the step where I can give the least amount of help, but I will be referring you to key sites and people for specific editing information. You may find yourself wanting Adobe After Effects for more advanced editing, a software that is used in conjunction with Premiere.
== 3. IMAGES: You'll likely find having PHOTOSHOP will make your life easier when trying to create custom artwork for use in videos and DVD menus/buttons. It will also be nice if you want to make custom DVD cases/artwork for your new movies.
== 4. MPEG ENCODING: DVD Video uses MPEG video format. Your DV is AVI format, as AVI is an editing format, you'll edit it AVI in Premiere. When you are done editing, you'll encode to MPEG (final destination format). You should have Canopus Procoder Express now, something we talked about from e-mail earlier on. It's a nifty $60 high quality program.
== 5. DVD AUTHORING: You've already got DVDit! PE, so you are set! This is excellent authoring software, should take care of most needs for most people most of the time!
Be sure you have all these things installed before we proceed. If anything does not work, it may require a few freeware/codec downloads.
== ADVANCED: If you ever want to get involved with restoring your audio and video quality, TMPGENC PLUS, BESWEET and SOUNDFORGE will be useful. This is more of a note than anything else, outside of the scope of this lesson, but something I felt important to briefly mention.
......... end for now. Will come back within 36 hours for more.
If you have any questions, let me know. Next lesson will cover capturing and then information on editing. I'll give brief info on Premiere, my notes, and then point you towards some advanced information guides to follow.
- Did this site help you? Then upgrade to Premium Member and show your support!
- Also: Like Us on Facebook for special DVD/Blu-ray news and deals!
|
|
08-03-2004, 02:13 AM
|
|
Premium Member
|
|
Join Date: Jul 2004
Location: United States
Posts: 12
Thanked 0 Times in 0 Posts
|
|
Hi Lordsmurf,
This is a great start...I am ready to move further now.
Waiting for further instructions.

Thank you.
Ron
|
|
08-05-2004, 06:30 AM
|
|
Premium Member
|
|
Join Date: Jul 2004
Location: United States
Posts: 12
Thanked 0 Times in 0 Posts
|
|
|
Hello,
Hoping to get a good amount of feedback. Would like to really get this down this weekend. I have alot of time to spare.
Thanks.
-Ron
|
|
08-05-2004, 07:31 AM
|
|
Site Staff | Web Development
|
|
Join Date: Jul 2003
Posts: 4,310
Thanked 654 Times in 457 Posts
|
|
You should have it by then. 
- Did this site help you? Then upgrade to Premium Member and show your support!
- Also: Like Us on Facebook for special DVD/Blu-ray news and deals!
|
|
08-06-2004, 12:32 AM
|
|
Site Staff | Web Development
|
|
Join Date: Jul 2003
Posts: 4,310
Thanked 654 Times in 457 Posts
|
|
CAPTURING
There are a lot of different guides for DV transfer online, but most of them are pretty basic. DV transfer software is fairly straight-forward, and should work rather well. Not all IEEE1394 card will work perfectly with DV transfer, so be aware you may need a good card. The only one that I know of that has problems is the one based of Texas Instruments chipsets.
Since WINDV has a simple interface and is free software, we'll try to use that first.
Download WINDV and then install it (download here http://windv.mourek.cz/. Start the program.
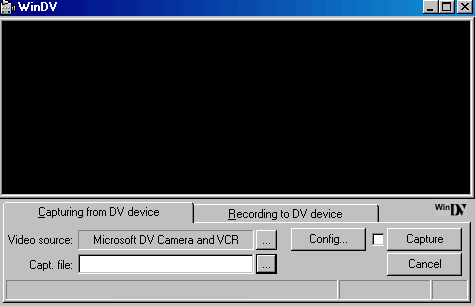
Click the CAPT FILE [...] to name your capture file and save location.
Then click on CONFIG... to configure the DV transfer properties.
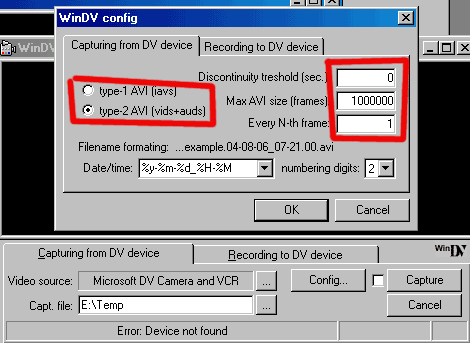
The max AVI size the file size. Are you on NTFS file system? NTFS is the file system used by NT-based Windows systems (Windows NT, 2000 and XP have it). NTFS allows files larger than 4GB on a PC.
Go to MY COMPUTER and then right-click it to bring upt he little menu, then go down to PROPERTIES. It'll show this window:
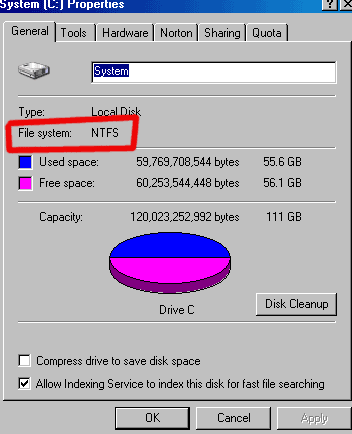
If you are on FAT32, you may have trouble capturing DV files, as DV is large, and 4GB or smaller will not be good enough. At very least, it will makes things difficult. A second hard drive formatted as NTFS, again, is optimal here.
Back to the WINDV..
You want TYPE II DV for audio and video both.
Click OK and go back to the main WINDV window.
Click on the VIDEO SOURCE [...] and pick your camera. It should appear on the list, if it is plugged into the PC, if the IEEE1394 firewire card works good, and Windows cooperates with all the correct drivers.
Hopefully you won't have install troubles. That's always the hard part if something doesn't work correctly.
Anyway, click the big CAPTURE button, and you should be able to transfer DV to the PC. There should not be any sync troubles on a good transfer. There should not be any dropped frames either if the system and card keep a good sustained data transfer rate (again, good reason for 2nd hard drive, as no OS temp/cache to cause problems).
End of capturing section..
- Did this site help you? Then upgrade to Premium Member and show your support!
- Also: Like Us on Facebook for special DVD/Blu-ray news and deals!
|
|
08-06-2004, 12:48 AM
|
|
Site Staff | Web Development
|
|
Join Date: Jul 2003
Posts: 4,310
Thanked 654 Times in 457 Posts
|
|
EDITING IN PREMIERE:
=== INTRO
Premiere is nice program. It's only as limited as the user, for the most part. I've been using it for 3-4 years now, and I'm always learning something new.
=== ADVANCED EDITING MENTIONED
Two sites good for advanced Premiere tutorials is
1. the Adobe site:
http://www.adobe.com/products/tips/premiere.html
2. Wrigley Video:
6.5: http://www.wrigleyvideo.com/videotut...premiere65.htm
6.0: http://www.wrigleyvideo.com/videotut...premiere60.htm
PRO: http://www.wrigleyvideo.com/videotut...premierepro.ht m
Wrigley has separate guides for Premiere 6.0, 6.5 and PRO, but they're all very close to working the same. In many of his video tutorials, he mentions the differences in these version when doing certain editing techniques.
=== CAPTURING OPTIONS
... just as a side note, it is POSSIBLE to also capture directly into Premiere, but I prefer to do things one step at a time. Premiere is a glutton on system resources too, so it could cause more harm than good...
=== BASIC PREMIERE LESSON
For now, I'll cover the basics here:
The first thing is to import your assets into Premiere. This is relatively easy, either done by drag-n-drop or manual open by mouse clicks.
=== IMPORTING FILES
Open PREMIERE. Select standard template for NTSC video. Click OK.
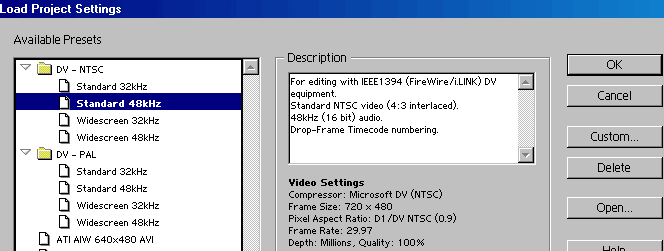
Get familiar with the PREMIERE interface:
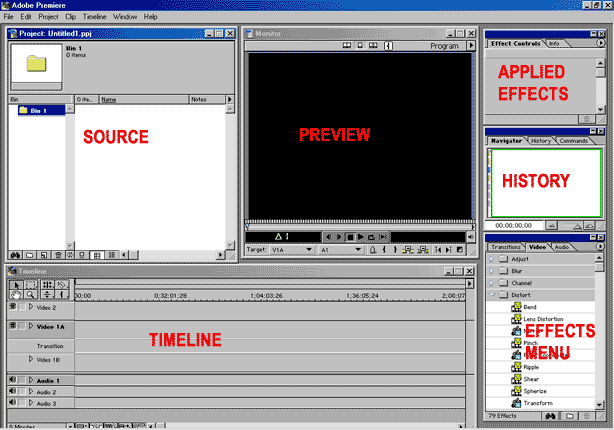
- EFFECTS MENU is audio/video effects you can choose.
- APPLIED EFFECTS is what you have in use for the project at hand. You add them by dragging them onto the video or audio in the timeline.
- TIMELINE is where the video and audio is maintained. The first time you launch PREMIERE, it'll ask if you want A/B editing or single time-line editing. As it suggests, for most people the A/B is easier.
- PREVIEW shows you the video as it should look when exported, though it can be a bit buggy on all versions, and needs a good CPU, and fluidity of movement is sometimes determined by the compression of the source file.
- SOURCE is where you import the source files. The assets. Audio, video, images.
On to importing source...
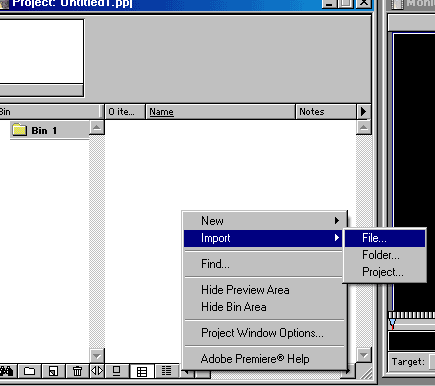
Right click in the blank area of the SOURCE window.
Go to IMPORT -> FILE and select your audio/video/images for use in the project. You can import new items at any time.
!!!!! SAVE OFTEN - SAVE OFTEN - SAVE OFTEN - SAVE OFTEN - SAVE OFTEN - SAVE OFTEN - SAVE OFTEN - SAVE OFTEN - SAVE OFTEN - SAVE OFTEN - SAVE OFTEN - SAVE OFTEN - SAVE OFTEN - SAVE OFTEN !!!!!!
Premiere is not 100% stable... as if anything on a PC were. It's no fun to lose 15-20 minutes of work in Premiere. Save your PPJ projects files all the time, after every 2-3 new steps you make while editing. You've been warned.
Mine just crashed on a MOV file making this guide. 
...more to come...
- Did this site help you? Then upgrade to Premium Member and show your support!
- Also: Like Us on Facebook for special DVD/Blu-ray news and deals!
|
|
08-08-2004, 11:03 AM
|
|
Premium Member
|
|
Join Date: Jul 2004
Location: United States
Posts: 12
Thanked 0 Times in 0 Posts
|
|
Hello Lordsmurf...capturing was successful and easy to use. I am going over the Adobe Premier response you have said and should read up on it by tonight.
Were moving forward. 
Thanks.
-Ron
|
|
08-08-2004, 11:22 AM
|
|
Premium Member
|
|
Join Date: Jul 2004
Location: United States
Posts: 12
Thanked 0 Times in 0 Posts
|
|
|
Hello Lordsmurf...complete the importing to Premiere...and ready and waiting for more.
Thanks.
-Ron
|
|
08-13-2004, 03:24 AM
|
|
Site Staff | Web Development
|
|
Join Date: Jul 2003
Posts: 4,310
Thanked 654 Times in 457 Posts
|
|
== THE LESSON
A friend asked me to make him an object last week, so this lesson will use this object. He wants the Batman intro for something. It needs to be resized to hide some mess at the bottom of the screen, and to cover up the overscan noise. It will have a few basic transitions added (dissolves, "fade to black" and "fade black to picture"). It will then get more fancy and have an image dropped on top of it. This is the kind of thing that will be useful for making custom motion menus. This sample has no audio, just video.
== GETTING SETUP TO EDIT
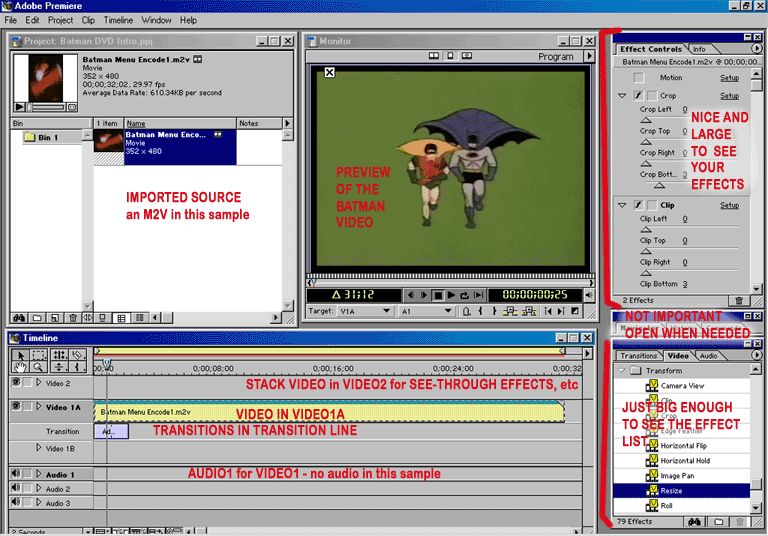
For me, the first order of business in Premiere is making the workspace more useful. Some of those windows are just sized wrong and not needed.
 == SOURCE NOTES, PRE-FILTERING/POST-FILTERING
Because I wanted to pre-filter the video file, not post-filter, you'll see I'm using an M2V as source. The actual capture file was an AVI that needed some work, so it's already seen a restoration filter set in TMPGEnc. It gave the cleaner file desired for the NLE. Post-filtering would have meant the Premiere effects would have been filtered, and this was not at all desired.
== TEACHING YOURSELF PREMIERE
Much like Photoshop and any other numbers of intricate/complex softwares, the best way to learn in Premiere is to literally "play around". This mini-guide should introduce you to the location and workflow of common elements found in this NLE ("NLE" means non-linear editor, and is usually confined to describing software like Apple Final Cut Pro, Adobe Premiere, and Sony Vegas Video).
== WORKING WITH THE TIMELINE
The first step is to make sure the video is properly imported. Then drag the video/audio (or video and audio separately if they are separate files) to the timeline. In the image above, I already dragged the M2V file to the VIDEO1A timeline slot.
Become familiar with the timeline tools. It'll affect how you work in the timeline:
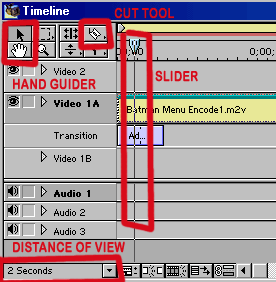
The "hand" tool works much like it does in Photoshop. You can select this tool, click on the timeline footage, and then hold the mouse button and slide the mouse to move down the timeline with handheld accuracy. This is an alternative to using the scroll bars. Much like photographers prefer this tool, videographers tend to like it also.
The arrow is "default" status with no tool selected. This lets you move object around on the timeline.
The "cut" tool will slice items on the timeline into smaller parts. You can then move these smaller parts around or use the arrow to select them and then press DELETE on the keyboard to delete unwanted footage. A good trick for using the CUT tool is to move the timeline slider to the exact position. The slider controls what the preview window shows, so you can see precisely when the cut is being made. When you get the slider in the correct position, move the cut tool on top of the slider line and the cut tool will disappear. This means you have a perfect alignment and will be cutting in the exact spot shown in the preview window.
The "distance" meter select the visual increments on the timeline. The clip in this guide in 30 seconds long. The default 8 minute mark makes 30 second nothing more than a sliver, and near impossible to accurately insert those 1-second additive fades. Cuts are also harder to make at such long intervals. A 2-second span was chosen for this clip. Usually, 10 seconds is good for long footage, change it as needed. (FYI: There is a max length the Premiere timeline can hold, many hours, I forget the amoun. I never have more than 3 hours in a timeline, so I never paid much attention to that high limit, not something that affects me.)
The DELETE button in general removes items from the timeline.
== NOTES ON SCREEN RESOLUTION
Not sure if I've said this yet, but 1024x768 screen resolution is the minimum screen res you can comfortably have in Premiere. If you have a good video card, I'd actually suggest raising it to 1600x1200 when editing video, simply because all that headroom in the Premiere workplace is nice. This guide was made in the 1024x768 space and feels a bit crammed. Both digitalFAQ.com and digitalFAQsupport.com are based on the suggested video desktop res of 1024x768 minimum.
== ADDING FILTERS/EFFECTS/TRANSITIONS
As shown in the workspace image above, this clip has already had 2 effects and 1 transition added. Go to the effect window. Notice how it has effects organized in 3 tabs (transitions, video effects, audio effects). Both a crop filter and clip filter were added to the video in this example. Click on the filter you want, hold the mouse button, drag to the timeline item (video in this case) and drop it on the item when it is highlighted. A green bar will appear at the top of the timeline item and the effect will now appear in the effects window. Most effects are "virgin" and must be altered to actually add the effect (much like clip and crop, which come set to all "0").
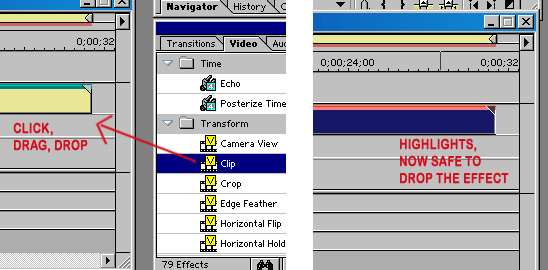 == BASIC EFFECTS
What's CLIP? What's CROP?
This is by far a high-use filter for those editing VHS tapes, and often used interchangeably, which is INCORRECT. "Clip" is another term for "MASK" or to "cover up" parts of the video. It will not resize the video. "Crop" is the process of removing extraneous image/footage, and will result in a resize of the remaining image, as it must now fill the canvas with less data. While it is possible to crop without resize, your final video will not be the correct size compliant with DVD. Clip is great for covering up overscan noise.
See this guide for more info on overscan, near bottom:
">http://www.digitalfaq.com/understandsource.htm
While not necessary, clipping off noise will result in better bitrate allocation for the final MPEG file.
Cropping is used for many things, explained in here:
http://www.digitalfaq.com/restoration/video/videorestore.htm
These are just two of many, many filters. Most PREMIERE filters are named so that they are self-explanatory.
In this video in the example (Batman), I wanted to clip out noise, as well as crop in on the video some. Some of the noise over-spilled the typical overscan, so both filters were needed.
The next effect I wanted to add was a fade-in and fade-out of the video. The final video will be used in a loop, so this is required. Therefore, I'll be adding both.
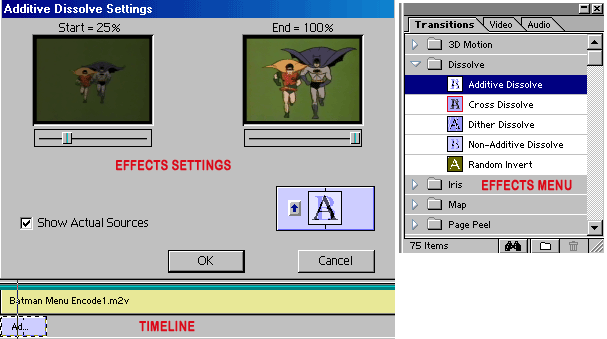
Like any other affect, you drag the effect from the effects menu to the timeline. However, you'll be putting it into the TRANSITIONS slot instead of the VIDEO/AUDIO slots. It will be dropped at default size, but can be dragged out to larger or smaller length. If you hover the mouse over the left or right sides of the effect, a resize icon with arrows will appear that you can use to stretch or shrink the effect.
Once it is in the right position, double-click on it (must be on the ARROW tool) to launch the properties window. As shown above, for this dissolve, you can view it on the actual video. Click the up/down arrows to flip the direction of the fade. Move the sliders to preview it in action.
This will now get you a clip that is edited to the correct size, has noise covered, cropped as needed, and transitions in place. This will serve for most home editing. It's a good handful of basics.
== ADVANCED EFFECTS (optional, example only): STEP 1
The Batman video needs to occupy 2/3rds of the screen on the left side, and then a black semi-circle will be on the right, partially covering the image (and specifically hiding the TVLAND logo).
Now, most of this is based off the CONAN tutorial found here: http://www.wrigleyvideo.com/videotut...premiere65.htm (the "Lips Thru Still Image" video). That guide shows the skills used for the Batman (although that guide will have a much different-looking output).
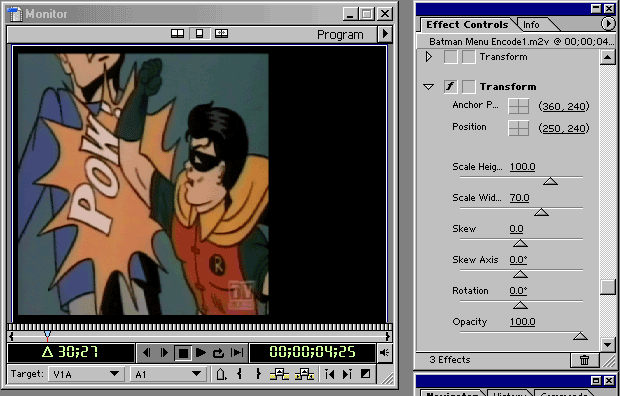
I need to first move over the video. This is done by adding a TRANSFORM filter, and then adjusting the settings. I choose to play with the numbers (click on the underlined links) instead of messing with those slider bars.
 == NOTES ON EFFECTS EDITING AND PREVIEW
Note how I have TWO transform filters. I messed up the first time, made mistakes. The history only goes so far back, so rather than start over, I just deselected that filter (the "f" in the box) and added a new filter to start all over.
Also, sometimes Premiere does not want to preview the effects properly. It's a software bug. The way to fix this is to deselect the effect ("f") and then select it again. The cursor will change to the number count-down and apply the filters in the preview window.
== ADVANCED EFFECTS (optional, example only): STEP 2
Now that the video has been positioned, I created a PSD image in Photoshop. (For learning how to use Photoshop, I suggest investing $20 in PHOTOSHOP FOR DUMMIES. The software is worth it, but takes a book and lots of images to understand. Again, one of those play-with-it softwares.)
Again, this is using concepts learned in the CONAN tutorial.
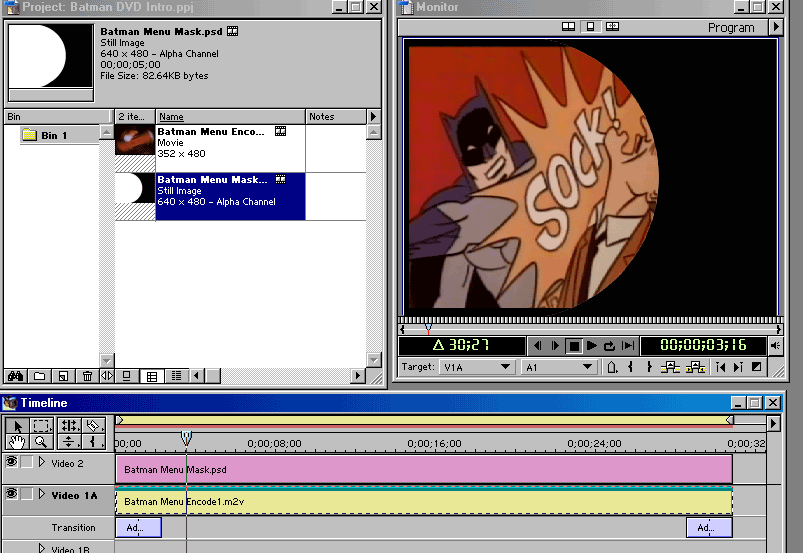
I import the PSD file. When it is added, it asked how to treat the image. Because I want to maintain the transparent part of the PSD, I select "LAYER 1" (the name of the layer in the PSD document). I do not want to flatten the image (and therefore lose the invisible portion).

I then add it to the VIDEO2 layer, which takes priority over VIDEO1, and is therefore on the top. (To make an image transparent or partially transparent on top of the video, like a logo, follow the CONAN instructions, and drop the VIDEO2 window using the down arrow. The using the FADE tool, lower the opacity of the ALPHA KEY.)
Here is my final timeline:
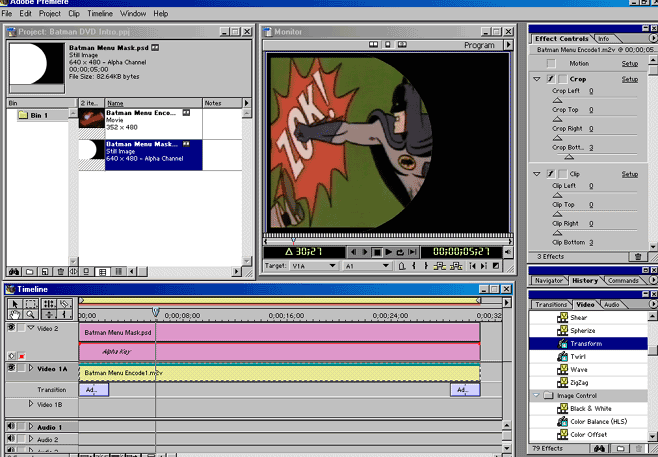
My basic and advanced editing have made a custom object suitable for a menu on a Batman DVD.
== END OF PREMIERE GUIDE ==
Note: Although I'm far from an expert on Premiere, I can find my way around things. The WVP site is a valuable place for advanced technique. If there is something special you want to know, ask, and I'll see what I can do.
And one more time, for good luck's sake:
SAVE OFTEN! SAVE OFTEN! SAVE OFTEN! SAVE OFTEN! SAVE OFTEN! SAVE OFTEN! SAVE OFTEN! SAVE OFTEN! SAVE OFTEN! SAVE OFTEN! SAVE OFTEN! SAVE OFTEN! SAVE OFTEN! SAVE OFTEN! SAVE OFTEN! SAVE OFTEN! SAVE OFTEN! SAVE OFTEN! SAVE OFTEN! SAVE OFTEN! SAVE OFTEN! SAVE OFTEN! SAVE OFTEN!
- Did this site help you? Then upgrade to Premium Member and show your support!
- Also: Like Us on Facebook for special DVD/Blu-ray news and deals!
|
|
08-13-2004, 08:17 AM
|
|
Site Staff | Web Development
|
|
Join Date: Jul 2003
Posts: 4,310
Thanked 654 Times in 457 Posts
|
|
Let's see.
We did capture. Check.
Import into Premiere. Check.
Editing on the timeline. Check.
What's next? Export the timeline to the MPEG-2 files that you'll use in an authoring program (DVDit! PE) which will make the final DVD.
Almost there.
== EXPORT THE PREMIERE TIMELINE TO PROCODER EXPRESS
In Premiere, go to FILE -> EXPORT TIMELINE - PROCODER EXPORTER.
This should launch PROCODER EXPRESS.
Procoder Express is a pretty straight-forward piece of software. This next little bit is cut-n-pasted straight from the book I just wrote for (Windows Media Hacks, Chapter 7, available in stores October/November):
Quote:
CONVERT TO MPEG-2 USING CANOPUS PROCODER EXPRESS
Canopus Procoder, and more recently, the lower-priced Canopus Procoder Express, is an encoder package known for its extremely high quality. This part of the hack is intended for high quality video source that needs no filtering. Procoder Express is available for about $60 at www.canopus.com. There is no demo or trial.
Using Procoder
Procoder is a fairly simple program to operate. The Express version is almost completely wizard-based, meaning it asks you about the settings as soon as the program is started. The first question asks if you want to Convert a Source to Another Format or create a watch folder. Select the Convert a Source option and click Next.
The next window asks for you to Load the video file that is to be converted. Check the Config Source File Settings box. Click Next. This new window allows you to select on part of the file for encoding. If you want to encode the entire file, do not change anything, and click Next. This new window has two features. The first ones is for cropping the video. If you want to crop, use the Manual Crop option, and press the Select Cropping button to launch the crop tool. For the Advanced Source Configuration, press the Select Settings button. It will launch the source settings information. Verify that it is reading the source file correctly. If it made a mistake, change the settings as needed to match your source file settings. Click Next.
Procoder Express next asks for the encode template. You can select a format from the wizard, an existing history template, or a generic template. The wizard templates are generally limited and cannot be altered. The history templates will only exist after youve used the program. Choose the Select a generic target option and click Next. Select MPEG on the next screen and press Next. On the next screen, choose the filename and save location, then press Next.
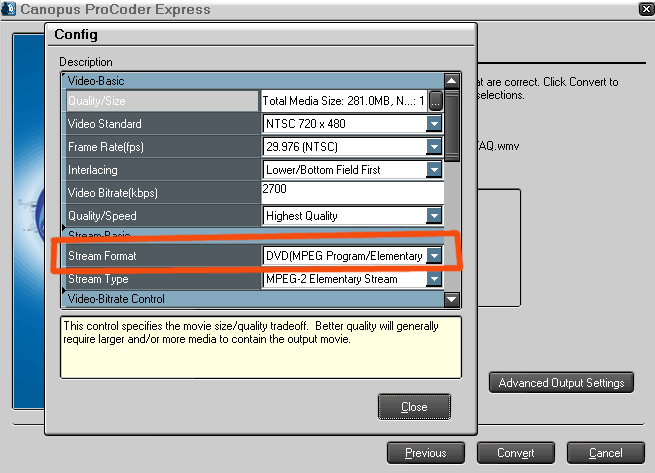
Figure 7.w Procoder Express Config (Advanced Output Settings).
On the final screen, press the Advanced Output Settings button to launch the manual encoder settings. See Figure 7.w. In this area, a custom MPEG-2 352x480 Half D1 template can be made. This is the only way to use 352x480 DVD resolution with Procoder Express, as the wizard is very limited. This trick also works on the full version of Procoder. Find the Stream Format option, and change it to DVD MPEG-2. All the DVD MPEG setting will appear in the other windows. Notice how the only resolution available is 720x480/720x576. Now change the Stream Format back to ISO MPEG. All the DVD MPEG settings remained, but the locked settings have been unlocked.
Go to the resolution and change it to 352 width. Change the bit-rates as needed. The 2-pass VBR will yield best quality. CBR will be fastest. Match the output Interlace method to the source interlace. Select Strict GOP bit-rate control. Alter audio bit-rate to 256k. All other settings should be left at default (29.97 NTSC, Highest Quality, MPEG-2 Program Stream, MP@ML, 4x3 aspect, DC 9, MPEG Layer II audio, 48kHz, stereo, error protection selected). Click Close.
Click Convert and come back later to your newly-converted MPEG video.
|
Once you have the PROCODER-encoded MPEG-2 video files, it's time to author in DVDit! PE.
Follow this guide for authoring:
http://www.digitalfaq.com/authorburn/dvdit/dvdit.htm
Since you do not have NERO (unless you bought it as per the e-mail I sent you a while back) go ahead and let DVDit! burn the DVD for you.
You can get NERO 6 for $4 here:
http://www.softwareandstuff.com/SWW12281.html
Hopefully it's not sold out. Normal price is about $50 or so. Sometimes it's given out free with new hardware like DVD burners and capture cards. This was a deal reported at bensbargains.net not too long ago.
And the NERO guides are here:
http://www.digitalfaq.com/authorburn...vd/neroburndvd .htm
- Did this site help you? Then upgrade to Premium Member and show your support!
- Also: Like Us on Facebook for special DVD/Blu-ray news and deals!
|
|
08-13-2004, 08:28 AM
|
|
Site Staff | Web Development
|
|
Join Date: Jul 2003
Posts: 4,310
Thanked 654 Times in 457 Posts
|
|
|
== FINAL REMARKS ==
This guide was delayed several time because Premiere and Photoshop (both required to create such a guide) do not like to co-exist at the same time. They are both very greedy softwares when it comes to CPU/RAM. Hopefully, you'll never experience this. Try to never run both programs at the same time. In fact, try to never run anything else while PREMIERE is open (the same goes for FCP or VEGAS if you ever use them).
== QUESTIONS ?????
Let me know, and I'll do my best to answer them.
(I may be out of town on business, so there may be some small delays over the weekend and early next week.)
- Did this site help you? Then upgrade to Premium Member and show your support!
- Also: Like Us on Facebook for special DVD/Blu-ray news and deals!
|
|
08-14-2004, 09:43 AM
|
|
Premium Member
|
|
Join Date: Jul 2004
Location: United States
Posts: 12
Thanked 0 Times in 0 Posts
|
|
Lordsmurf...thanks so much for all this info. I've received my NERO software that you told me to purchase. Before you leave for vacation, can you finish your lessons off with the NERO burning? Thanks.

-Ron
|
|
08-14-2004, 09:46 AM
|
|
Site Staff | Web Development
|
|
Join Date: Jul 2003
Posts: 4,310
Thanked 654 Times in 457 Posts
|
|
For NERO, pretty much just follow this guide:
http://www.digitalfaq.com/authorburn...vd/neroburndvd .htm
We're only using NERO to burn the folders/files created by DVDit! PE.
- Did this site help you? Then upgrade to Premium Member and show your support!
- Also: Like Us on Facebook for special DVD/Blu-ray news and deals!
|
|
09-04-2004, 05:55 AM
|
|
Premium Member
|
|
Join Date: Jul 2004
Location: United States
Posts: 12
Thanked 0 Times in 0 Posts
|
|
Hello Lordsmurf,
How's it going? The site and the advice that you've given has been working really well so far. I've been able to import movies...save them...edit them...transfer them and so forth. The biggest problem I've run into is authoring them. Here is the problem. After I add the movie to DVDIt PE and go to 'Project Settings' and update and click ok, I go to 'Build' and then click on 'Make DVD Folder' and it shows me the error that I've copied into the word document that I attached. I've done many searches on the internet for this and it turns out that it's supposedly a bug with DVDIt PE version 2.1. They say that version 2.5 is better and 5.0 is the latest...but I was hoping that you could solve this for me.
Also...I've been using Microsoft Movie Maker instead of Adobe...Adobe is a little to complicated for me. The conversion of the file after I edit it in Movie Maker was easy with Canopus. Any advice on the movie maker software?
Couple of Questions:
Is it possible for DVDIt PE version 2.1 to build and author an avi file? Does it only need to be converted to mpeg-2 before authoring? I tried to do author an avi file and it was working on it...but I stopped it because I don't want to corrupt anything if I'm not supposed to do that. Please advise.
Another question is...in DVDIt PE 5.0...they have a converting and authoring software built into one. I've attached a link to purchase this software on ebay. Should I just buy this and dump the 2.1? Anyway, can help me with the problem in 2.1?
http://cgi.ebay.com/ws/eBayISAPI.dll...category=51345 &item=7100140092&rd=1&ssPageName=WDVW
Why is it so necessary to convert to mpeg-2? Can I just author an avi file?
Please reply soon K...I'd really like to get over this ridiculous obstacle.
Thanks.
Ron


|
|
09-04-2004, 08:23 AM
|
|
Site Staff | Web Development
|
|
Join Date: Jul 2003
Posts: 4,310
Thanked 654 Times in 457 Posts
|
|
An MPEG is defined as the video format for DVD. No other format will work.
DVDit! 5 is one of the worst pieces of software I've ever had the displeasure of using. It's so full of bugs and errors that I have NEVER gotten a project to successfully compile in it.
You never want to use authoring software that also does encoding. The encoding engines are often based upon a limited version of a mediocre engine. Doubel punishment this way.
You should immediately go to the SONIC SOLUTIONS site and update to DVDit! PE 2.5.4 (free for current owners of PE software).
<a href="http://support.sonic.com/login/sl_login.asp?type=professiona l&product=dvdit" target="_blank">
http://support.sonic.com/login/sl_lo...pe=professiona l&product=dvdit</a>
Older ones had bugs.
The error you see is because the authoring software is reporting the sequence headers are not being found. It may be a bug in the DVDit! 2.1 reader. If so, and update will fix it.
An MPEG file is a sequence of images, compressed both in the frame and temporally (in time). This is done by Groups of Pictures (GOP). At the beginning of each GOP, for an MPEG for DVD, it must have a sequence header. This is done in the encoding aspect. This setting is ON by default in PROCODER, but maybe something goofy happened to you. Are you using the MPEG-DVD template? Or at very least, following the guide and selecting the MPEG, then changing the preset to DVD and then off again? That's the trick to allow for using 352x480. But be sure to move to DVD and off again so the default MPEG DVD settings (including sequence headers) are made.
Yeah, Premiere isn't easy. I've been using it for 3 years, but I'm still learning it.
... more to be added within 48 hours (images for Procoder) ...
- Did this site help you? Then upgrade to Premium Member and show your support!
- Also: Like Us on Facebook for special DVD/Blu-ray news and deals!
|
|
09-04-2004, 10:38 AM
|
|
Site Staff | Web Development
|
|
Join Date: Jul 2003
Posts: 4,310
Thanked 654 Times in 457 Posts
|
|
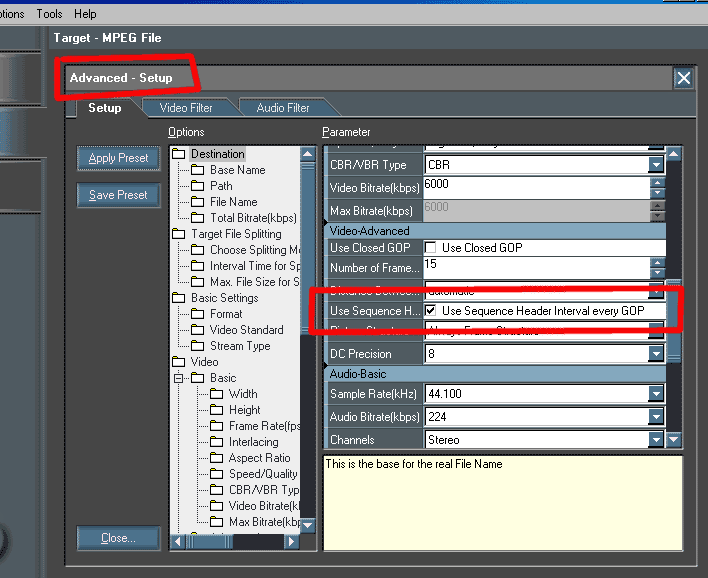
In PROCODER (this is the full version 1.5 in the image), you want to find the SEQUENCE headers option, and make sure it's enabled. In PC full, it's under the ADVANCED settings. My EXPRESS version quit working on me (I never use it, so that took me by surprise), so I cannot find the exact spot in EXPRESS for you. Not yet anyway.
Look around a bit, should be there.
- Did this site help you? Then upgrade to Premium Member and show your support!
- Also: Like Us on Facebook for special DVD/Blu-ray news and deals!
|
|
09-08-2004, 01:27 AM
|
|
Site Staff | Web Development
|
|
Join Date: Jul 2003
Posts: 4,310
Thanked 654 Times in 457 Posts
|
|
Quote:
|
Originally Posted by ravid57
Tried to use 'Closed GOPs' and it still gave me the same error as last time.
Interlacing - what does this need to be for me? Non-interlaced or Lower/Bottom Field First? In your procoder...you have it as your second one and the instructions you have it as non-interlaced.
Should I have both 'Use Closed GOP' and 'Use Strict GOP bitrate control' checked?
'Bitrate Type' - should this be VBR or CBR?
'Number of Passes' - should this be one or two? If it's two...it says that
I cannot use 2-pass mode and multiple file output together. Do you want to use single file mode?What do I do here? If I select yes...what should Video Bitrate(kbps), Max Bitrate and Min Bitrate be?
I cannot find the 'Use Sequence Header' and check the 'Use Sequence Header Interval every GOP' box. Any resolution to this...or are you testing it out? Not understanding why this is happening with DVDit. The upgrade is installed correctly and everything
|
- Did this site help you? Then upgrade to Premium Member and show your support!
- Also: Like Us on Facebook for special DVD/Blu-ray news and deals!
|
All times are GMT -5. The time now is 06:16 AM
|