|
05-04-2016, 02:44 PM
|
|
Free Member
|
|
Join Date: May 2016
Posts: 4
Thanked 0 Times in 0 Posts
|
|
Hi,
I recently captured some video from some NTSC DV tapes. The issue I have is that the colour looks too pale. I've tried doing some colour correction using VirtualDub however it is quite subjective and I'm concerned that I'm using the wrong settings altogether. I'm unsure whether its, the colour, gamma, luminence, chroma that needs adjusting.
I have a few questions:
1) Is there an analysis tool or filter I can use to identify colour issues on a histogram or something which will help guide me on what needs correcting?
2) Similar question to above but can I use photoshop to identify colour issues and export a settings file from there to import into a video editing tool?
3) My monitor is calibrated however how do I use the colour bars to correct the picture/colour of the sample footage?
4) I have the sample footage taken from an alternative source where the colours look fine. Is there a tool that I can use which does a like for like comparison and offers some recommended colour correction settings?
5) Can someone download the video files please and off some recommended settings to use in Virtualdub (or AVIsynth if I have to) to correc the colour?
Any help would be greatly appreciated.
Here are some video uploads I've done:
DV NTSC Tape Colour Bars at start - http://imyashy4.webspace.virginmedia.com/cbars.avi
Sample footage from Tape - http://imyashy4.webspace.virginmedia.com/Video%202.avi
The first pic is the frame 488 from the source file. The Second pic is the same frame from an alternative version of the same video.


|
|
Someday, 12:01 PM
|
|
Ads / Sponsors
|
|
Join Date: ∞
Posts: 42
Thanks: ∞
Thanked 42 Times in 42 Posts
|
|
|
|
|
05-04-2016, 05:05 PM
|
|
Premium Member
|
|
Join Date: Aug 2009
Location: N. Carolina and NY, USA
Posts: 3,648
Thanked 1,337 Times in 996 Posts
|
|
Welcome to digitalfaq. 
Quote:
Originally Posted by imyashy

I recently captured some video from some NTSC DV tapes.
|
How were they captured? True DV format isn't captured, it's copied 1:1 via Firewire to a computer with no processing or re-encoding. How was the source tape made? It looks a little soft for DV.
Quote:
Originally Posted by imyashy
The issue I have is that the colour looks too pale.
|
It dosn't look pale top me. It has some levels and gamma problems but they vary from shot to shot. Maybe it looks pale because highlights are blown out in the original and blacks are crushed in some shots. You can't retrieve bright or dark data after they've been destroyed by clipping, and you can't re-create it. Clipped data puts limits on how much dynamic range you can create or restore in an image.
Quote:
Originally Posted by imyashy
I'm unsure whether its, the colour, gamma, luminence, chroma that needs adjusting.
|
Every shot looks a little different as far as those elements are concerned. Not unusual for music videos of this type.
Quote:
Originally Posted by imyashy
Is there an analysis tool or filter I can use to identify colour issues on a histogram or something which will help guide me on what needs correcting?
|
Histograms are analysis tools. There aren't any analysis tools for the analysis tools. Yes, you can use Photoshop (Photoshop Pro, not Photoshoip Elements) and use its tools to determine problems and fixes. There are a ton of free Photoshop web tutorials on how to read histograms, but you can use any histogram or similar graph you want. Below are two useful links about how to read histograms and what they tell you. These are 'grams as used in still cameras and photo apps -- nut the principles behind good still images and good video images are the same. A movie is really a stream of still images.
Understanding histograms Part 1 and Part 2
http://www.cambridgeincolour.com/tut...istograms1.htm
http://www.cambridgeincolour.com/tut...istograms2.htm
Settings from Photoshop Pro's curves filter can be imported into VirtualDub's gradation curves plugin. Likely settings from other controls can be imported into Premiere Pro, but I don't use Premiere. Anyway, if you already have Premiere Pro for color you wouldn't need Photoshop.
Quote:
Originally Posted by imyashy
how do I use the colour bars to correct the picture/colour of the sample footage?
|
You can't. Colorbars are used to adjust hardware. They're not an accurate guide to the color balance of the video content.
Quote:
Originally Posted by imyashy
I have the sample footage taken from an alternative source where the colours look fine. Is there a tool that I can use which does a like for like comparison and offers some recommended colour correction settings?
|
Why don't you use the alternative source? IMO from the "corrected" image you posted, the alternative source doesn't have a clean color balance: it's too pink, looks a bit over saturated, and seems to have less shadow detail. The frame from the original posted above it is somewhat green in the midtones, but that problem doesn't exist in most of the other shots.
I'm looking over the downloaded avi. Your sample is from video originally shot at 23.976 fps progressive with hard-coded 3:2 pulldown applied for 29.97 fps playback. I'll give it a longer look tonight.
|
|
05-05-2016, 04:25 AM
|
|
Free Member
|
|
Join Date: May 2016
Posts: 4
Thanked 0 Times in 0 Posts
|
|
Quote:
Originally Posted by sanlyn
Welcome to digitalfaq.
How were they captured? True DV format isn't captured, it's copied 1:1 via Firewire to a computer with no processing or re-encoding. How was the source tape made? It looks a little soft for DV.
It dosn't look pale top me. It has some levels and gamma problems but they vary from shot to shot. Maybe it looks pale because highlights are blown out in the original and blacks are crushed in some shots. You can't retrieve bright or dark data after they've been destroyed by clipping, and you can't re-create it. Clipped data puts limits on how much dynamic range you can create or restore in an image.
Every shot looks a little different as far as those elements are concerned. Not unusual for music videos of this type.
Histograms are analysis tools. There aren't any analysis tools for the analysis tools. Yes, you can use Photoshop (Photoshop Pro, not Photoshoip Elements) and use its tools to determine problems and fixes. There are a ton of free Photoshop web tutorials on how to read histograms, but you can use any histogram or similar graph you want. Below are two useful links about how to read histograms and what they tell you. These are 'grams as used in still cameras and photo apps -- nut the principles behind good still images and good video images are the same. A movie is really a stream of still images.
Understanding histograms Part 1 and Part 2
http://www.cambridgeincolour.com/tut...istograms1.htm
http://www.cambridgeincolour.com/tut...istograms2.htm
Settings from Photoshop Pro's curves filter can be imported into VirtualDub's gradation curves plugin. Likely settings from other controls can be imported into Premiere Pro, but I don't use Premiere. Anyway, if you already have Premiere Pro for color you wouldn't need Photoshop.
You can't. Colorbars are used to adjust hardware. They're not an accurate guide to the color balance of the video content.
Why don't you use the alternative source? IMO from the "corrected" image you posted, the alternative source doesn't have a clean color balance: it's too pink, looks a bit over saturated, and seems to have less shadow detail. The frame from the original posted above it is somewhat green in the midtones, but that problem doesn't exist in most of the other shots.
I'm looking over the downloaded avi. Your sample is from video originally shot at 23.976 fps progressive with hard-coded 3:2 pulldown applied for 29.97 fps playback. I'll give it a longer look tonight. |
Hi mate, Thanks for the welcome and thank you very much for the detailed breakdown and help you're offering. I appreciate it very much.
Here are some answers to your questions.
Forgive my terminology. The DV tapes were transferred using a DV deck via firewire without any processing or re-encoding. Correct - the footage looks a little soft. I got them from a record company and I think they are just dubs. The footage was recorded onto the tapes in 2003.
In comparison to other versions of the music video I have seen before the colour looks dull. I always notice a greeny/yellowy tint with NTSC footage also.
Thanks - I'll look into the histograms.
The alternative source is over-cropped which is why I'm not using it. You have a great eye - The alt source is slightly mis-leading in that the colour was 'improved' by a fellow music video collector therefore maybe it's not a correct baseline to use due to the subjective nature of colour correction. I do however have another alt version of this video which I obtained from a music video subscription service who would have obtained their videos directly from the record company and in theory should have a true reflection of what the colours should look like. I'll post a clip or screenshots from it later tonight.
Is it worth doing an IVTC to achieve the original 24p?
|
|
05-05-2016, 12:20 PM
|
|
Premium Member
|
|
Join Date: Aug 2009
Location: N. Carolina and NY, USA
Posts: 3,648
Thanked 1,337 Times in 996 Posts
|
|
|
Sorry for the delay. I'll post more details later today.
|
|
05-05-2016, 03:52 PM
|
|
Premium Member
|
|
Join Date: Aug 2009
Location: N. Carolina and NY, USA
Posts: 3,648
Thanked 1,337 Times in 996 Posts
|
|
Sorry to take a whle getting back. Easiest question first:
Quote:
Originally Posted by imyashy
Is it worth doing an IVTC to achieve the original 24p?
|
Depends on what you want for final format. Standard definition DVD/BluRay/AVCHD are either interlaced or telecined, and can't be 23.976 fps. Unless you see excessive combing on the telecined frames (Is see a little but not much) and re-encode with soft-coded pulldown flags instead of hard coded interlacing, IVTC in itself wouldn't make an improvement. Kept as 23.976 progressive the "official" formats mentioned can't be used. But this video is a maverick: it has interlaced shots, telecined shots, progressive shots with duped fields -- a real hybrid. I'd leave it as-is.
There's a cost to another stage of re-encoding the final format. That's one reason why most pro's object to encoding VHS as lossy DV. Two lossy encodes aren't better than one. DV compression tends to discard fine detail, makes subtle changes in color values (and removes 50% of the original NTSC VHS chroma resolution), and usually accentuates film grain and tape noise, evident here in some darker colors of the capture.
All that aside, the main reason for colorbars is to set general display properties within a known standard. Correcting colorbars makes the bars look nice and can correct some severe overall tape production or aging problems. However, that doesn't mean that the entire video content is color corrected from beginning to end. You've likely seen enough VHS tapes to know that tape changes color balance and levels unpredictably.
The very first frame in your sample is a case in point. The IRE levels (black levels) are too high, which can indeed make it look washed out. Other scenes are too dark and/or oversaturated, others are too bright, so a correction for one shot won't work in all of them. The first frame isn't too green so much as it's too cyan (too much blue + green). Here's the original frame, below:

Notice the whites blown away, lacking detail and with a blue tint, and clipping created yellowish discoloration in areas especially the shoulders (in other scenes, the whites are fairly clean). Shadows in the shirt and on the ground are bluish, the greens are too blue. VHS is analog waveforms: every capture device responds differently to those variations. So you have inconsistent color problems varying with levels, difficult to adjust.
Below, I corrected the image in VirtualDub by reducing cyan saturation, added a new level of mild overall saturation, adjusted the midpoint (midrange levels) downward, and darkened the bottom end somewhat. I used the ColorMill and HSI filter for these adjustments.

What gets lost in the above example is some clarity in facial detail and yellow that leans toward orange. Notice that the road isn't gray any more but has gone a bit yellow. The road is in the same brightness and color range as the overly blue shadows and greens. Very likely the real road wasn't a neutral gray anyway. You can't have everything. The color correction tools in Premiere Pro and AfterEffects are more sophisticated and precise. You can do more tweaking if desired. One problem with browser display is that none of them make pics look the way they do on a calibrated monitor. Both images look very different on my calibrated display.
Music videos are a world of their own. Many don't attempt to render realistically. This one has been processed for "hot" tropical colors and aggressive contrast. In some scenes darks are overly dense and even crushed. Every camera shot has its own problems. Michael Jackson did this sort of thing, from bright primary-color overload in some vids to grimly subdued brownish-gray-greens in one of them. But in digital form the playback color and levels are consistent. Analog sources just don't have that uniformity.
These corrections don't work for the other shots, including the greenish image posted earlier. That shot can be fixed up by increasing saturation and lowering green gamma. It can be done with ColorMill.
I can pursue all this later, but it will take a while.
|
|
05-05-2016, 05:24 PM
|
|
Free Member
|
|
Join Date: May 2016
Posts: 4
Thanked 0 Times in 0 Posts
|
|
Thanks for your reply. I think I will keep them as interlaced to be honest.
Can you use the 'save processed settings' option in Virtualdub and send the file to me please?
Thanks for clearing up my understanding of colour bars.
Looks like I'm going to have find the sweet spot settings wise whereby the colour isn't compromised much on the other scenes throughout the video.
I have attached some screenshots from a version of the video I received from a VJ. Do these help at all with identifying some suitable settings to work towards?
|
|
05-06-2016, 07:07 AM
|
|
Premium Member
|
|
Join Date: Aug 2009
Location: N. Carolina and NY, USA
Posts: 3,648
Thanked 1,337 Times in 996 Posts
|
|
I'm traveling at the moment with only my Netbook. I'll post a .vcf settings file when I return home later today. You'll need three VirtualDub plugins that you might not have, so I'll zip them and post.
|
|
05-06-2016, 12:51 PM
|
|
Premium Member
|
|
Join Date: Aug 2009
Location: N. Carolina and NY, USA
Posts: 3,648
Thanked 1,337 Times in 996 Posts
|
|
Quote:
Originally Posted by imyashy
Can you use the 'save processed settings' option in Virtualdub and send the file to me please? |
No problem. The attached .vcf has filters and settings setup for the first camera shot in the sample video. That setup might work with some of the otehr shots, maybe not so well for others.
I used 4 VDub filters for that scene.: HSI (Hue/Saturation/Intensity), gradation curves, ColorMill, and Levels. Levels is a built-in filter, the other three go in the VDub plugins folder. The attached .zip contains HSI, gradation curves, and ColorMill, and docs for them.
Quote:
Originally Posted by imyashy
Looks like I'm going to have find the sweet spot settings wise whereby the colour isn't compromised much on the other scenes throughout the video.
|
That might eb possible, likely not for everything. The first scene has darkened levels; the same filters will darken everything else. They'll also give bright whites a slight green or red tint.
Quote:
Originally Posted by imyashy
I have attached some screenshots from a version of the video I received from a VJ. Do these help at all with identifying some suitable settings to work towards?
|
They could, if you know how to take pixel value readings on selected areas and adjust the same frames or scenes to approximate those same values. Don't assume that the color and levels are optimal for every scene in the new version. The video was created with certain effects in mind. In the capture you submitted, where you say the owner played around with some colors, you'll be correcting some things you don't like. How those changes were made I don't know, and I doubt the owner worked on every scene separately.
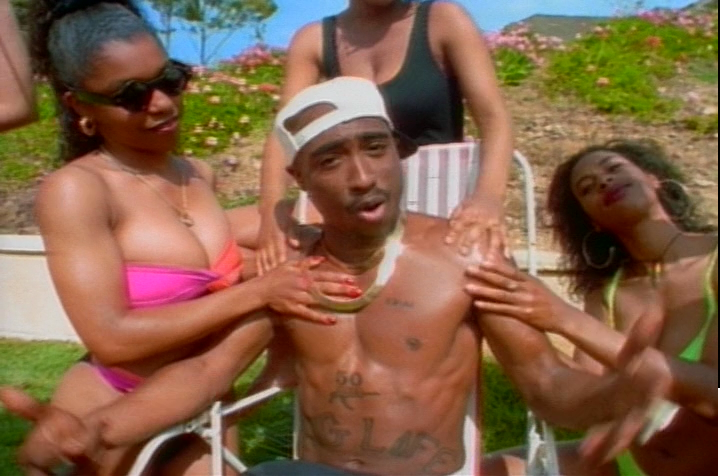
The U-matic frame has out of spec brights that climb up the right-hand side of histograms and result in "hot", unnatural highlights. Overall midtones are pinkish. The white cap the guy is wearing clips out at RGB 255-255-255, which is super white and is the appropriate RGB values for white, but it will likely be clipped in encoding. The white stripes on the chair have the same values. There's a bright hot spot on the guy's chest at RGB 255-207-181, which shows too much blue in skin tones, resulting in a pink tint (sunburn). The gal on the left also has hot spots with red clipping at RGB 255. The stone wall in the background is turning white due to red clipping while slightly darker parts of the same wall have the brownish yellow tint of the stone or whatever the wall is made of.
The "ladies" shot is pretty much overly bright like the other samples of that shot, so I assume it looks that way in all the original tapes and probably was created that way. It has the same cyan tint as other versions, which can be seen in purple-tinted skin tones. In the shadow area of the foreground gal's face, the RGB values are R99 G68 B49, which is very nearly purple. There is more blue in ndark nareas thna there should be (the lady in front has blue hair average values of R82 G75 B98, showing that blue is the highest color value there). All of the bright whites are clipping.
Advanced NLE's like Photoshop Pro, Vegas Pro, After Effects, etc., come with pixel readers that let you read RGB values off groups of 3 or 5 pixels. You would do this especially to test for values hat should be pure white (RGB 235 235 235) neutral middle grays (RGB 128-128-128), and pure black (RGB 16-16-16), and all white-to-black objects in between. VirtualDub doesn't have a pixel reader, but you can get free ones for your desktop that read pixel values anywhere on the screen. One such handy tool is CSamp.exe, which sits on the desktop and can be turned and off. The Csamp home page nbo longer exists, but the original text, the stand-alone .exe, and the image from that site are attached as Csamp.zip. There's another freebie (ColorPic) at http://www.iconico.com/colorpic/.
I'd say the two new images likely reflect more accurately what the original video looked like, but contrast is overdone. It's certainly sharper and seems less tampered with without a lot of the re-encoding loss evidenced in your earlier sample. No video engineer would produce a video with those levels unless they didn't know what they were doing. And from what I see on cable TV these days, there are lots of those engineers around.
|
|
05-15-2016, 09:33 AM
|
|
Free Member
|
|
Join Date: May 2016
Posts: 4
Thanked 0 Times in 0 Posts
|
|
|
Thanks for investing your time into this Sanlyn. I've downloaded the files and have been doing some experimenting with some success.
|
All times are GMT -5. The time now is 09:09 PM
|


