How to Encode MPEG Video with Canopus Procoder
Canopus ProCoder is not only an easy program to use, but it provides superb quality for MPEG-2 encoding. On some systems it even provides speeds rivaling that of CinemaCraft and TMPGEnc Plus, often with similar or higher quality, especially at the Mastering level. We suggest Procoder only be used for high quality video source that needs no filtering. Sadly, Canopus provides no demo or trial of these software.
Procoder Express is a slightly more limited version of Procoder. It mainly lacks the filters package and the Mastering Mode encoding, as well as resolution choices for DVD-Video compliant encodes. It is still quite good, especially for a mere $60 price tag. The full edition of Procoder can convert to many formats, many resolutions, has a handful of nice filters, and has a special Mastering Mode meant for professional quality encoding.
Converting with Procoder Express
The Express version of Procoder is almost completely wizard-based, meaning it asks you about the settings as soon as the program is started. NOTE: This part of the guide is mostly text-based because the options are easily explained by words.
Start Procoder. The first question asks if you want to “Convert a Source to Another Format” or “create a watch folder”. Select the Convert a Source option and click Next.
Load file, select part of file to encode. The next window asks for you to Load the video file that is to be converted. Check the “Config Source File Settings” box. Click Next. This new window allows you to select on part of the file for encoding. If you want to encode the entire file, do not change anything, and click Next.
Optional crop filter, verify source settings. This new window has two features. The first ones is for cropping the video. If you want to crop, use the Manual Crop option, and press the Select Cropping button to launch the crop tool. For the Advanced Source Configuration, press the Select Settings button. It will launch the source settings information. Verify that it is reading the source file correctly. If it made a mistake, change the settings as needed to match your source file settings. Click Next.
Encode templates. Procoder Express next asks for the encode template. You can select a format from the wizard, an existing history template, or a generic template. The wizard templates are generally limited and cannot be altered. The history templates will only exist after you’ve used the program. Choose the “Select a generic target” option and click Next. Select MPEG on the next screen and press Next. On the next screen, choose the filename and save location, then press Next.
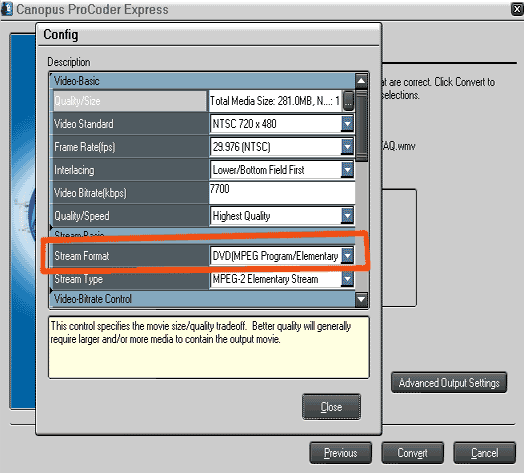
Advanced Output Settings. Click on the Advanced Output Settings button to launch the advanced configuration window. In this area, bitrate and quality settings can be altered as needed. Because Procoder Express does not add sequence headers to files in non-DVD encoding templates, 720×480 is the only encoding option when DVD is the desired output.
Done. Click Convert and come back later to your newly-converted MPEG video.
Converting with Procoder
This guide was made using the professional version of Procoder, the previous Procoder 1.5. The newer 2.0 and 3.0 versions should not be much different.
Open up Procoder. Do not use the Wizard. Notice the SOURCE, TARGET and CONVERT tabs. These should be self-explanatory as to what they are.
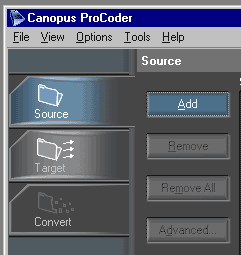
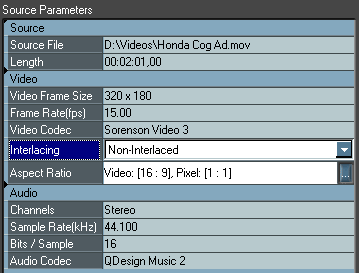
Add source. Under the SOURCE tab, click ADD. Provided that you have the codecs installed on your system, ProCoder should be able to open up almost any video file, including AVI Synth scripts (not tested). After selecting the file and pressing OK, it will return to the main screen and show you the parameters of the source file as read by ProCoder. Verify they are correct. Change as needed.
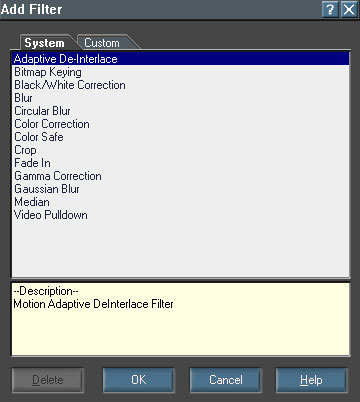
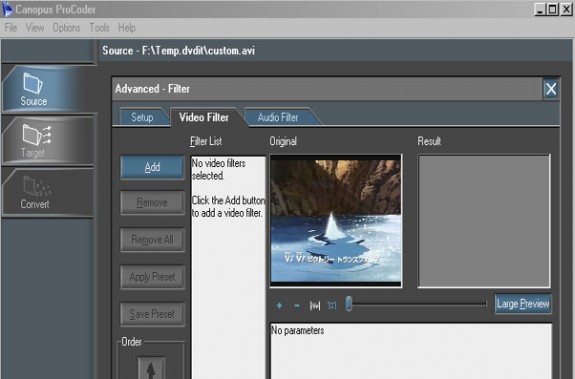
Add filters for video or audio (optional). This is not covered in this guide, but this is the time and location to add filters. More information on VIDEO RESTORATION will be found on that guides section of the site. Clicking ADVANCED on either SOURCE or TARGET will bring up the SETUP-VIDEO FILTERS-AUDIO FILTER menu. Please note: the filters can be changed at either the source or the target level. I do not know why this is, nor what the difference is. All tests have shown them to be interchangeable, and I normally choose to add filters at the SOURCE level.
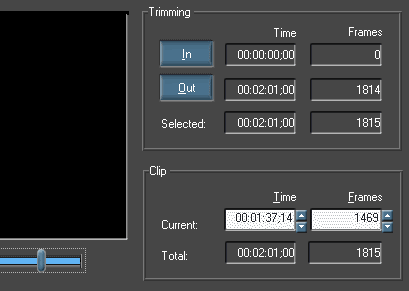
Select source range (optional). Under the SOURCE tab, under ADVANCED, in the SETUP window, you can specify the mark-in and mark-out (source range) of the part of the file to be encoded. By default, the entire source video will be encoded unless it is altered here. Drag the slider to the location where the cut is needed, then press IN or OUT to select the clip.
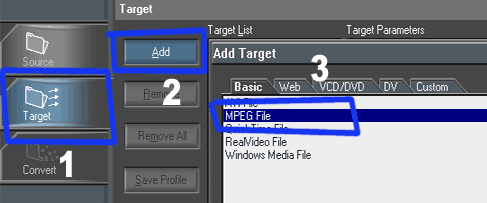
Create/select target template. Goto TARGET, add target (file to be made). You can use a template if desired. Since I like to use 352×480 MPEG2, I have to make a preset. It’s easy to do. The first step is to select BASIC and MPEG FILE. Click OK.
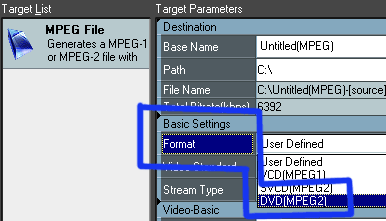
Create custom 352×480 template (optional). Find the FORMAT under BASIC SETTINGS. Change it to MPEG2 DVD. Then change it back to USER DEFINED. This has made the MPEG2 DVD settings come up, and now you can edit them. Manually type in the new resolution and make whatever changes you want. Highest Quality is the best option overall. Mastering is better, but the time to complete the encode can be days. Filters can be added again under TARGET (odd), but not suggested. Be sure field order is correct. Be sure aspect ratio is set to 4:3 encode.
2-PASS VBR is best. 256k audio is best.
Done. Goto CONVERT, click convert. Come back later and you should have a new file. It will encode faster if nothing else is running. Never try to do anything else on the computer when encoding video, as it usually leads to glitches in the audio/video files that are output.
Copyright Notice: All guides, articles and editorials found on digitalFAQ.com are copyright by The Digital FAQ and/or the respective authors. Articles may not be copied, borrowed, full-quoted or reproduced in any manner, online or in print, which includes blogs and forums, without the written email consent of Site Staff (which may or may not be given, for free or fee). Know that digitalFAQ.com staff does routinely monitor online plagiarism, and we do send takedown notices to site admins and/or web hosts (DMCA et al legal actions) as is necessary. If you would like for others to read articles found on The Digital FAQ, simply link to our content. (Note: Printouts for personal use is specifically allowed.)