How to Remove Commercials from MPEG Video with VideoReDo Editor
Removing commercials from an MPEG is a really simple splicing process, and should not be considered “editing” in the traditional video sense. All that is required to remove commercials is to cut and join the footage. This guide is good for trimming MPEG files in general, not limited to just cutting commercials.
VideoReDo is an easy-to-use non-linear editor with an intuitive user interface. It can also fix audio sync problems normally associated with certain types of MPEG files. Portions of this guide were provided by the folks at VideoReDo.com
Using VideoReDo to Remove Commercials
There are two main modes in VideoReDo:
(1) An additive “scene” mode, where footage to be kept is selected, or
(2) A subtractive “cut” mode, where footage to be deleted is selected
Cut mode is often used for removing commercials while Scene mode may be more useful when you are making a “best of” video file. You can also automatically detect and mark for deletion commercial segments using Ad-Detective, although it may or may not be completely helpful or accurate (automated software rarely is). This tutorial demonstrates “Cut Mode”.
1. Start VideoReDo Plus. Open a file for editing.

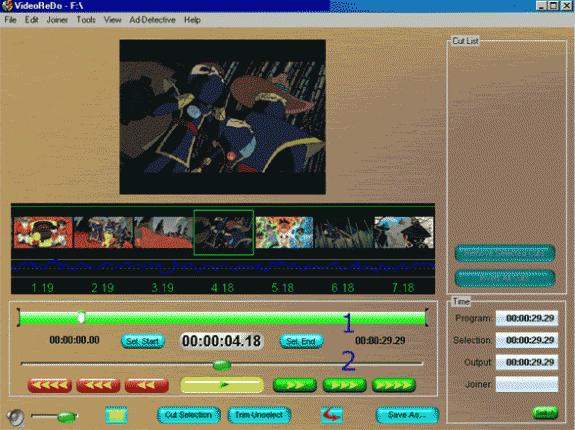
The timeline is green, indicating the entire file will be output, as no commercial segments have yet been selected for deletion. If thumbnails are not displayed, press the F11 key or use the menu: View>Show Thumbnails. This will display a series of frames below the main screen allowing easier placement of selection markers. Use the Upper Slider (1) for coarse adjustment through the timeline and the Lower Slider (2) for fine adjustment. Even finer control is available using the lower slider with the right mouse button.
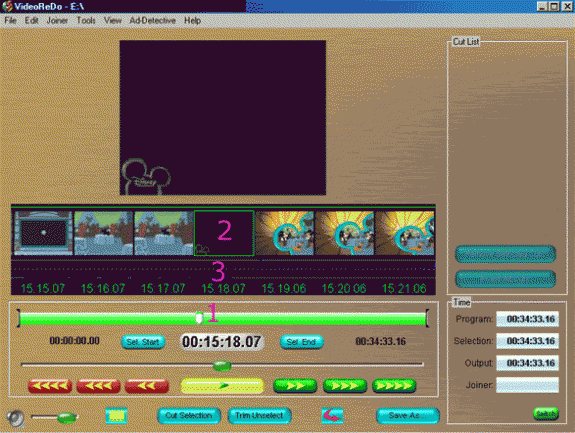
2. Placing Markers and Deleting Segments. Move the timeline cursor (1) to the black frames just before the beginning of the commercial or, if there are no black frames (fade to black transition) to the first frame of the commercial. You can see the center thumbnail (2) highlighted with a green box. This is the frame currently displayed on the main screen with the fade-out from the show and the fade-in to the commercial visible. Also the audio graph (3) displays a low point indicating the audio has faded as well. This is the best frame to mark the beginning of the commercial.

Press the SET START button to mark the beginning of the segment. A mark will appear on the timeline indicating your choice. Navigate to the end of the commercial. Press the SET END button to mark the end. A second mark will appear. Press the CUT SELECTION button and the segment between the 2 marks will turn red, indicating the successful selection of the commercial. Repeat as necessary to mark all the commercial segments of the file.
You can automatically detect and mark commercials for deletion by using the Ad-Detective button. This method is not magical, so be sure to verify the cuts.
3. Previewing Your Cuts. As you are placing your cuts or once you have finished, you can select Preview Mode to view your output file before saving. Press the TOGGLE PREVIEW MODE button (looks like a filmstrip). The timeline display will change from:
![]()
to
![]()
You can preview your video and the cuts by navigating the same as in edit mode or by pressing the >> or << buttons to jump to the cut points. You can also set a Preview lead-in time so as you jump to the cuts, VideoReDo will display them with your selected pre-roll time. This is available under the Tools>Options menu.
4. Managing your edits. As you are editing or previewing, you may wish to modify the precise location of your cuts (to add or remove an extra frame or two for a “cleaner” edit. This is easily accomplished by simply double-clicking on the edit that will highlight the selected cut. You can use the >> and << buttons or “S” and “E” keys to navigate to the beginning and end of the cut. Reposition the marks using the SET START and SET END buttons and press CUT SELECTION again. A dialog box will appear asking you to confirm replacement of your existing cut. Click “Replace” if you are satisfied with your changes.
5. Saving your edited file. Press the SAVE AS button to save your edited, commercial-free video. The file will be saved in a few minutes without re- encoding the entire video. Only what you viewed in preview mode (or the green segments of the edit mode timeline) will be saved.
Copyright Notice: All guides, articles and editorials found on digitalFAQ.com are copyright by The Digital FAQ and/or the respective authors. Articles may not be copied, borrowed, full-quoted or reproduced in any manner, online or in print, which includes blogs and forums, without the written email consent of Site Staff (which may or may not be given, for free or fee). Know that digitalFAQ.com staff does routinely monitor online plagiarism, and we do send takedown notices to site admins and/or web hosts (DMCA et al legal actions) as is necessary. If you would like for others to read articles found on The Digital FAQ, simply link to our content. (Note: Printouts for personal use is specifically allowed.)