How to Create/Burn VCD with VCD Easy (Freeware)
VCDEasy is a versatile program that can be used for burning VCD, XVCD, SVCD, XSVCD and CVD formats. Most of the early versions of this program are freeware, such as the 1.1.5.2 free version being used in this guide. This guide only covers the actual disc creation process as the program only supports this aspect of creating a CD-based video disc. Your files must already be encoded and ready for use.
STEP 1 – Setup VCDEasy to work with a CD burner
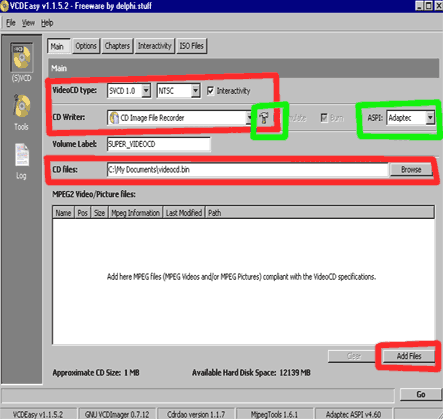
After starting VCDEasy, it should open to the MAIN window. Find the burner settings button (marked in GREEN on this guide) and click it to bring up the options menu.
The other green-marked item should show some kind of ASPI layer, normally Adaptec. If no ASPI layer is availaable, it means you have never installed CD burning software on this computer. Either install CD burning software (like Nero or Roxio) or go and download ASPI4ALL software. It is a freeware driver pack and should be easy to find a download if you search on Google.
VCDEasy is not as simple as your average burning software like Nero, RecordNow or Roxio. You must setup both the CD burner drive AND the burning drivers, as it uses the freeware engine CDRDAO to burn discs. After clicking the options button, this screen should appear:
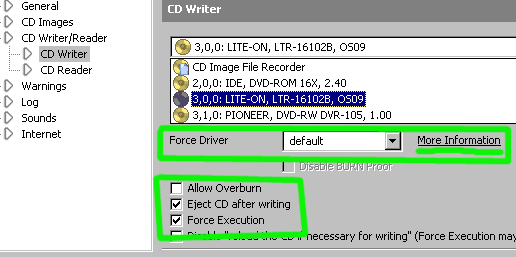
Select your burner from the list.
I have a LITE-ON CD burner, and I must force the GENERIC-MMC-RAW drivers on my burner. Clicking on MORE INFORMATION will take you to the VCDEasy support site and give a list of burners and proper drivers. Most burners use GENERIC-MMC or GENERIC-MMC-RAW drivers. Be sure to also checkmark the FORCE EXECUTION box. The other check boxes are optional. The image shows what I use.
Be aware that choosing the wrong driver may damage your burner. Not likely, but can happen. Also, overburning CD video discs is not suggested.
Click OK and let’s go make a disc. The burner setup is finished.
STEP 2 – Importing video files
The MAIN window should re-appear:

The items marked in red in the above image are the important ones.
VideoCD type: This is easy. Merely select the format of the file you wish to import. VCD and XVCD should use the VCD 2.0 type. SVCD, XSVCD and CVD should use the SVCD 1.0 type. PAL or NTSC depending on the footage. Checkmark the INTERACTIVITY box if you want menus. Since VCD 1.1 did not allow for PBC (playback controls), the interactivity option is not available. Normally VCDEasy will auto-select this based on your imported video files.
CD Writer: This should already be setup from STEP 1 of this guide. Just verify it still shows the correct burner. Be sure the BURN option is checkmarked. Burning simulation is not needed, but you can do it by checking the SIMULATION option.
Volume Label: You can label the disc here if you want.
CD Files: This is where VCDEasy will store your temporary S/X/VCD files. Make sure you have at least 700MB available in this location.
Add Files: Select your video files. Again, they must already be in proper format. Note that XVCD, CVD and XSVCD files will give error messages, and you must tell VCDEasy to ignore these “problems” found in the files. It will load the files, as shown in the status bar at the bottom of the VCDEasy screen. If the file requires AUTOPADDING then go ahead and select ‘YES’ when prompted.
- If no INTERACTIVITY was selected, then the disc is ready to burn. Goto STEP 4.
- If you want menus and chapters, and INTERACTIVITY is selected, then continue on to STEP 3.
STEP 3 – Advanced functions: menus and chapter
Adding chapters is fairly easy. But making menus can get a bit complex.
Chapters. First, change from the MAIN screen to the CHAPTERS screen. This is where chapters are created.
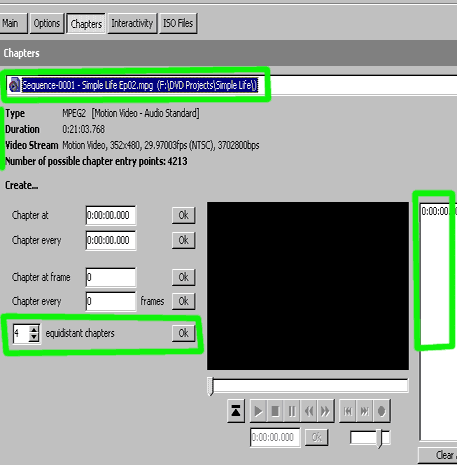
The items in green are the most important ones when making simple chapters. The SEQUENCE box shows the file that is being worked on. Each file must be worked on separately. This example is a single CVD file. This disc will only have one actual video file. If your disc has more, select each sequence one-by-one and add chapters as needed.
The easiest method is to select a couple of equidistant chapters, however you can also select precise chapters based upon time or frame. There is also a preview window, though you must have proper MPEG codecs installed for it to function.
The window on the far right side shows the chapter marks.
Menus. This guide only supports making one menu for the full disc. And again, this guide only covers the actual disc layout and burning. All files must be ready prior to using this guide. For VCD/XVCD menus, make a 320×240 image. For SVCD/CVD/XSVCD menus, make a 640×480 image. These are NTSC values. For PAL use 384×288 and 768×576. Adobe Photoshop is suggested for image creation.
In VCDEasy, select TOOLS on the far right menu and then select the MPEG STILLS button found near the top of the program screen. This is where your menu image is converted into a MPEG file suited for VCDEasy menu use.
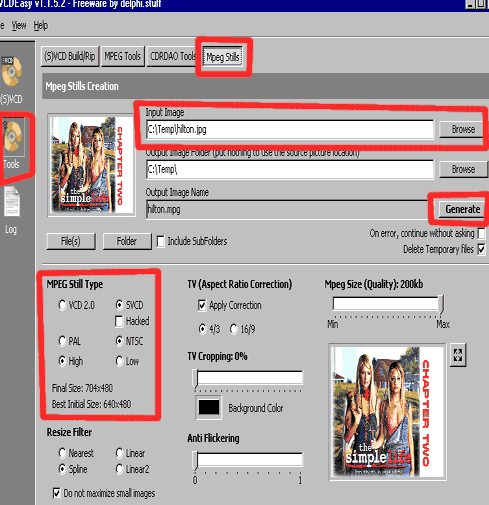
First. Go to the INPUT IMAGE area and BROWSE. Find your menu images and select the file.
Second. Go to the MPEG STILL TYPE area and select the type of MPEG that correlates to the CD-baed video disc you are trying to create. In this example, a CVD is being made, and thus uses SVCD values. It is NTSC format. If the disc is VCD/XVCD format, use LOW. If the disc is SVCD/CVD/XSVCD format, use the HIGH option.
The defaults for all other settings are fine. Only tweak if needed or if you like to experiment.
Third. Press the GENERATE button to create the MPEG files based on the still images. The new file will match the name of the image source and go to the location specified in the OUTPUT IMAGE FOLDER.
Fourth. The menu is now made, and it is time to import the menu video. Go back to the (S)VCD page and go to the MAIN window. As was done with the main video, click the ADD FILES button and add the newly-created menu MPEG file.
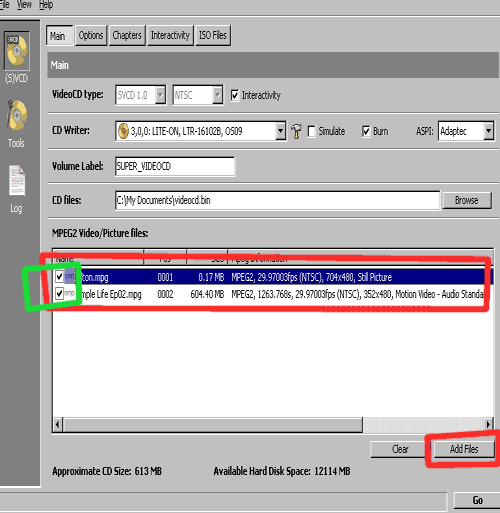
Fifth. Finally, be sure that the video files are in the proper order and selected.
A checkmark appear on selected files. If an item is not selected, right-click in the box to change it to selected.
The menu file should be first. All video files should be after it, and in order. To change the arrangement of files, click on the filename and drag it to the desired location. In the example, the “hilton.mpg” file appeared second when added, instead of first, and it was dragged into the first spot.
End. Though the menu in the example was fairly basic, it can get as complex as you make it. Some people even go so far as to make MPEG file in Adobe Premiere and create the effect of motion menus on VCD.
STEP 4 – Burning the video to disc
Burning the VCDEasy project is actually the easiest aspect of the process, as long as the burner is properly setup as per STEP 1, and the video and optional menus are setup properly as per STEP 2 and 3.
Find the GO button and press it. This will initiate the burning process. When done, pop it in your CD-media-capable player and enjoy!
Copyright Notice: All guides, articles and editorials found on digitalFAQ.com are copyright by The Digital FAQ and/or the respective authors. Articles may not be copied, borrowed, full-quoted or reproduced in any manner, online or in print, which includes blogs and forums, without the written email consent of Site Staff (which may or may not be given, for free or fee). Know that digitalFAQ.com staff does routinely monitor online plagiarism, and we do send takedown notices to site admins and/or web hosts (DMCA et al legal actions) as is necessary. If you would like for others to read articles found on The Digital FAQ, simply link to our content. (Note: Printouts for personal use is specifically allowed.)