How to Edit Video from DVD Recorder on a Computer (Windows)
DVD recorders make for excellent capture devices, for recording television or converting analog formats like VHS tapes. The quality of some DVD recorders can even surpass the images quality of professional-grade computer capture cards! A DVD recorder is also much easier to use than most capture cards.
However, the editing abilities of these machines is very stiff and rudimentary, offering low-quality edits that are often imprecise. In addition to inferior editing, the menus created by DVD recorders tend to be tacky and completely lacking in visual appeal. Most of the offer only limited options in how videos are labeled and are selected. Many people would prefer cleanly edited video, authored with attractive custom menus.
This presents us with a dilemma: Ease of Use + Video Quality vs. Poor Edits + Poor Menus. The solution to this problem is to use the DVD recorder where it excels (recording), but not where it flops (editing and authoring). Once the recording is finished, simply extract the recording from the DVD and edit and author on the computer.
Only two software are needed: (1) A extraction utility, such as DVD Decrypter, and (2) an MPEG editor, such as Womble MPEG Video Wizard.
NOTE: This guide was created for DVD-Video and DVD+VR recordings. DVD-VR recordings (normally DVD-RAM media) may not work with this method. To remove DVD-VR content from a disc, simply copy the VRO file to your hard drive. While this might make DVD-VR seems “superior”, that format actually has many disadvantages.
IMPORTANT! This is not the proper method to use if your discs were created on anything other than a consumer DVD recorder! To extract video from professionally-made DVDs, refer to the guide Extracting Video From a Professional DVD.
Decompile the Disc
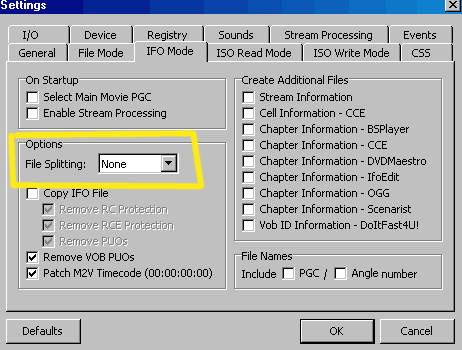
After you launch DVD Decrypter, go to TOOLS and SETTINGS. Move over to the IFO MODE tab. Normally a DVD-Video is broken up into 1GB VOB files. By default, Decypter will maintain the 1GB splits, which can be pretty inconvenient for editing. Change it to “NONE” as the split mode:

Put the disc in the drive. Go into IFO MODE.

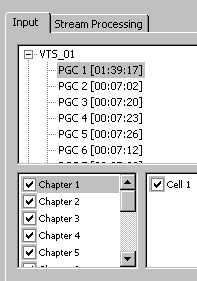
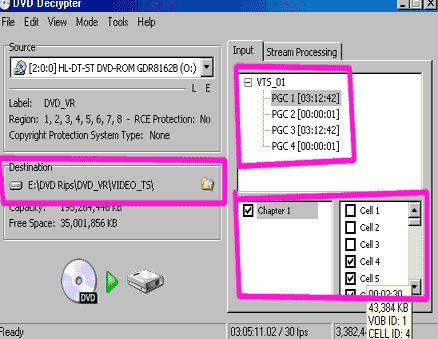
Notice the PGC list. These are your recorded MPEG video files. In this example, PGC 1 is the first recording of 90 minutes, followed by a handful of 7-minute recordings. Note the CHAPTER and CELL options.

IFO mode ripping. Each IFO you rip will dump a VOB on the hard drive wherever you specified. The VOBs contain the M2V and AC3 in most cases (sometimes MP2 depending on the recorder), the files you will later edit.
When ripping the VOB files, note that the entire file does not have to be taken. CHAPTERS and CELLS can be deselected. Hovering the mouse over the chapter/cell will tell you the length of that segment. This is useful for those recordings where you hit RECORD early and walked away, letting it fill up the disc. Of course, if you only want a 30-minute segment, no need to waste time ripping the full disc, only to later edit it out.
In the images above, there were several chapters with a single cell (JVC DVD recorder with chapters enabled at finalize). The image below has one long chapter with many cells (LiteOn DVD recorder with chapters disabled at recording).

File size limitations. The DESTINATION is where your new files are located. Remember that a recordable DVD can currently hold up to 4.38GB of data (future DL discs will hold almost twice this amount), but certain hard drives (ones using the FAT32 file system) can only have file 4GB or smaller. You will get an error if you attempt to rip a file larger than 4GB on a FAT32 system.
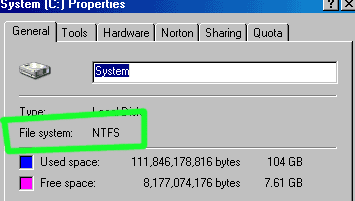
FAT32 is the system found on Win32 system (Windows 95/98/98SE/ME) and NTFS is on NT system (Windows NT/2000/XP/Vista/7). FAT32 is also optional for the NT systems. To discover whether you have a FAT32 or NTFS file system, go to MY COMPUTER, and then right-click on the hard drive in question, and go down to PROPERTIES. If you have NTFS, you can make a single file from any modern DVD medium. If you have FAT32, you’ll have to split the files at 4GB.

Help! My disc doesn’t rip!
1. Did you remember to FINALIZE it in your DVD-RW/DVD-R recorder? If not, go finalize it.
2. Does this DVD-RW use DVD-Video or VR mode? This will only work for DVD-Video mode!
3. Is this a DVD-RAM disc that uses the VRO format?
4. Is this a DVD+VR disc? It should be fine. No need to finalize.
The VR mode found on DVD-RW and DVD-RAM media cannot use this guide (not the DVD+VR format found on DVD+R and DVD+RW media). For VR mode, simply copy the VRO files to the hard drive. Please note that copying VRO files will often take considerably longer to copy, sometimes 30 minutes for a full disc.
Edit the Files in an MPEG Editors
Most recorders use VOB (or VRO files) with almost zero navigation info and simple audio/video streams, so a proper video demux is not really needed. You can open the files directly and edit in a good MPEG editor, like WOMBLE MPEG-VCR. Follow one of the MPEG editing guides (such as the Womble MPEG-VCR guide) and edit the VOB files or VRO files directly. Save the edited files as FILENAME.mpg.
Copyright Notice: All guides, articles and editorials found on digitalFAQ.com are copyright by The Digital FAQ and/or the respective authors. Articles may not be copied, borrowed, full-quoted or reproduced in any manner, online or in print, which includes blogs and forums, without the written email consent of Site Staff (which may or may not be given, for free or fee). Know that digitalFAQ.com staff does routinely monitor online plagiarism, and we do send takedown notices to site admins and/or web hosts (DMCA et al legal actions) as is necessary. If you would like for others to read articles found on The Digital FAQ, simply link to our content. (Note: Printouts for personal use is specifically allowed.)